Friday, April 12, 2013

Garden Show at Midtown Gallery, Kalamazoo

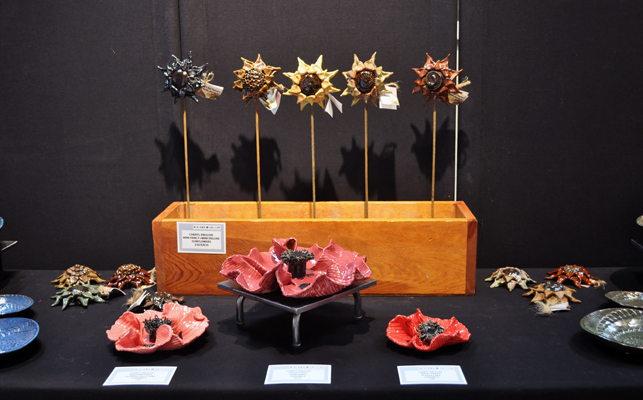
Finally got some pictures of my work on exhibit for the Garden Show at Midtown Gallery, at 356 So Kalamazoo Mall in Kalamazoo. The show is up through April 27 and there is some truly wonderful art to be seen, including metal sculpture, photography and acrylics, among other media. I love how the show was hung, so the various artists' work could complement one another. Be sure to check it out and give a shout out to Terry!

First Row, left: Eastern Cottonwood Leaf Basin (left); Eastern Redbud Embossed Leaf Bowls (right).
First Row, right: American Beech Embossed Leaf Bowls (left); Eastern Redbud Basin (right).
Second Row: Rosette Pillow Vases.
Third Row, left: Clytie (top); Large Sunflower Leaf (bottom).
Third Row, right: Clytie's Son (top); Large Eastern Cottonwood Applied Leaf Bowl with Brake Disk Charger (bottom).
Fourth Row: Lace Bowls (far left and far right); Poppies (front center); Mini Sunflowers (back center).
Fifth Row, left: Deluxe Large, Extra-Large and Ginormous Words Sunflower Installation.
Fifth Row, right: Scrolled Libation Bowl with Stand.


The Seven Deadly Sins: Gluttony - Part 4

It was time to "put it all together". I had everything done (except the door pulls, which were being glaze fired) so I decided to go ahead and assemble what I could. First I laid everything out - the cabinet and its doors and hardware, the mask and the nameplate and three drywall screws.

When I first started working on The Seven Deadly Sins concept, I had made some name-plates for the seven cabinets, rolling out a slab of clay, using my Poetry Stones Kit letters to stamp out the seven sins and punching holes for screws to affix them to the cabinets when the time came. I had finished these by reserving out the letters and glazing the rest with crackle white glaze and raku firing them; they had been in storage for over ten years, waiting for me to finally get back to the project.

I had also thrown a doorpull master all those years ago, of which I finally made a bi-valve mold this Spring. After making two casts from the mold and letting them harden a bit, I incised them with what I hoped might look like a rotting apple (if you really used your imagination) and made holes to take threaded inserts for screws to affix to the doors. I bisque fired them to Cone 06. After firing (and determining that they would work with the inserts), I applied black glaze to the tops, pulling off the excess so the glaze only remained in the incised areas; then I glazed all but the bottoms with my Pearl White glaze - tying them back to the nameplates I had made all those years ago.

My first step was to attach the doors to the rest of the cabinet using the tiny little hinges my handyman/friend Keith had given me. Then, using black drywall screws (which looked perfect with its raku finish), I attached the nameplate at the top center inside the cabinet. I had to do this very carefully because the plaque was not perfectly flat and if I screwed it down too tightly on both sides, it could easily crack; so, using a small cordless screw driver, I worked very slowly and checked frequently to make sure it was tight but not too tight. The screws were much too long, of course, so I marked them after I drilled them in, then took them out and cut them off using a pair of bolt cutters. This way, they firmly held the nameplate in place without extending beyond the back of the cabinet, which would have created considerable problems when installing the piece.

With the cabinet sitting up, I figured out where I wanted the mask to sit, then measured how far down from the top of the mask the wire would stretch when the piece was hung inside the cabinet. Measuring to the center and then three inches down from where I wanted the top of the mask to rest (the distance between the top of the mask and the wire), I drove another drywall screw in at an angle. After making sure I liked how the mask was oriented, I took out the mask, removed the screw, cut it down so it would not extend beyond the back of the cabinet, then replaced it.

When the doorpulls were fired and cooled, I placed them on the outside of the doors. I marked and drilled holes, then put the screws through and put the threaded inserts on them. After making sure that the doorpulls were going to look right and work correctly, I filled both with epoxy and put the over the inserts and screws, making sure the "rotten apples" were correctly oriented.

I thought the piece was "done". I was actually pretty happy with it - the contrast between the innocuous exterior and the excess of the interior was working for me. My best friend, Catherine, came over to go out to lunch (she had generously offered to treat me to celebrate the successful refinancing of my house here in Detroit) and she was the first person to see the finished piece. Despite the fact that she protests that she lacks any creativity, Catherine made the suggestion that I put a knife and fork at the bottom of the piece to balance the nameplate at the top, further suggesting that they be crossed so as to be reminiscent of the crossed bones indicating "Poison". Since we were going to the local diner to eat, I asked our waitress (and friend) if we could buy a knife and fork. Although it isn't in any of the pictures here - we dropped the piece off for jurying for the Grosse Pointe Art Center's "Food for Thought" show right after we finished eating, it really finished off the piece.

Keep your fingers crossed that the piece gets in the show. I actually feel it's one of the best pieces I've ever submitted. The description of the show refers to our "ambivalent relationship with food" and I think this piece does a decent job of capturing just that.

The Seven Deadly Sins: Gluttony - Part 3

When I first started thinking about this concept for the Seven Deadly Sins, I had picked up a few of the small wooden boxes that are designed to hold a few bottles of wine at some of my local markets. They all still had their "lids" - usually two roughly evenly-sized boards - which I felt could easily be adapted into cupboard doors. One of the first things I did once I decided to proceed with "Gluttony" was to contact my handyman, Keith, and asked him to hinge the "doors" and make the box so it could hang.

Well, Keith did that and more. In the intervening years, the boards had warped, so he took the back off the box, used the boards as a new back, and hinged the still-(relatively)flat boards as the new doors. Using almost unimaginably small hinges as well as some picture wire and small staples, he set me up.

I knew I wanted to use pictures of pasta dishes for the inside of the cabinet. I found an Italian recipe magazine at my local market that had photos of 13 pasta dishes; unfortunately, the photos were almost all back-to-back, so I had to get two copies of the publication - at $12.99 a pop (the things we do for our art). But the pictures were exactly what I wanted.

I stained the entire exterior, all of the edges and the inside top and bottom of the cabinet using Minwax Ebony Stain. Once it was completely dry (and the house aired out), it was time to work on the interior. I tore out all the pasta recipe pictures (I didn't want to cut anything because I wanted to have the softer torn edge), then - using a good metal ruler - tore off any excess white space in the images; I wanted as much of a riot of color as possible inside the cabinet. I roughly placed the pictures I wanted over the doors and inside the cabinet (I wanted pictures with red sauces to be more prominent to pick up the colors in the mask) and started applying them using Mod Podge, a product I remembered from my childhood.

In the process, I discovered it was best to apply the Mod Podge to the paper using a one-inch-wide flat brush, flip it over and apply it to the desired surface and then move it into position. Using a barely-damp sponge, I smoothed the paper (as much as I could on a very rough wood surface), pushed the paper it into any corners and removed any excess Mod Podge from previously applied paper surfaces.

I did the doors first and let them dry completely before trimming them with a sharp knife - I wanted to carry the excess over into the inside of the cupboard. Because the doors were a bit longer than the interior (in order to completely cover the box), I trimmed the bottom and top images off to register as closely as possible when the doors were opened. I had one extra image, which I tore into quarters and applied randomly inside the cabinet. Then I let the piece dry over night.

It was time for final assembly.

The Seven Deadly Sins: Gluttony - Part 2

Mask, Bisque Fired
Due to my own anxiety, I had bisque-fired the mask on its own in the small kiln - I was really uncertain it would survive, even though I had been very careful in fabricating it. Luckily, all was fine.

Once the mask had cooled sufficiently, I brought it in and started glazing it. I knew it was going to be a multi-step process: glaze sauce (three colors); wax resist pasta and sauce; stain (and nuance) meatballs; wax meatballs; finally, glaze the rest of the face.

Working methodically, I applied three coats of Amaco Celebration Series Scarlet Red to all of the sauce areas (photo below, left). (It helped that I had other things to do in the studio, including glazing some ladybugs on a commission toad house Scarlet Red and Black, it also helped that I had a fan I could put on the piece to speed up the drying, as well as the fact that I had forgotten an appointment, which gave the piece additional time to dry between coats.) I knew I didn't want the "sauce" to be the same color - nothing is really all the same color, after all. So, after applying the Scarlet Red and letting it dry completely, I added dabs of Burgundy from the same glaze series (photo below, center) and, finally, dabs of Clementine, also from the Celebration glaze series (photo below, right).


Mask Waxed
Next, I applied wax resist to all the areas of "pasta" and "sauce" to minimize the chances of their getting the other (much darker) stains and glazes on them. I tend to use the wax resist from the jug at a 1:4 ratio with water. Thicker wax resist is harder to apply precisely and takes a very long time to dry. Thinner wax resist can provide less protection if it isn't allowed to dry completely, so I often put my waxed pieces in front of a fan or under the heat vent in the basement (if the heat is on).

Mask Glazed
Once the wax was completely dry, I applied a water-based Burnt Umber solution to the "meatballs" using a very small brush (the space was very tight, as I had applied "pasta" over some of the "meatballs") and, as much as I could, removed the excess using a damp sponge, a technique I have used to great effect on many of my "leaf"pieces for nearly 20 years. By taking even a bit of the stain or colorant off with the sponge, nuance is added to the piece, generally to positive effect.

Mask Glaze Fired
After having waxed the "meatballs" and allowed the wax to completely set and dry, it was time to glaze the rest of the face. I had had Glazemixer.com make up some small batches of some glaze recipes I was given my my first pottery teacher, Gene Pluhar, including a glaze called Matte Black Brown. This glaze is actually intended to be used in a Cone 6 reduction environment (I fire Cone 6 oxidation) but I really liked the glaze's irregular pitted surface in my firing conditions and figured I might have a use for it at some time in the future. I thought it would be an effective finish for the "skin" on "Gluttony" as I wanted to convey the sense of having eaten to such excess that the image was irretrievably corrupted. Again, using a very small brush, I applied the glaze (rather thickly) over all exposed areas of the face. (I did miss one area, but I'm not telling where....)

I fired the piece on a four-hour cycle at Cone 6 on four stilts. I was delighted when I opened up the kiln and saw the final results. "Gluttony" was shaping up very nicely....

The Seven Deadly Sins: Gluttony - Part 1

James's Face
Over 15 years ago, after my Dad died, I started working on a concept relating to the Seven Deadly Sins. At the time, had been doing a lot of work with series of masks; I had even had a one-woman show at Planet Ant Coffee House (now Planet Ant Theater) in Hamtramck consisting solely of the masks I had created in the three years of pottery instruction I had had at that point in time.

I'd be fooling myself (and no one else) if I thought there was no correlation between my father's recent demise and the birth of this concept. I was in a pretty morbid (in a lot of ways - personally, professionally, psychologically) place in my life - and what does any artist do with that sort of stuff?

Anyway, I started working on this idea in 1996, while I was working at a place called IRI, where I met my now-good-friend James, who was the company's IT person and, in addition to being rocky smart, culturally attuned and utterly devoted to his family, weighed, well, quite a lot at the time.

Part of the Extruded Pasta and Meatballs
James, being James and possessed of a wide-ranging creative sensibility, provided a useful counterpoint to my musings on what was going to be a very big piece - eight (yes, that's right - eight) cabinets with doors (so-called to tie in with the classic 1920 film, The Cabinet of Dr. Caligari) made using recovered wine crates (the kind that hold four or so bottles of wine). The entire piece was actually an installation, to be honest. I had already decided that I would stain the exteriors all of the boxes black (or ebony) so they would look relatively uniform and innocuous on the outside. I also planned to make my own door pulls featuring hand-incised images of momento mori (iconographical reminders of death, such as an hourglass, clock face, extinguished candle, fading flower, rotten fruit - you get the idea). I planned to decoupage the inside of each cabinet with pertinent paper-based imagery and affixe a raku "nameplate" inside at the top of each one, above a mask conveying that particular vice. Some of the pieces were more challenging to conceptualize (and some still are); others were relatively easy.

The Pasta Finished
One day, James and I were discussing what I could do with "Gluttony". I wanted a strong contrast between the plain matte black stain of the exterior of the cabinet and thought a collage of pictures of pasta dishes - with their strong colors and textures - would work. James (who weighed over 400 pounds at the time) chimed in that I should use the face of a really fat person (he was not disingenuous about his physique) for the mask and put pasta, meatballs and sauce all over it. I observed that I didn't know any fat people, which was met with a look of mingled affection and exasperation.

Needless to say, I did make a cast of James's face; you can see the piece I pulled from it in the top picture here. I went ahead and used my Rovin RO-23 Peach Stoneware for the face itself because I planned to use an opaque glaze from my first pottery teacher and I prefer this clay for most of my work. I also planned to use that clay body for the "meatballs", as I planned to stain them using Burnt Umber, for a different type of matte finish. After cleaning up the face and putting in holes from which to hang it once the piece was finished, I began the process of adding the "pasta", "meatballs" and "sauce".

The Mask, Completely Fabricated
Because I didn't want to have to glaze the "pasta" and wanted to be able to use glazes from the Amaco celebration series for the "sauce", I decided to use Rovin RO-77 Lite Stoneware for those parts of the composition. I used my Mini Klay Gun extruder with the largest die for the pasta, having scored the face underneath. Once I got a good "base", I rolled meatball-sized balls of Peach Stoneware on burlap to give them some texture, cut them in half and applied them to the face, then added more extruded White Stoneware, this time scattered over the entire face.

The final touch was going to be the sauce. Using a pastry knife, I slung clumps of semi-liquid white stoneware slip slip at
the mask, randomly hitting it all over the pasta and exposed "skin". I made quite a mess all over my work area (including the floor) but I loved the effect - it conveyed the unbridled energy I was driving for as successfully as I could have wished.

Once I had made sure the hanging holes had not been covered in the fabrication process, I set the mask to dry, then bisque-fired it to Cone 06. Now it was ready to be glazed. I had been (relatively) careful about documenting the process, partly to include on this blog but also because I wanted James to see what I had done with his face. I actually saw him later on the day I fabricated the mask. He had had surgery in the intervening years and it was truly amazing to see how great he was looking - and he liked what I had done with our concept.

Sunday, March 31, 2013

Black Cat Pottery Southwest Michigan Tour

Before
Two garden-themed shows for April were the impetus for a circle tour of Midland, Saugatuck, Glenn, Kalamazoo, Chelsea, Ann Arbor and Northville March 28-29, 2013. What started out as a trip to cover both galleries turned into a trip covering over a half dozen accounts in the southwest Lower Peninsula, all in an attempt to make the most of the gas and my time. The most challenging hurdle proved getting inventories ready for seven accounts (not to mention the daisies I pulled together to drop off to Urban Attic in St. Clair Shores earlier in the week) - a challenge I'm not sure I'm willing to repeat any time soon.

As you can see to the right, that's what the car looked like before loading in the cats to go for boarding, let alone my personal effects. I guess it could have been a bit more full, but not much more! (Good thing my friend Chris Hopp decided to do his own delivery to Midland - I really don't think his work would have fit!)

I headed out shortly before 8:00 am on Thursday to drop the kitties off for their overnight at Harper Woods Veterinarians - getting the cats ready to go is a military maneuver in itself! Then, it was off to Midland. I had four stops to make. I arrived around 10:00am and rendezvoused with Jeanne Calkins, who had messaged me the day before, lamenting her failure to acquire one of my pieces while I was in the area over a month ago and inquiring when I would next be in town - perfect timing, as I was able to personally deliver the piece she wanted. Then, it was on to Serendipity 181 to drop off work for the upcoming garden show and spend a few minutes with Mary Moore - you're going to see a lot of different work there, including Toadstools, Cat Tails, Clytie Masks and Deluxe Sunflowers. Then, on to Monique Scott's to pick up the quilt I had dropped off some weeks before - Monique was good enough to put the binding on a quilt I had pieced (another person did the quilting) in exchange for some pottery.

I had hoped to meet with my friend Debbie Groat for lunch and had brought some empty canning jars with me in anticipation of doing so - but she was in Standish at her grandson's school for a special reading day. (The principal was up on the school's roof in a super-hero outfit, reading a book for the students - something not to be missed.) Luckily, my Master Gardener friend Susan Gaul was available, so we met at the North End Deli for some gyros and homemade ships before I headed off to Saugatuck.

Partial View of the Quilt
About two-and-a-half hours later, I rolled up to Timmel Collection, where I dropped off 21 Baby Daisies, 21 Gerbera Daisies, 21 Deluxe Gerbera Daisies and 24 stakes to go out the garden once Joel has it in shape. (I also dropped off three sets of Embossed Leaf Bowls while there.) I had a great visit with Joel and the dogs and then it was off to At Last in Glenn.

Chuck was ready for me and we exchanged some pieces from last year's stock and loaded him up with Deluxe Sunflowers and some fun Wild Sheep and Farm Animal Tiles before heading on for Kalamazoo.

I had two stops to make once I arrived. Midtown Gallery is having a Garden Show (see my previous post) opening April 5, running through April 27. I unloaded all the work so Terry (Nikil) can set it up one the previous show comes down. Leaving my car in his parking area, I headed across the street to Nature Connection Kalamazoo to meet with Laurie Russell and to stock her up with some leaves (including some very special Sunflower Leaves), Toad Houses, Fairy Houses and Michigan Tiles. In discussing current projects with her, she suggested I talk to Terry about my concept for The Seven Deadly Sins (I'm working on "Gluttony" for the upcoming "Food for Thought" show at Grosse Pointe Art Center). On my way back to my car, I did just that - and it looks like I'll have a place to show that piece once I get it done - so now I have more work to do!

Finally, the end of my day took me to my friends' Julie and Bob Peterson, where I was fed like a queen (dinner was planked salmon with mango avocado salsa, homemade risotto, salad with a delicious baked apple for dessert; breakfast a delicious egg scramble with leftover salsa for breakfast) and slept like a stone. It was here that I was finally able to open up the quilt and get a look at it. (Monique did a beautiful job finishing what I had started four years ago....)

After
Come morning, it was off to The Garden Mill in Chelsea - a new account, with Hanging Bird Bowls, Toad Houses, Toadstools and one lone Fairy House (more are in the works). Then on to Rovin Ceramics in Ann Arbor to pick up more clay, some glazes and an oddment or two before heading on to Dancing Eye Gallery in Northville, my last delivery (including lunch at Edward's). Before picking up the cats and heading home, I stopped in Plymouth to pick up some bins from the delivery that had been taken down to North Carolina the week before.

When all was said and done, this is how much was left after the trip (deducting the clay and bins that were returned from previous deliveries). Needless to say, it was pretty cool how the car got lighter, and lighter, and lighter as the trip went on...!