Showing posts with label Pottery - Sunflowers (Deluxe). Show all posts

Wednesday, December 28, 2016

Developing a New Deluxe Sunflower Design

Deluxe Sunflower Test
 Basketweave Tip 48
One of my greatest challenges as an artist is keeping my work fresh, especially in terms of developing new product lines or new designs within existing product lines. I had started (unsuspectingly) developing the concept for my Deluxe Sunflower Series over 15 years ago but it was only in the past few years ago that I finally pulled them together into a coherent series of their own with consistent design and glaze parameters, finally putting together a collection of 15 different designs. These were pieces characterized by applied centers, either in the form of clay cut-outs, extruded clay or slip applied using a typical pastry bag and decorating tips.

Deluxe Sunflower Test
Chrysanthemum Tip 352
For 2015, I set myself the challenge of coming up with a new Deluxe Sunflower design and decided to focus on experimenting on some of the cake decorating tips I hadn't used. I had used a typical "Star" tip (including numbers 30, 31 and 32) for my very first experiment with this process, creating my "Cake" design for the series. (See post dated March 22, 2012.) I found I can use the same tip regardless of the sunflower's size (ranging from "Mini" to "Ginormous") by managing how much slip I squeeze out of the bag for each "star". Subsequently, I started working with "Round" tips (including numbers 5, 10 and 12) to create my "Bubbles" design. (See post dated April 28, 2011.) For these, I did find that working with smaller to larger tips for smaller to larger sunflowers was helpful. Finally, I created my "Ribbon" design using a "Basketweave" tip (number 48) for most of the design, finishing off the center using a Star tip. (See post dated September 4, 2012.)
Deluxe Sunflower Test
Ripple Tip 70

I had become fairly adept with the process (getting the slip consistency right, especially in terms of eliminating lumps; figuring out how to manage the bag - how full, tightening it as I went, etc.) but wanted to come up with some new ideas. I sorted through the box of tips I had collected and experimented a bit but felt I need more options - I wanted to have six new designs to compare and contrast. I researched decorating tips on-line and, finally, took myself off to the nearest Jo-Ann Fabric Shop to peruse their selection. I found a few additional tips based on my research, enough to develop six different designs.

Deluxe Sunflower Test
Rose Tip 104
In the interest of being as "scientific" as I could, I decided I would do all of the samples in the same size - Tiny - so they would be large enough to give a really good idea of how the finished texture would look for larger-sized sunflowers without investing an excessive amount of time, energy and materials in something that might not really turn out particularly well and I could make a one-to one comparison. I also used the same glaze for the petals on all of the samples - Amaco's Potter's Choice Frosted Melon - to "even the playing field". (The centers of all the Deluxe Sunflowers are done using the same glaze, Amaco's Potter's Choice Temmoku.) Firing them together - both bisque and glaze firings - would further ensure the pieces would be as consistent in every way other than the center motifs.
Deluxe Sunflower Test
Rosette Tip 107

All of the sunflowers were fabricated in the same way: A slab of clay is "humped" over the center mold, cut so it has about a half inch of "selvage" and the entire top surface scored; then I apply two rows of petals - one larger than the other, the larger first and the smaller on top, around the perimeter of the sunflower. After slipping the center, I filed in the decorative design using thick slip and a pastry bag with the appropriate tip.
Deluxe Sunflower Test
Ruffle Tip 67

I completed the six sunflowers, as seen here. (I've included both the names I used to distinguish the designs from one another as well as the numbers used for each tip by the manufacturer in each caption.)

"Chrysanthemum" was - by far - the most tedious design, as each petal was very small, requiring much more repetition. I used the same tip for "Basket" as I had used for "Ribbon" but wasn't particularly happy with its relative sloppiness - which made it more difficult to decipher visually. "Ruffle" and "Ripple" seemed pretty similar to me and neither was particularly interesting. I didn't feel "Rosette" adequately filled the center space - but I might return to it to see if I can do better in the future. I personally felt "Rose" was the most successful of the bunch. Once they were finished, I did an informal survey of folks in my circle, seeing what they felt worked best of the designs without conveying my assessments. Most folks agreed with me that the "Rose" design would be the best addition to the series.

Now I had to decide which glaze to use for the petals for the "Rose" design. Although I will use any glaze with any sunflower design (Deluxe or Fancy), for the purposes of "spec" production, I have developed a "recipe" for each design which includes the center motif and the glaze for the petals. (As stated before, the same glaze is always used for the centers - a dark brown that, when fired correctly, highlights the texture while maintaining a relatively neutral foil for the different petal glazes.) I had done some tests with some Coyote glazes and decided that Leopard Shino would be a great addition to the Deluxe Sunflower series. (I also, being a cat person, liked the name!) So, now we have a new addition to the Deluxe Sunflower Series - Rose!

Ginormous Deluxe Sunflower "Rose" with our Spokesmodel and Sales Manager, Doni.

Friday, April 12, 2013

Garden Show at Midtown Gallery, Kalamazoo

Finally got some pictures of my work on exhibit for the Garden Show at Midtown Gallery, at 356 So Kalamazoo Mall in Kalamazoo. The show is up through April 27 and there is some truly wonderful art to be seen, including metal sculpture, photography and acrylics, among other media. I love how the show was hung, so the various artists' work could complement one another. Be sure to check it out and give a shout out to Terry!

First Row, left: Eastern Cottonwood Leaf Basin (left); Eastern Redbud Embossed Leaf Bowls (right).
First Row, right: American Beech Embossed Leaf Bowls (left); Eastern Redbud Basin (right).
Second Row: Rosette Pillow Vases.
Third Row, left: Clytie (top); Large Sunflower Leaf (bottom).
Third Row, right: Clytie's Son (top); Large Eastern Cottonwood Applied Leaf Bowl with Brake Disk Charger (bottom).
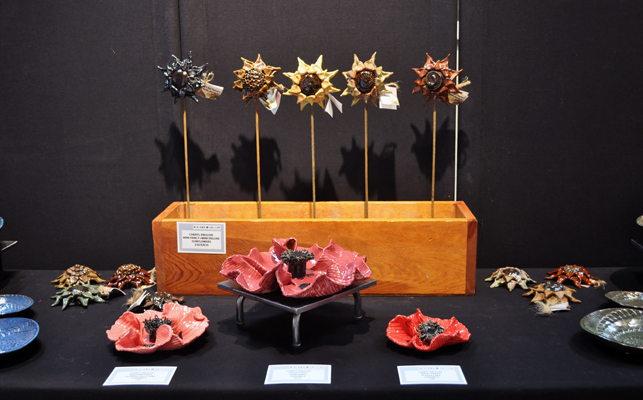
Fourth Row: Lace Bowls (far left and far right); Poppies (front center); Mini Sunflowers (back center).
Fifth Row, left: Deluxe Large, Extra-Large and Ginormous Words Sunflower Installation.
Fifth Row, right: Scrolled Libation Bowl with Stand.


Tuesday, February 26, 2013

New Glazes!

As a potter, I am always on the hunt for new, unique glazes. I'm especially interested in finding rich, earth-tone glazes for my Deluxe Sunflower series (which could also work for other parts of my repertoire) and cool glazes across the spectrum to use in my increasing range of leaf-related work. (I try to use a single glaze for all pieces using the leaves from a given plant species, just so I don't drive myself nuts.)

Amaco's Potter's Choice series of glazes has been a real friend to me - most of the glazes have been great to work with. (There are exceptions and, in at least one case as far as I'm concerned, a complete misfire.) But their development of new glazes has not kept up with my expanding inventory. You can imagine my delight when I heard that my materials supplier, Rovin Ceramics of Ann Arbor, had decided to start carrying selected glazes from Coyote Clay & Color.

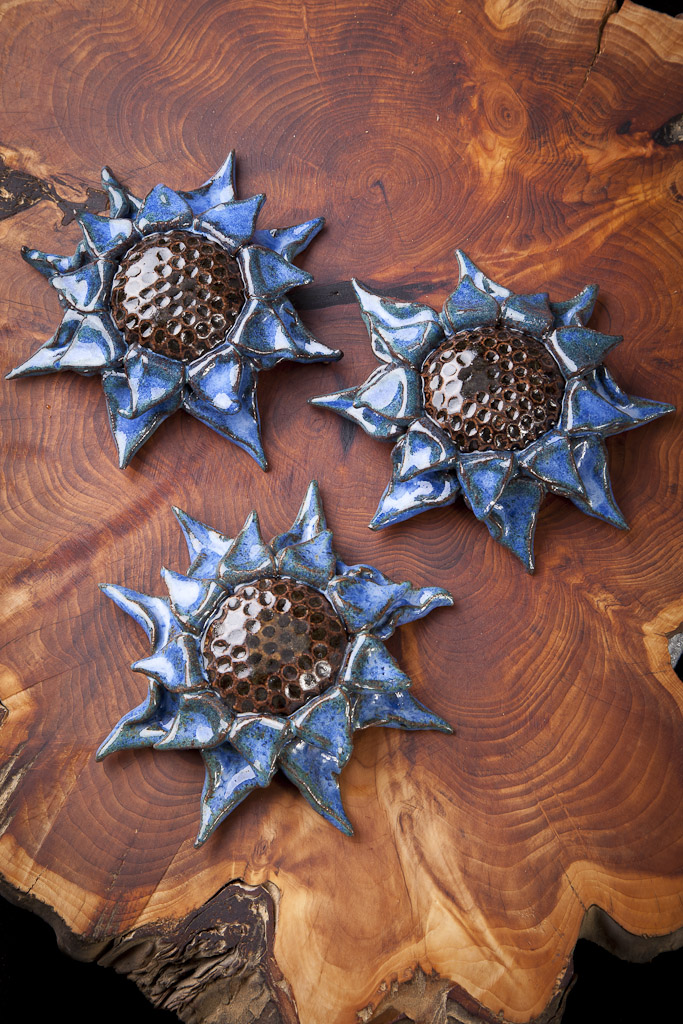
Rovin did a great job of generating samples not only on the standard white stoneware or porcelain body (standard practice in the industry) but also on the Peach Stoneware (RO-23) I use for a lot of my work. After perusing the test tiles, I selected ten of their glazes, samples of five of which are shown here, on Mini Sunflowers.

I started out by doing test tiles but, since I planned to use these particular glazes on my sunflowers, thought it would be a good idea to try them out in that format as well. My choices included Goldenrod Shino (MBG088, upper left, which has already gone into production for my revised Spinning Deluxe Sunflower Design), Butterscotch Shino (MGB 086, upper right), Leopard Shino (MGB089, center), Light Shino (MGB045, lower left) and, finally, Cedar Shino (MGB087, lower right, which I have combined with red iron oxide for a Dwarf Chinkapin Oak [Quercus prinoides] Leaf Pocket for my friend Chad Hughson of Hidden Savannah Nursery in Kalamazoo, Michigan).

I'm still sorting through the results, as it's important that the glazes I purchase be sufficiently distinct from one another to be worth purchasing but I'm pleased with these samples and will definitely be investing in the Goldenrod Shino when finances permit.

Sunday, December 16, 2012

Deluxe Sunflower: Spider

Many, many years ago - when I first started working with clay, I produced a huge series of masks which were featured in my first show at Planet Ant Coffee House (now Planet Ant Theatre) in Hamtramck, Michigan. I had the assistance of a good friend of mine, Jay, in hanging the show. In the course of the several  hours we were at work, he realized that the pieces were organizing themselves into three broad categories: Working Girls (The Four Seasons, The Furies, The Fates, etc.), Great Date Girls ("Three Graces for the Twentieth Century,""Too Cool for Color TV," etc.) and Girls Gone Wrong (several Medusas, Clytie, etc.) One of the pieces I had created which ended up in Girls Gone Wrong was of Arachne, the young woman who, as a result of her hubris in comparing the quality of her weaving with that of Athena, the goddess of weaving, was turned into a spider, who weaves every night, only to consume her web the next day in an endless cycle of creation and destruction. The Arachne I created had a spiderweb made up of extruded clay covering part of her face to allude to both her human and arachnid aspects, a process and outcome that was less than satisfactory as it was quite tedious and the results were not quite "up to snuff".


In the ongoing quest for cool things to do with clay in the context of my Deluxe Sunflower series, I was later reminded of various techniques used to create marbled papers and in slip decorations of ceramic wares. I wanted to see if I could do something with applied slip decoration in combination with a variation on feather-combing, revisiting the Arachne imagery in my Deluxe Sunflower series. This time I decided to use a combination of slip extruded from a pastry bag and a modified feather-combing technique.

Various Plain Round Cake Decorating Tips
When I first explored this idea, I prepared the center of the sunflower before applying the petals, humping the base slab over the mold and finding a rough center. With a pastry bag of rather thick slip with a small, plain round tip #6 (I use #12 for the "Bubbles" design), I traced concentric circles on center of the sunflower. I did not score the surface as the scoring would show through the glaze on the areas that did not have the pattern but I did slip the entire surface to increase the degree of adhesion, with varied results. Where the piping broke or didn't adhere, I used a small tool to "nudge" it back together or back into place.

Fine Detail Cut-out Tool
After I finished the circles, I used a very fine, sharp cutting tool to very gently draw through the slip and make very fine, straight lines radiating out from the center of the flower at regular intervals. In order to replicate the general appearance of a spider's web, I had to work out from the center and did so marking 180 degrees, then 90 degrees, then 45, then 22.5, eventually dividing the center into sixteen "pie slices" through the concentric circles of piped slip. Again, I used a small tool to nudge any slip back into place that had moved in the process. After I finished with the center, I applied three rows of petals.

If I do this pattern again, I would modify it in that I would apply the two outer layers of petals, fabricate the center, then add the last row of petals, as it would be easier to find and preserve the center of the design and I would also have an easier judging exactly how much of the center of the flower needed to be filled with the central motif.

As with all of the sunflowers in the Deluxe series, I glazed the center with Amaco Potter's Choice Temmoku; I used Smoked Sienna from the same series for the petals.

Sunday, December 2, 2012

Mini Sunflower (Original, Fancy, Deluxe): Comparing Clay Bodies

Original Sunflowers (Titanium)
(All images are:
Top Left - Laguna Brown;
Top Right - RO-23;
Botom - Laguna Speckle Buff)
Any artist worth her salt is always willing to try out new materials, with the realization that there may be something even better out there to take her work to the next level. A significant portion of the final product consists of a combination of the artist's talent, skill and experience; but having the right/best materials for the job can make the difference between a good piece and a great one.

Not surprisingly and, I would imagine, like most potters, I'm rather particular about my clay bodies, considering I really only use two of them, both manufactured by Rovin Ceramics based in Ann Arbor, Michigan. For my Daisies, Calla Lilies, Jack-in-the-Pulpits, Poppies, Deluxe Toadstools and hand-painted tiles, I use RO-77, "Lite Stoneware," rated Cone 2 to Cone 10. I was first introduced to this white stoneware body when taking throwing classes at Pewabic Pottery. It is an excellent throwing body, lighter on the grog, which also works well for slab work and tiles. Furthermore, it holds the purity of the colors of the glazes I use for these pieces - Amaco's Celebration Series (and a couple glazes from their High Fire Sahara Series - Black and White), giving them a lot of punch; with a less-white clay body, these glazes look rather "muddy." I recognize the fact that any number of white stoneware bodies would do the job equally well.

Fancy Sunflowers (Indigo Float)
For the bulk of my work, including all of my Sunflowers (Original, Fancy and Deluxe), Wildflower and Michigan Tiles, organic leaf pieces (Leaves, Applied and Embossed Leaf Bowls, etc.), lace pieces (Bowls, Crosses, Stars of David, etc.) and other work utilizing the glaze recipes I inherited from my first pottery teacher, Gene Pluhar, or Amaco's Potter's Choice Series of glazes - often in combination with Mason Stains and various oxides, I use RO-23, or Peach Stoneware, rated Cone 6 to Cone 10. With more iron than a typical gray stoneware body, it retains its "warmth" even in an oxidation firing environment. (I wish I could fire reduction - the clay's minerals express themselves even more, resulting in even deeper, nuanced results.) I first used this clay when working with Gene; he had been using a gray stoneware body from another manufacturer but was having difficulties with the supplier. After spending some time trying out other bodies, he  settled on this one. I've been very happy with the results I've gotten with it with my glaze palette; when I've used Gene's glazes or the Amaco's Potter's Choice Glazes on a white clay body, they are not nearly as rich and almost look, comparatively, pretty anemic.

Nevertheless, I'm always willing to try new things. (After a while, sometimes....) My friend Marie Colbert Gougeon, of MCG Graphics, based out of Holt and Okemos, suggested that I try a couple of the Laguna clay bodies she used in her quite accomplished work, specifically their Brown and Speckle Buff stoneware bodies. I had been lamenting to Marie about how much I missed being able to fire work in a reduction environment, with its richer results, so she recommended the Brown body because she thought it might be sufficiently darker than the Peach stoneware body I had been using. (Rovin used to make a much darker stoneware body but, by the time I discovered it, had ceased to manufacture it as one of the critical ingredients had become unavailable or prohibitively expensive.) She thought the Speckled Buff stoneware body might fun to work with.

Deluxe Sunflowers
(Albany Slip Brown)
I decided the best way to test them out would be to do apples-to-apples, oranges-to-oranges and raspberries-to-raspberries comparisons, using all three clay bodies (the Rovin Peach stoneware and the Laguna Brown and Speckled Buff stoneware) to make identical small-scale pieces in the three "phases" I generally use. So, I made three Mini Original Sunflowers with a woven pandanus coaster design, three Mini Fancy Sunflowers with a mini-bubblewrap impression and three Mini Deluxe Sunflowers with the "Starry Night" center. I bisque fired all to Cone 06.

For the Mini Original Sunflowers, I stained the centers with Burnt Umber in a water-based solution, removing the excess with a damp sponge to bring up the texture. I stained the petals using Titanium Mason Stain, again, removing the excess with a damp sponge to further enhance the pieces' dimensionality. The centers of the Mini Fancy Sunflowers were all glazed with three coats of Amaco's Potter's Choice Temmoku; I dip-glazed the petals in Indigo Float from the same series. The Mini Deluxe Sunflowers were glazed in the same way as the Mini Fancy Sunflowers except that I used Albany Slip Brown for the petals. All were glaze-fired to Cone 6.

I found that the Laguna Brown, while somewhat darker than the Rovin Peach, was not sufficiently different to warrant changing my clay body or adding another to my repertoire. (Space is already tight - I can fit about 500 pounds of Peach stoneware and about 200 of the Lite.) My photographer friend Don and I concurred that the Speckle Buff pieces look kind of... gimmicky; the speckles are actually rather distracting, failing to enhance the designs in any appreciable manner. Although I won't be changing my clay selection, based on these experiments, I'm glad I had the chance to try out some new clay bodies. I think they manner in which I approached the situation was objective and the results were easy to evaluate.

Saturday, November 24, 2012

Deluxe Sunflower: Spinning

In developing the various designs in the Deluxe Sunflower series, I had been able to come up with quite a few designs using a slip-filled pastry bag with various decorating tips. I had also found a couple of uses for Kemper Klay Kutters. I had created three designs - Pasta, String Theory and Starry Night - using the Kemper Klay Gun and various dies but wanted to explore the potential of this tool more fully.

In browsing through the dies which come with the Klay Gun, I thought I might be able to use one of the circle dies to make long coils, which I could then make into a spiral or spirals. I thought I would first try making a piece with a large spiral covering the entire center. The challenge was going to be marrying a series of long coils into one very long continuous coil to make the spiral.

I started out by fabricating the base of the sunflower, slumping a large slab over the ginormous sunflower mold, cutting it to size with a 1/2" flange at the base. I wanted to make sure the spiral would completely fill the center space so I opted to fabricate the center first and apply the petals afterwards. After scoring and slipping the entire surface, I attached the circle die to the Klay Gun and filled the barrel with clay and pushed out the first coil, forming it into the center of the spiral, starting at the center of the sunflower. It's important that the clay be fairly plastic for this process: if it's too stiff, you have to work really hard to get it to extrude and it will be more prone to cracking during fabrication. I added coils to the spiral until I felt fairly certain that the spiral would completely fill the desired space, carefully smoothing the joins between the coils.
Kemper Klay Gun and Dies

After the coil was finished, I applied two rows of petals to the sunflower, making sure the surface was slipped to guarantee optimal adhesion. I allowed the sunflower to dry to leather hard, removed it from the mold, applied a clay fitting to take a copper fitting so the sunflower can go on a stake and put holes in to take a wire for hanging. After drying completely, the piece is fired to Cone 06.

I glazed the sunflower with Amaco's Potter's Choice Temmoku in the center, as I do for all my Deluxe and Fancy Sunflowers. For the petals, I used Starfire Brown, a glaze recipe I was given by my first pottery teacher, Gene Pluhar, which breaks and pools in almost a jasper-like manner. The glaze is reminiscent of the surfaces preferred about 30 years ago, so it contributes a nostalgic quality to the piece.

Thursday, September 6, 2012

Deluxe Sunflower: Confetti

Owing to my ongoing obsessiveness, when I find a tool that really works for me, I tend to investigate all of its available variations. I had been working with the Kemper Klay Kutters for a long time, primarily with the various sizes of the "Basic Set", which consists of a circle, teardrop, five-petaled floret and heart. These had been useful for me with some ladybugs I made, as well as both Original (floret-spotted) and Deluxe (round-spotted) Toadstools, and some of the sunflowers. I didn't even think they might have other shapes available until one day, while teaching a class at the Anton Art Center in Mt. Clemens, Michigan, I came across a triangle cutter and realized I needed to dig a little deeper.

Boy, did I strike gold! Triangle sets, square sets, Lilac (four-petaled florets)sets and oval sets. And, in researching for this post, I just now discovered they have a set of star-shaped cutters - I may have to get those, too!

The mechanism is simple - a shaped tube which is closed at the end with a plunger assembly to push (in my case) the clay out. What I've learned with using these is that a bit of clay gradually builds up on the cutter, making it difficult to release the clay; cleaning out with a cutting tool or fettling knife usually does the trick; also, the wetter and more plastic the clay, the more likely it is to adhere to the cutter. Also, it's important to keep them clean and dry - part of the assembly is steel which will rust. A shot of WD-40 has been helpful for me when things start to "lock up". Another key issue is that the plunger will make a circular mark in one side of the cut-out. This looks pretty cool on a floret but doesn't always work for some of the other things I use these for; I resolve this by making sure the side with the circular impression is the side I attach to whatever it is I'm making.

With this design, I wanted to evoke something of the cascade of confetti at a parade or other celebration. I assembled the sunflower as usual, draping the clay over the hump mold and applying the three layers of petals. I then rolled out a thinner slab of clay and, using the three largest cutters (as I was making a ginormous sunflower - I scale the elements to fit the size of the flower I'm making), cut out a bunch of squares. I slipped the surface of the center of the sunflower (don't score - because you're not covering the entire surface, those scoring marks that are not covered by the squares will even after glazing) and then scored and slipped the back side of each square and applied in what I hoped would look like a random pattern. When finished, I let it dry to leather hard, flip it off the mold (this gets easier and easier - I've gone from only doing these big pieces on spec to fabricating them quite routinely), put in the holes for the hanging wire and apply a clay receptacle to take a copper fitting and let it dry.

Once bisque fired to Cone 06, I glazed the center with my go-to glaze, Amaco's Potters Choice Temmoku. For the petals, I used a glaze I was given by my first pottery instructor, Gene Pluhar, called Albrecht Sand, a subtle matte glaze with a genuinely sandy appearance. This is a design that might still require some tweaking. I'm going to live with for a while and see how I feel about; then we'll see!

Tuesday, September 4, 2012

Deluxe Sunflower: Ribbon

Anyone who knows me will tell you: I definitely have my obsessive side. (OK, don't get all snarky on me; at least I admit it - freely!) When an idea grabs hold, I tend to keep pushing on it until I either get sick of it or can't think of one more thing to do with it.

The Deluxe Sunflower series has been no exception. When I first returned to these designs a couple years ago, I went from three initial concepts to a total of ten. (Now twelve.) I had a lot of fun with the pastry-bag/slip combo, visiting Michael's to find new pastry tips that might make for another interesting design. I had already used a star or scalloped tip, as well as small and large round tips. I found a ribbon tip that reminded me of the tips I had used while decorating cakes at Baskin Robbins and decided to see what I could do with it.

I fabricated the sunflower in the same manner as I had the Bubbles and Cake sunflowers, draping the slab over the hump mold and applying the three layers of petals. My plan was to use the ribbon tip with slip for a new effect for the center.

The ribbon tip I used was scalloped on one side and plain on the other, like those illustrated here. (I honestly don't know why I didn't get the one that was scalloped on both sides, except that maybe, subconsciously, I was thinking I could do more things with the two different sides. Haven't. Yet.) I used a technique I learned for decorating the edges of the ice cream cakes I used to work with - but only doing one arabesque instead of a continuous line of them. I worked, as previously, from the outside toward the center, making a row of arabesques, then making another and another, working concentrically inward. for the center, I just made a little "pillow" with the tip - but I think it might look better (but be a bit more work) to use a star tip for that final "touch".

The sunflower is finished as are the others, with holes in the back for hanging wire and a receptacle for a copper fitting for a stem, once it is leather hard. Once bone dry, the greenware is fired to cone 06.

I glazed this piece with Amaco's Potters Choice Temmoku for the center and Iron Lustre for the petals. I really like the subtle satiny quality of the latter glaze, plus the fact that it is the same color as my cat Doni's coat - the best recommendation I can think of for just about anything!

Friday, August 24, 2012

Deluxe Sunflower: Blossom

The Blossom Deluxe Sunflower was also one of the first designs I came up with when I revisited these concepts after a long hiatus. I have to admit to a certain "technological" approach to my work, which feeds into the way I approach other activities in my life: if there is a way I can do it more quickly and uniformly using some kind of simple tool, I will. In this case, I dipped into my stash of Kemper Klay Kutters, tools which had been developed primarily for use with polymer clays but work just fine with traditional clay.

This design, like the Cake, Pasta and Bubbles designs, is derived from the fact that sunflowers are members of the Asteraceae family, formerly known as the Compositae. The flowers of these plants are thought to be the most highly evolved flowers, composed as they are of ray flowers around the edge of the flower head and characterized by relatively elaborate petals, and disk flowers, which fill in the center field and whose petals are relatively inconspicuous. The disk flowers open sequentially over a period of days, from the center working their way outward, making these highly-desirable plants for native pollinators (leading to high seed production) and, later, attracting birds and other animals who eat those seeds. The Blossom design is another interpretation of this structure, with the typical sunflower petals indicating the ray flowers and cut-out florets for the disk flowers.

Kemper Klay Kutters - Florets
As with the other sunflowers, I start with a slab of clay draped over a plaster hump mold. In this case, as with Cake, Blossom and Pasta, the petals are applied before the center is finished, so the florets will be flush to the edge of the petals. After applying the petals, I roll out a thin slab of clay and cut out several dozen florets (I use a larger cutter for larger flowers, a smaller one for ones). These tools consist of a brass tube that has been shaped, in cross section, into the desired motif (circle, heart, teardrop, floret, etc.) with a spring-assisted plunger assembly to push the clay out. The key here is that the plunger makes a round mark in the middle of the design, which initially frustrated me until I realized that could be the center of the individual disk flower.

Having cut out a bunch of florets, I score and slip the sunflower's center and, applying slip to the back of each floret, apply them to the flower's center, working from the outside to the center, positioning them to get maximum coverage without overlapping. It's a good idea to use a fair but of slip, as that will allow you to move them around a bit as you work toward the center, when things can get a bit cramped.

The sunflower is dried to leather hard, pulled off the mold. Holes for wire are punched in the sides between petals. (I usually get about 15 petals on a Ginormous Sunflower and I position the holes so they are three petals to the left and right of the gap between base petals with a centered middle petal so that will be at the top when the Sunflower is displayed.) I also apply an angle-cut section of a one-inch-diameter clay cylinder I fabricate by forming a clay slab around a length of one-inch copper tubing to take a 3/4" copper fitting so the sunflower can be put on a stake by its final owner. Once the flower is bone dry, I bisque fire.

For glazing, I, once again, use Amaco's Potter's Choice glazes. The Temmoku is the workhorse of my glaze palette, employed for the centers of all Fancy and Deluxe Sunflowers, as well as for some of my Cat-tails, Toad Houses and Bird Houses. What makes this glaze so good in the context of my work is how its appearance varies depending on the quality of the surface to which it is applied. For the petals I used Oil Spot from the same glaze series, which is actually a fairly good reproduction of the Oil Spot glaze I used when I first took classes with Gene Pluhar through Grosse Pointe Community Education. This glaze has a rich, satin finish that refracts the light rather than reflecting it, making for a more subtle composition.

Friday, June 1, 2012

Deluxe Sunflowers: Starry Night

When I started working on new ideas for my Deluxe Sunflowers - designs in which I added clay to the base of the center of the sunflower, I was working with a basic set of tools consisting of a cake decorating set (which I used with rather thick slip, or liquid clay), numerous Kemper Tools Klay Kutters (plunger-style tools) and a Kemper Tools Mini Klay Gun, a mini extruder with a series of dies. I had used this last tool with one of its dies to make the "Pasta" Deluxe Sunflower design.

Years ago, I had experimented with some of the other dies in a series of sushi plates I made. I used the Sasaki Colorstone Stoneware Salad Plate as my "mold" for these giving them a gentle curve, cutting them in round, square and triangular forms. I used half-round, square and triangular extrusions from the Klay Gun to embellish these pieces. I hadn't used those dies since.


I rediscovered the triangular die as I as coming up with new ideas for the Deluxe Sunflowers. I initially used the die to create a new toadstool master, finding it interesting how the clay would curl as it was extruded. I made a new toadstool design consisting of arabesques to which the triangular extrusions seemed to lend themselves. This gave me the idea to do a similar design for a sunflower.

Unlike the "Cake", "Seed" and "Pasta" designs, in this case the center composition had to be completed before the petals were applied so it would completely fill (and even break the frame of) the flower's center. My first attempt was quite successful, actually, although I learned that it was best not to score the entire center surface, as most of it would not be covered by the design and the scoring marks could show through even after glazing; I wanted the center to be as clean as possible so the arabesques really stood out. I did, however, score the area where the petals would be applied so as to not disturbe the central design when I went on to next steps.

The best method I've come up with this technique is to make sure the clay surface is somewhat wet, so I do slip it initially and then spray with water as I work. Extruding a section of clay (fill the Klay Gun as full as possible, with highly plastic clay that will extrude easily; dry clay will tend to crack more easily), I work it into an arabesque, starting in the center of the flower. I work around the surface, well below where I think (based on experience) the petals will begin, even making "half circles" to imply the continuation of the design. For my first attempt, I just did the arabesques. Once the center is completed, slip and begin to apply petals, working from the largest on the outside, finishing with the third row of smallest petals.

I used my typical Amaco's Potters Choice Temmoku for the center. I can't get enough of this glaze 0 although it can look very different on different surfaces, I'm never unhappy with out it turns out, as the warm blackish-brown satin finish subtly plays up the surface without being distracting. I generally blot on three coats to get a really rich, opaque finish. I used Albany Slip Brown from the same glaze collection for the petals, a rich medium red-brown glaze that pools to a lighter orange - it's one of my students' favorite and mine.

Although I was very pleased with the result of my first attempt, after that piece sold and decided I made another, I felt it needed "something more", so I rolled out a thin slab of clay and cut out small circles, which I scattered throughout the composition, usually at the center of an arabesque or in the interstices between them. This is now the template for this design, as you see here.

Sunday, April 15, 2012

Deluxe Sunfllower - Seed

My aesthetic as a potter is intimately connected to my vocation as a gardener and my interest in native plants and the environment at large. Even though some of my work does not seem to relate very closely to my other vocations (the lace bowls and tool caddies are clearly "outliers"), somewhere there is a relationship, however obscure or tenuous: the lace bowls were derived from the lace center of a sunflower; the first tool caddies featured embossed leaves.

Some of my work is much more closely allied - the sunflowers certainly are. And the first three Deluxe Sunflower designs I created - Pasta, Cake and (lastly) Seed - are all strongly reflective of their inspiration - the genus Helianthus in the family Asteraceae. Pasta and Cake are both more connected to the flower as it's blooming. Seed is inspired by the flower as it develops the resulting fruit. Seed is also the most painful - both mentally and physically - sunflower I make. (Little did I realize this would be the case when I first took the plunge; and now I'm trapped by how great these pieces turn out...!)

My desire was to recreate the patterning a sunflower develops as it goes to seed. I prepare the piece as I do for all my sunflowers - drape the clay slab over the mold and score the entire surface. (This is generally the rule for all the Deluxe Sunflowers where the entire center surface is covered with the applied texture; for those designs that don't have complete coverage, I have learned that any scored surface that is not covered by added clay will still be visible after glazing.) I then apply three rows of graduated petals. (For some designs, I only use two rows; for these more exhausting pieces, I always use three so I have a little less "real estate" to fill in the center.)

Once those have been applied in my usual manner (not being coy here; just don't want to repeat myself!), I roll out a relatively thin piece of clay and, using my Kemper Tools Clay Cutters, I start cutting out little disks of clay. (Lots and lots of little disks of clay. About 500 little disks of clay. Yes, I have counted them.) Then I roll every single little disk of clay into an oblong, sunflower-seed shape. (This is where it becomes more useful than usual to have a work-study person in the studio. Thank you, Barb!) I don't actually cut and roll out all the disks of clay in one go; it's never really certain how many I'll need (plus I'd go insane if I did).

Having cut out and formed a significant number of seeds, I slip the center of the sunflower and begin applying them, working from the outside in. And I keep applying concentric, ever-so-slowly shrinking circles of seeds to the center of the sunflower. (The entire seed manufacturing/applying activity is the mentally painful part of the process.) Until I finally get to the last one. It's important to pack them in closely and get good coverage. I then set the sunflower to dry until leather hard, when I pull it off the mold, apply a receptacle to take a copper fitting for a stake and make holes to take hanging wire. I then let the piece dry completely and fire to Cone 06.

Glazing consists of three coats of Amaco Potter's Choice Temmoku for the center, which I then wax resist to reduce errors and clean-up time. Then I pour Potter's Choice Deep Firebrick over the petals, top side first, then brushing on the back, always making sure everything that could be visible is covered. (This is the physically painful part of the process, as I have to support the piece with my left hand while pouring the glaze with my right - and this is one heavy piece!) The piece is fired to Cone 6.

Despite the pain and agony, I am always pleased with the results. The richness of the glazes really set off the complexity of the design. At the end of the day, it's worth it!

Thursday, March 22, 2012

Deluxe Sunflower - Cake

When I first started working with what I now refer to as my "Deluxe Sunflower" designs, I came up with three different designs - including "Pasta", which I described some time ago. Another of those initial textures is what I call "Cake", because I use a pastry bag filled with slip (liquified clay) with a cake tip to create the center, which, for me, is somewhat reminiscent of the disk flowers characterized by members of the Asteraceae family of plants, formerly known as the Compositae, to which such popular plants as daisies, asters, coneflower, black-eyed susans and sunflowers belong.

This idea was inspired by a couple things. Many, many, many years ago, I worked at a Baskin Robbins in East Lansing (Dan Wardlow owned that business as well as one on the other side of town) scooping ice cream; this was my "half-time" job complementing my full-time job as a prep-cook, sand-man, egg-man, dinner cook at Beggar's Banquet. Once I got the job down (no, it wasn't that difficult, except for the customers!), I started helping to decorate the cakes. And I got pretty good at it, over time. And it was at least a little bit more creative than most of the other stuff I was doing at the time. (There are only so many ways you can chop an onion, really.)

Relatively recently, I came across a pastry decorating set at K-Mart when Martha Stewart's relationship with that company was going strong and they had a lot of "Everyday Living" products marketed under her name. This kit was pretty comprehensive - a couple of "parchment" pastry bags, a few thinner, clear plastic pastry bags, a set of basic tips and the plastic fittings to attach them securely to the bag, a device on which to make flowers to be transfered to a decorated cake and a frosting knife. I haven't used either of the last two items but I've had an absolute field day with the rest of the kit, and have added to it over the years. (It's a good thing...)

To fabricate the sunflower, I follow my typical process of forming a slab of clay (about 1/4" thick) over the mold and applying the petals. Now I'm ready to start applying the center. I take a pastry bag and attach the desired tip - for the "Cake" texture, I use a typical "Star" tip. I fill the bag with enough slip so that I can securely close the back of the bag and comfortably grip it with my hands (this last thing is important for the long haul). I try to get as much of the air out of the bag because blow-outs can really mess up the application of the slip, creating more work. Also, the slip has to be the right consistency: too wet, and it won't form up nicely; too dry and you're going to be working way too hard. (It does take a certain amount of strength to do this, especially over a large surface, so cut yourself some slack when you start out.) Starting from the outside edge of the flower's center, I apply "stars" of slip, working toward the center.

Once I've finished, I set the flower to dry until it's leather hard. It's important with this piece not to handle the center until the rosettes are pretty well set up or they'll smoosh. Once it's dry enough to handle without the flower collapsing of the center smooshing, I finish with a fitting and holes for wire and allow it to go bone dry before firing.

I like to use Amaco's Potter's Choice Ironstone (one of my students' favorite glazes, actually) on this piece for some reason. (There's a synchronistic dynamic for me in my work, associating certain forms to certain glazes and stains.) I glaze the center with Temmoku from the same glaze series (which I also use to add some more "umph" to the area where the fitting is attached to the back of the sunflower), wax resist it and then, when the wax is completely dry, pour the Ironstone over the top of the petals and then brush to completely coat the unglazed portions underneath. I fire the pieces to Cone 6 on bar stilts placed along the inner perimeter of the petals. The glaze breaks and pools from black through a buff to a brick red which enhances the dimensional quality of the sunflower, which is exactly the sort of effect I wanted.

Monday, February 13, 2012

Anniversary Sunflower

I did a post last year about a series of Deluxe Sunflowers I did for a show at the Grosse Pointe Art Association's "Word Play" show. I took a slab of clay and stamped it all over with the word "sunflower" and added some rosettes over where the ascenders ("f" and "l") rose into each line of text and used that to form the centers of three sunflowers - large, extra-large and ginormous - I was going to use to create the piece I called "What kind of flower *is* that?" It ended up being accepted for the show, a wonderful treat in a surprisingly successful year of submissions.

My friend Estela Boudreau sponsored a show of my work at her gallery in Grosse Pointe Woods, Galeria Mariposa, late last year, and we decided to feature those three sunflowers. Instead of hanging them as I had at the GPAA show, we thought it would be cool to display them on stakes, as I had at one of my garden tours. This necessitated the fabrication of a stable display stand to hold the stakes securely with no risk of tilting or any other movement.

I, of course, took this challenge to my very capable handyman, Keith Battjes, my go-to guy for everything from toilet back-ups to fashioning worktables for my studio. I hauled the three pieces and their respective stakes over to his shop and, over a couple of beers, we figured out what we needed to do. The stand was a complete success and Estela eventually purchased the three sunflowers with stakes for her "Wind Rise" retreat center near Metamora. I have the base in storage for the next similar project.

Fast forward to January 2012. My toilet has had a crisis. Keith comes to the rescue. He then asks about a sunflower as a gift for his wife for their upcoming 31st anniversary, recalling the sunflowers he had worked with previously. Luckily, he and his wife have relatively short names ("Diane" and "Keith") and, after ascertaining which name should "go on top" (his wife's of course!), I began the process of creating my first Anniversary Sunflower. Which Keith picked up today and put up in their kitchen this evening. What a wonderful project!

Please send out best wishes to Keith and Diane on their anniversary, this Sunday, February 19.

Friday, December 9, 2011

Deluxe Sunflower - Teddy Bear

Gary Kohs and Laura Scaccia are two of the people who joined my family in 2010. Laura's sister had purchased one of my sunflowers at Pewabic Pottery and told Laura about me.  She got in touch and we made arrangements for the two of them to stop by the day before Mother's Day.  Gary and Laura arrived a bit early - early enough that, while I was out of the shower, I was not really dressed. I let them in and asked that they hang in the dining room while I dressed. And that is about as formal as our relationship has been since.

Gary and Laura (and their family and friends) have been some of the most supportive folks I've come to know since the inception of Black Cat Pottery: A sunflower tile has been installed above the stove in Gary's kitchen; one of my Ginormous Original Sunflowers hangs in the peak of Gary's pizza oven on his terrace; a plaque reading "Villa Girasole"("House of the Sunflower") is a housewarming gift from Laura; and 40 Mini Original Sunflowers were gifts to the guests at the official housewarming party. And that's just for starters.

The Inspiration. Gary can be kind of a challenging guy. In a good way. The day we first met, he challenged me to fabricate a ginormous sunflower completely covered by petals. I asked him if he was trying to kill me. (I'm still wondering about that....) But I'm not one to let a challenge pass, so I finally started to work, and the product is my Deluxe Teddy Bear Sunflower design.

The Process. I start the process as I would any Deluxe Sunflower, with a slab of clay draped over the hump mold, which has been placed on a kiln shelf. For the Ginormous Deluxe Teddy Bear design (inspired by the Teddy Bear Annual Sunflower, the center of which is entirely covered with petaloids), I use all seven sizes of sunflower petal cookie cutters. I score the entire surface of the slab, then apply the petals in rows around the piece sequentially, largest to smallest. Although I only use one row of each of the six largest-sized petals, I do use multiple rows of the smallest petal for the central rosette. The key here is to make sure to push the petals down as much as possible so they don't stick up and are vulnerable to breakage through the rest of the process. It is pretty heavy, what with the shelf, the plaster mold, and all that clay.

I set the piece to dry until I can lift it off the mold safely - pretty close to leather hard. I carefully lift the piece off the mold, flip it over and cradle it in my left hand (here's where having those petals well down really makes a difference) to cut holes for hanging wire and attach a fitting to the back for a stake. I then carefully flip the sunflower back onto a clean kiln shelf and allow to dry completely before firing.  Because the piece is quite massive, it's best to let it dry for several days before trying to fire; otherwise, it could easily explode - an expensive lesson.

Glazing is simple yet tricky. There is no "center" to glaze another color, so I'm only applying one glaze to the entire surface; in this case, I'm using Amaco's Potter's Choice Salt Buff - for some reason, this was just the "right" glaze for this design. The piece, however, is probably the heaviest piece I have to glaze. I cradle the piece in my left hand, top side up, and ladle the well-mixed glaze into and over all of the petals for three coats, allowing the piece to dry between. Then, using a slip-trail bottle, I drizzle more glaze haphazardly over the entire surface - thereby achieving the "irregular" application necessary to achieve the correct effect. Once the top surface is dry, I flip over the flower and brush glaze on any unglazed portions of all the petals. I then allow to dry and fire on stilts. I have found that using seven or eight bar stilts place under the slabbed flange is the more efficient arrangement.

Because the piece is so large, I tend to allow the kiln to get pretty cool before opening, to minimize the risk of fracturing if it's cooled too quickly.

Gary's next challenge? A sunflower larger than 24 inches across. I'm still working out the details on that one; once I'm about eighty percent there, I'll take that on as well! 

Friday, August 19, 2011

Deluxe Sunflower - Pasta

As a potter, certainly one of the driving forces of my creative process is my interest in texture.  If you work with clay, you know that, unlike painting, for example, there's often nothing between your hand and the material; the tactile is key.  When I was first developing the designs for what are now my Deluxe Sunflowers several years ago, I came up with three applied textures; two of which, not surprisingly, were (and still) are extremely labor intensive.

Probably the most challenging design technically is what I call my "Pasta" texture, as it reminds me of really fine spaghetti, cut short and applied on end to the center of the sunflower.  My usual process with these pieces is to drape a slab over the mold to create the raised center for the flower and either apply the petals and then the texture (as with my Bubbles design) or apply  the texture and then the petals (as with "String Theory); in either case, the goal is to make sure there is no "gap" between the petals and where the center starts.  The decision as to the order of work has to do with the manner in which the texture is applied.  As with all the sunflowers, they are taken off the mold when sufficiently dried to remain rigid but permit final steps to allow hanging (holes made to allow wire) and/or staking (in the case of the larger pieces, a clay socket to take a copper plumber's fitting; for the smaller pieces, a hole and a socket to take a 1/4" steel stake).

With the "Pasta" design, it didn't work to apply the texture before it came off the mold.  (Believe me - I tried it that way; good thing greenware is recyclable!)  The surface is simply too delicate - made up of thousands of tiny tubes of clay - to take the weight of supporting the piece as it's flipped over and holes made and the clay socket applied.  The solution with this piece (I can get away with the usual order of work in the smaller pieces, as my large hands can span the sunflower's center and support it with the petals resting on my) was to lay the slab center and add the petals, then let it dry as usual.  When it was sufficiently dried to retain its shape (with some pressure), I remove it from the mold, add the holes and clay socket, flip it back over onto a large kiln shelf, then apply the center.  Which consists of loading my Klay Gun (which has a fine screen as the die) with numerous large coils of clay and extruding 1/2-3/4" bundles of clay and applying each bundle to the center, over and over and over again, until it is filled in.  The piece is then let dry and fired as usual.

Glazing is also a bit different with this design.  First, to make sure the extrusions are about the same height to make for a more consistent surface (and one less prone to damage later in life), I take a3" kiln post and rake it side-on across the center surface to break off any excessively tall pieces of clay.  Because of the high level of surface area of the extruded texture, the center is capable of absorbing a significant amount of water but takes forever to dry.  I'll rinse the piece off to remove and dust and minimize glaze absorption but I have to let it dry out quite a lot.  then I apply the glaze for the center, Amaco Potter's Choice Temmoku, blotting it in to get the glaze between and in all around the texture.  The glaze can run as the clay becomes saturated, so I take a long break between the first and second coats.  Once the center is completely dry after the second coat of glaze, I apply wax resist.  Then I glaze the petals.

I chose Amaco Potter's Choice Shino for this piece.  I have had a hard time getting this glaze to mix up in the bucket for me; it settles out into this immovable viscous mass in the bottom of the bucket.  What I've started to do is pull up some of that material out of the bucket, put it into a recycled yoghurt container and add some of the more fluid material.  I can more easily mix small quantities of the glaze.  I then apply by brush, dabbing rather than brushing.  The glaze gets an interesting cratered appearance with this technique, which really sets this design apart from the other pieces in the series.

Don't forget about our Garden Tour, tomorrow, Saturday, August 20, 10a-2p; see a garden bursting with native plants and clematis in bloom, as well as a selection of garden art (including this sunflower, if you want!) and locally-made refreshments.  See you there!

Monday, August 1, 2011

Deluxe Sunflower - String Theory

As a potter and gardener, I'm a pretty tactile person - my eyes and my hands are the most important sensory receptors I've got going.  And, I get a bit... obsessive (hey, at least I'm honest about it!) about discovering or creating new textures, whether for my original sunflowers or for my newer creations.

As I've said before, I developed my Deluxe Sunflowers as an exercise in applying clay in its various forms to the flowers' centers to create new textures.  In this case, I used my little mini-extruder/Klay Gun (a Kemper tool) to create this texture.  For this design, I laid the slab of clay over the mold, scored and slipped the entire surface and just started feeding pieces of clay into the extruder and pushing it out through the selected die, one which had a whole bunch of holes in it, and applying to the top of the humped slab (leaving the lower inch or so clear for the petals).  My goal was to create a highly irregular, stringy texture.  Once I covered the entire desired surface with a fairly consistent layer of extruded clay, I then continued on with typical sunflower fabrication, applying the individual petals in sequence.

Glazing these big pieces is quite a challenge, both because of their linear dimensions and their sheer weight.  I obviously cannot dip them in a five-gallon glaze bucket (even the "medium" sunflowers are a tight fit, let alone Large, Extra-Large or Ginormous).  I've been pouring glaze, using a 2oz. restaurant ladle, over the petals after I've glazed and wax-resisted the centers.  I had been glazing the underside (even though it's not usually visible, if I'm thorough I don't miss areas that can be distracting to me or the final purchaser) first, pouring with the ladle, and then flipping the piece over and pouring onto the top, following up with a glaze-loaded brush to touch up.  With this process, I'd end up with a lot of glaze on the piece, which could run and make a bit of a mess in the kiln.

While recently glazing a number of similarly-sized pieces, I changed my glazing tactics, pouring the glaze on the top side of the petals, then using a broad brush to touch up the back to get minimal coverage.  I'm using less glaze plus having less of a mess in the kiln.  Also, I had previously been using tripod stilts, which were actually difficult to space successfully and, if not done properly, could buckle under the weight of these bigger pieces; in this most recent load, I used bar stilts, which were much more effective in terms of placement and load bearing with no failures.

Just goes to show that I never stop learning!

Sunday, July 24, 2011

Deluxe Sunflower - Words

As a member of the Grosse Pointe Art Association (GPAA), I occasionally take the opportunity to submit work for their various exhibits.  I've actually done quite well this year; I don't often submit because pottery seems a stretch for some jurors, but this year I've submitted work for three shows successfully, as well as the Michigan Pottery Show closing soon at the Anton Art Center in Mt. Clemens.

The most recent show for which I submitted work at GPAA was for their "Word Play" exhibit, which closed earlier this month.  I had had an idea for many years of using words and/or images for the center of my sunflowers and had wanted to make the equivalent of a printer's plate with snippets of poetry and graphics of sunflowers.  My friend Tim Hanks (BFA, Wayne State University) suggested getting individual rubber stamps made of the various images/phrases I wanted to include but time got away from me so I downsized (but have not abandoned) that idea.

The solution?  I used my Poetry Stones letter dies and created a slab of clay with the word "sunflower" (all in lower case, 'cause that's all I had!) repeated over and over.  I started with a very large slab of clay, ruled baselines using a yardstick, then stamped the words on the slab.  I had one false start - I realized, due to the ascenders on the "f" and "l", that I had to start from the bottom and work my way up; otherwise, it was too confusing.  To resolve the remaining space above the "f" and "l" in each word, I used my Kemper rosette cutout and used those to fill the gap.

I wanted to do a piece consisting of three sunflowers - Ginormous, Extra Large and Large - for my submission, so I had to stamp a very large area just for the centers.  I know it took me between two and three hours just to prepare the slab for those centers, not including the actual fabrication of the pieces.  (I'm actually kind of glad I don't know how long it took me to do this....)  I then assembled the rest of the three pieces in the usual mode, trying to get enough of the word "sunflower" visible on each center that the concept would be intelligible.

The next challenge was how to glaze them.  I discussed this with Tim and his wife, Barb, and we concurred that glazing them all the same color would make the most sense and we agreed that using iconic sunflower colors would be best.  So, I glazed the centers with Amaco's Potter's Choice Temmoku and the petals with Frosted Melon from the same glaze series.  The three pieces got into the show under the title "What kind of flower is that?"

The same flowers were featured at my garden tour in August as well as my show at Galeria Mariposa in Grosse Pointe Woods. They will now reside at my friend Estela Boudreau's Windrise Retreat Center in Metamora, Michigan.

Thursday, April 28, 2011

Deluxe Sunflower - Bubbles

One of the bugs that bit me late last year was returning to some fancier sunflower designs I had tried some years ago with some success.  I initially called them my "Extra Fancy" Sunflowers but that got rather cumbersome, so now I call them my "Deluxe" Sunflowers, reserving "Fancy" for the sunflowers I do with brightly-glazed petals.

My goal with the Deluxe Sunflowers was to come up with interesting applied textures.  The three original styles I had developed included "Pasta", using a mini extruder to apply an infinitesimal series of tiny tubes of clay to look like an entire carpet of stamens.  (I once did an entire series of five of these of various sizes for friends for Christmas; I swore off them for a while after that!)  I also used a star-shaped cake tip and slip to cover the flower's center, a much less exhausting process which worked quite successfully and I call "Cake".  Finally, I cut out 300-400 pieces of clay and rolled them into seed-like shapes and applied those for "Seed" in a process about a laborious as making "Pasta".  Yes, I do have a strong masochistic streak.

I was inspired by Amaco's Potter's Choice glaze series to explore this series further.  I really liked the rich tones of some of the earthier glazes, especially the Temmoku, which makes for a great sunflower center color, varying subtly on diverse textures.  In the last couple years, they've come out with some terrific colors, both brighter and more subtle; the former I'm been employing for my "Fancy" Sunflowers, the latter for the "Deluxe" series.

I featured my Deluxe Teddy Bear Sunflower earlier and there are now seven other designs in addition to Cake, Pasta and Seed.  This one, "Bubbles", uses the same technique as I used with "Cake" but with a large, round tip on the pastry bag with the slip.  I got these nice, big, round blots of slip, usually with a little peak in the center, which worked well with the Temmoku.  When I try these ideas out, I usually don't know for sure how it will evolve - this was a pleasing outcome for me.

In terms of the glazes I select, the piece seems to dictate that for me.  For some reason, this design wanted a brighter, lighter tone, so I selected Frosted Melon.  On a white clay body, as I think I've said before, this glaze is positively anemic.  On the peach stoneware I use, it really comes to life, going orangier where it's thinner and pooling to almost a pale yellow-green.

I hand-paint the center with at least two and sometimes three coats of Temmoku.  I then use wax resist over this, blotting - not brushing - it on so I don't pull away the glaze; I have a special jar reserved for these projects because it's difficult not to pick up a bit of the glaze in the process.  I let the piece sit for a couple hours (or put it under the furnace vent in the basement!) before I apply the glaze for the petals.  For smaller pieces - tiny, small and medium - I can usually dip the pieces in the glaze bucket.  For the larger pieces - large, extra-large and ginormous - I use a two-ounce ladle I found at Goldstar Products.  I typically do the back of the petals first and then the front, checking as I go to make sure I've gotten complete coverage,  I keep a number 3 or 4 brush handy to blot glaze into hard-to-reach areas between petals and a container of water and a small sponge to clean up drops of glaze off the center.

The pieces are fired on stilts, the number increasing with the size of the piece.  This can get tricky as some of these (especially Seed, Pasta and Teddy Bear) are pretty heavy - the more stilts you can fit around, the less likely you'll overwhelm a given stilt and have less salubrious results.

I was happy with this result.

Tuesday, November 30, 2010

Whew!


Yes, yes, I know: How long is it since you've heard from me? A really long time. It's been a pretty interesting year or so - some important losses and some encouraging accomplishments. I lost my dear friend Kathy Peabody in February, my Mother passed in April and my friend Gary passed in July. But Black Cat Pottery and The English Landscape are still here and going strong.

We've actually been growing and I'm now teaching in my studio, keeping class sizes small and intimate. This arrangement has worked out well, as all my equipment and materials - including gardening references and the computer (both of which have been useful) are right here for my students' use. We'll have more a more extensive schedule during the non-gardening season (January-March), so drop a line if you're interested. I've also been adding some improvements (real, actual stools, instead of five-gallon buckets for seats!), including a new kiln, shelving and ware carts (only took three hours to put that together!)

I've been doing some pretty great stuff, including some amazing new "Extra Fancy" Sunflowers, including the Ginormous "Teddy Bear" Sunflower you see here, in my very amatuerish image (gotta get with Don once he gets back from Florida). My friend Gary Kohs challenged me to make a ginormous sunflower covered with petals; I thought he was trying to kill me but - true to form - I gave it a shot and I'm pleased with the results - and can't wait to show it to Gary and Laura! Also doing some new designs for wall pockets and platters using large leaves - and I'll upload images of those as soon as I have them.

My friend Don Schulte - the photographer guy referenced above - has also bee busy, turning out a new set of Spring Wildflower notecards (with another on the way), a new set of Fall Wildflower notecards, new Clematis notecards, and upcoming sets of Herbs, more Clematis and one more set of Summer Wildflowers. And that's in his spare time, which hasn't been a lot as he and Debbie were married in September!

It was a tough gardening season but I had some great help from Andrew, Theresa and Andy. We completely renovated one property, moved a lot of mulch and drank a lot of water. I could not have done it without their help (or that of my massage therapist, Brandy, who is the best). Used to be, before I gardened professionally, that I dreaded the onset of winter; now, I confess, I quite look forward to it!

The cats are great: Alex and Meli are getting older but hanging tough and the kittens, well, the kittens aren't kittens any more! Rameses still tries to pick on Princess Nur but we're working on that.

Upcoming events include the Gifts and Greens holiday mart at Christ Church Grosse Pointe, December 3 and 4 ; and I'll be having an open house at the studio (at 3903
Grayton St., Detroit, MI 48224-4003) December 11, 10:00am to 4:00pm (no stragglers - I have a dinner appointment!) Come see what's been happening - there's always new stuff going on, enjoy some Christmas cheer and do your last minute shopping for Black Cat Pottery and Notable Greetings note cards and prints. Cheers and Happy Holidays!