Showing posts with label Pottery. Show all posts

Wednesday, December 28, 2016

Developing a New Deluxe Sunflower Design

Deluxe Sunflower Test
 Basketweave Tip 48
One of my greatest challenges as an artist is keeping my work fresh, especially in terms of developing new product lines or new designs within existing product lines. I had started (unsuspectingly) developing the concept for my Deluxe Sunflower Series over 15 years ago but it was only in the past few years ago that I finally pulled them together into a coherent series of their own with consistent design and glaze parameters, finally putting together a collection of 15 different designs. These were pieces characterized by applied centers, either in the form of clay cut-outs, extruded clay or slip applied using a typical pastry bag and decorating tips.

Deluxe Sunflower Test
Chrysanthemum Tip 352
For 2015, I set myself the challenge of coming up with a new Deluxe Sunflower design and decided to focus on experimenting on some of the cake decorating tips I hadn't used. I had used a typical "Star" tip (including numbers 30, 31 and 32) for my very first experiment with this process, creating my "Cake" design for the series. (See post dated March 22, 2012.) I found I can use the same tip regardless of the sunflower's size (ranging from "Mini" to "Ginormous") by managing how much slip I squeeze out of the bag for each "star". Subsequently, I started working with "Round" tips (including numbers 5, 10 and 12) to create my "Bubbles" design. (See post dated April 28, 2011.) For these, I did find that working with smaller to larger tips for smaller to larger sunflowers was helpful. Finally, I created my "Ribbon" design using a "Basketweave" tip (number 48) for most of the design, finishing off the center using a Star tip. (See post dated September 4, 2012.)
Deluxe Sunflower Test
Ripple Tip 70

I had become fairly adept with the process (getting the slip consistency right, especially in terms of eliminating lumps; figuring out how to manage the bag - how full, tightening it as I went, etc.) but wanted to come up with some new ideas. I sorted through the box of tips I had collected and experimented a bit but felt I need more options - I wanted to have six new designs to compare and contrast. I researched decorating tips on-line and, finally, took myself off to the nearest Jo-Ann Fabric Shop to peruse their selection. I found a few additional tips based on my research, enough to develop six different designs.

Deluxe Sunflower Test
Rose Tip 104
In the interest of being as "scientific" as I could, I decided I would do all of the samples in the same size - Tiny - so they would be large enough to give a really good idea of how the finished texture would look for larger-sized sunflowers without investing an excessive amount of time, energy and materials in something that might not really turn out particularly well and I could make a one-to one comparison. I also used the same glaze for the petals on all of the samples - Amaco's Potter's Choice Frosted Melon - to "even the playing field". (The centers of all the Deluxe Sunflowers are done using the same glaze, Amaco's Potter's Choice Temmoku.) Firing them together - both bisque and glaze firings - would further ensure the pieces would be as consistent in every way other than the center motifs.
Deluxe Sunflower Test
Rosette Tip 107

All of the sunflowers were fabricated in the same way: A slab of clay is "humped" over the center mold, cut so it has about a half inch of "selvage" and the entire top surface scored; then I apply two rows of petals - one larger than the other, the larger first and the smaller on top, around the perimeter of the sunflower. After slipping the center, I filed in the decorative design using thick slip and a pastry bag with the appropriate tip.
Deluxe Sunflower Test
Ruffle Tip 67

I completed the six sunflowers, as seen here. (I've included both the names I used to distinguish the designs from one another as well as the numbers used for each tip by the manufacturer in each caption.)

"Chrysanthemum" was - by far - the most tedious design, as each petal was very small, requiring much more repetition. I used the same tip for "Basket" as I had used for "Ribbon" but wasn't particularly happy with its relative sloppiness - which made it more difficult to decipher visually. "Ruffle" and "Ripple" seemed pretty similar to me and neither was particularly interesting. I didn't feel "Rosette" adequately filled the center space - but I might return to it to see if I can do better in the future. I personally felt "Rose" was the most successful of the bunch. Once they were finished, I did an informal survey of folks in my circle, seeing what they felt worked best of the designs without conveying my assessments. Most folks agreed with me that the "Rose" design would be the best addition to the series.

Now I had to decide which glaze to use for the petals for the "Rose" design. Although I will use any glaze with any sunflower design (Deluxe or Fancy), for the purposes of "spec" production, I have developed a "recipe" for each design which includes the center motif and the glaze for the petals. (As stated before, the same glaze is always used for the centers - a dark brown that, when fired correctly, highlights the texture while maintaining a relatively neutral foil for the different petal glazes.) I had done some tests with some Coyote glazes and decided that Leopard Shino would be a great addition to the Deluxe Sunflower series. (I also, being a cat person, liked the name!) So, now we have a new addition to the Deluxe Sunflower Series - Rose!

Ginormous Deluxe Sunflower "Rose" with our Spokesmodel and Sales Manager, Doni.

Thursday, November 5, 2015

Winterberry Serving Pieces

Set of four 4" Coasters
Although I am not particularly inclined to celebrate one winter/year-end holiday over another (except, perhaps, the Saturnalia), I do like to celebrate the seasons of the year. One of the most trying periods of my life was my nearly-two-year sojourn in Singapore - where the sun came up at 7:00am every single day and went down at 7:00pm every single day; and where the weather report inevitably consisted of "Temperatures will be in the low 30s (Celsius) with scattered showers throughout the island." One wondered why they even bothered. (Granted, in November the showers were less "scattered".)

Pair of Trivets (6" and 8")
I grew up in the northeastern and midwestern United States, where we have a full four glorious seasons. In Michigan, in fact - being part of the high midwest, we have some of the most extreme weather in North America, spanning sometimes 100º (Fahrenheit) in less than 12 months accompanied by epic snows, devastating droughts, punishing thunderstorms and the odd tornado or two. (As well as some earthquake aftershocks....) And, although I have my favorites, I appreciate the seasonal cycle. (My favorites - Spring and Fall - are rendered more favorite by the not-so-favorites - Winter and Summer.)

Tiny, Small, Medium and Large
Winterberry Bowls
So, Winter is not my favorite season. But I have learned to appreciate it as a time for stillness and quiet (snow is a great sound insulator), especially as opposed to the other three seasons of the year, burdened as they are by a race to get the garden ready, the struggle to keep the garden looking good and the race, once again, to put the garden to bed (among other things).

Winterberry Spoon Rest
Recently, a mentor strongly advised me to develop some seasonably-appropriate pieces for Winter and, despite my personal resistance to her admonition, I did so. I decided to use as an inspiration my Applied Leaf Bowls and Trays, as well as our own Michigan Holly (Ilex verticillata), a deciduous, heavily-fruiting holly also known as Winterberry. The results are as you see here.

Square Winterberry Tray
I've used the same molds for the bowls and trays as I use for my Applied Leaf Bowls and Trays. (I will be posting on the other pieces in that series over the next few weeks.) These initial samples utilize a plain, untextured coil for the branches; upon further research, I discovered that Winterberry twigs actually have visible lenticels, so I am now using a metal grid to create a more accurate texture for the twigs on the bowls and trays.

Square Winterberry Tray with
Tiny Winterberry Bowl
Probably the most demanding aspect of these pieces, as opposed to their "leaf" predecessors, are the berries, each of which is individually cut (I learned long ago that the key to making consistently-sized seeds or berries is using a half-inch round clay cutter and a thin slab), rolled, scored and slipped into place. Three coats of Scarlet Red Amaco HF-165 are required to get a good color to contrast successfully with the Amaco Potters Choice Vert Lustre glaze used for most of the piece (With 30 "berries" on each of the three largest trays and smaller quantities on the other pieces in the series, I go through a lot of berries....)

Winterberry Dessert Tray
Winterberry Dessert Tray with
Tiny Winterberry Bowl
All pieces are food safe as well as dishwasher safe. I'm willing to bet they're also oven safe, as they're fired to over 2200ºF. The pieces are modular, so bowls and trays can be used separately or in various combinations. The Tiny Winterberry Bowl works well with all four trays, converting them into highly-functional "chip-and-dip" servers without the burden of washing and storing an otherwise cumbersomely-designed, limited use serving piece. The Small Winterberry Bowl can used with similar ease with both the Oval and Rectangle Trays.

I'm hoping to come up with some figured trivets and coasters for next year, as well as, perhaps, a round tray, a wine-bottle coaster and, maybe, a toothpick holder. I'm definitely open to suggestions so as to develop a truly comprehensive range of serving pieces that are not only suitable for the holidays but for the entire Winter season.

I am pleased with them. I hope you like them as well.

Oval Winterberry Tray
Oval Winterberry Tray with
Tiny Winterberry Bowl


Oval Winterberry Tray with
Small Winterberry Bowl
Rectangle Winterberry Tray with
Tiny Winterberry Bowl

Rectangle Winterberry Tray


Rectangle Winterberry Tray with
Small Winterberry Bowl


Sunday, October 25, 2015

Leaf Serving Pieces II: Tiles/Trivets


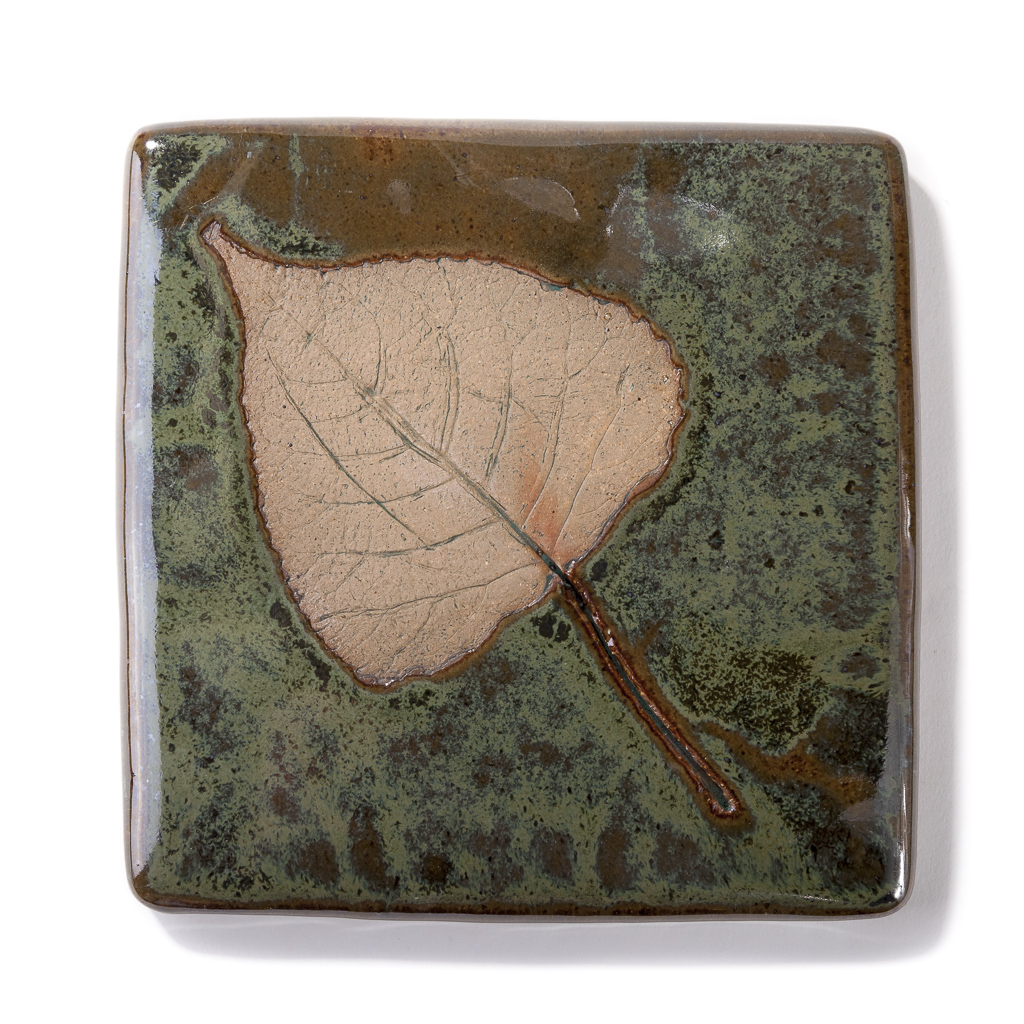
Six-inch Silver Maple
Tile/Trivet
Back when I first started making Spoon Rests, I also made complementary Tiles/Trivets to go with them. These were flat pieces with embossed leaves - like the Spoon Rests -  that could either be used flat to protect your table from a hot or damp dish or hung on the wall as a decoration. (As I've said for years, I grew up with a very rigid and controlling family; I'm still rebelling by being as versatile and flexible in my art as possible....) When I first started making these, since I had not yet taken a tile class and so had not learned how to make and use tile molds, I would work directly from a clay slab.

Six-inch Eastern Redbud
Tile/Trivet
Rolling out a half-inch-thick slab of clay on the slab roller, I would scrape the canvas texture away with the flat side of a metal kidney (sometimes following this up with a quick roll with my rolling pin), place a leaf (vein side down on the clay - this is very important) on the smooth surface and roll the leaf into it. Using my six-inch tile cutter, I'd cut around the leaf to make the tile/trivet.
Six-inch Eastern Cottonwood
Tile/Trivet

The difficulty was getting a good clean release from the tile cutter. All too often, the clay would stick on part of the device and release unevenly, warping the tile/trivet in the process. Since I hadn't learned about using scrap drywall to dry my flat pieces more evenly (even stacking dry wall with more tiles or other work on top, in a tower of tiles and other pottery), the warping might not be corrected as the piece dried and was bisque and glaze fired; clay has memory and, sometimes, it can be pretty tenacious. I sold quite a few of those pieces - both individually and in sets with a spoon rest - but I was never completely happy with them. I finally stopped making them.
Eight-inch Northern Catalpa
Tile/Trivet

Fast forward a few years and my Hanging Bird Bowls have evolved into, among other things, Applied Leaf Bowls and, earlier this year, Applied Leaf Trays. (I'll be doing posts on those shortly.) On the advice of my mentor, I decided to put additional pieces to assemble a comprehensive series for serving use at the dining or buffet table. Reviving the Spoon Rests and Trivets seemed obvious.

Eight-inch Common Witch-hazel
Tile/Trivet
In the interim, I had taken a tile-making class with David McGee at Pewabic Pottery. (David is an excellent instructor as well as a uniquely talented artist in his own right. I would encourage anyone interested in learning about pottery in general or in tile making specifically to take at least one class with him.) I learned how to design master tiles as well as how to make molds of those masters in order to take a design into production.

Eight-inch White Oak
Tile/Trivet
The challenge with these sorts of leaf designs is that, if you were to make a mold of an embossed leaf tile, the design is so subtle and has so little relief that, in pounding out the tile, you get "echoes" of the leaf rather than a clear image, which doesn't make for a particularly satisfying design. So, I've made a blank master mold and place a leaf into the mold (in this case, vein side up so it will be against the clay surface) each time I make a piece. The down side is that, for some leaves, you can only get one impression; the up side is that, even if you can re-use the leaf, each piece is unique as recreating the exact placement is essentially impossible. I insert hanging divots in three places in the back of the Tile/Trivet so the leaf can hang either square (with the leaf's tip pointing to the upper right or the upper left) or as a diamond (with the leaf tip pointing upward).

Once dried, cleaned up and bisque fired, the pieces are finished in my typical fashion, using a water-based stain on the leaf and drawing the excess off with a damp sponge to bring up the veins. Wax resist is applied to the leaf (I also use it on the backs of my tiles - it's just easier for me to do that rather than clean off glaze) and allowed to cure. I then glaze the piece, wiping the edges so they don't drip. I fire to Cone 6 with a 40-minute hold. The Tiles/Trivets are food safe and heatproof.

Sunday, October 18, 2015

Leaf Serving Pieces I: Spoon Rest

Silver Maple Spoon Rest
It's been almost a year-and-a-half since my last post. My apologies for my long-term absence; it's been a tough time but I'm starting to get back to my normal. So, I thought I'd just plunge back in and start with a blog post. Finally.

Northern Catalpa Spoon Rest
I've been working on a series of pieces for a wholesale website and, in the process, returning to some (very) old designs as well as taking some more recent ones to a new level. I've been developing a collection of serving pieces based on my Applied Leaf Bowls and, in that context, revisiting some pieces I had stopped producing, having realized they worked well with my new direction.

Eastern Redbud Spoon Rest
Common Witch-hazel Spoon Rest
The spoon rests are one of my earliest leaf pieces, inspired by my friend Rebecca who asked for something she could use on her stovetop. I had been using leaves fired with a stain to bring up the texture of the veins but she wanted something with some glaze and a more consistent shape. I came up with a pie-piece (actually, about 120 degrees, or a third of a circle) that I formed it into one of my small bowl molds, embossed a leaf into it and added a small clay branch. The key is to make sure any canvas texture is smoothed away from the surface before embossing the leaf; emboss the leaf with a smooth stone rather than a sponge, which would pull clay away from the surface and not push the leaf into the clay surface consistently.
Eastern Cottonwood Spoon Rest

After drying, the piece is cleaned up (synthetic steel wool is great for this; I save the accumulated clay dust and recycle it with the rest of my waste clay) and bisque fired to Cone 04 or 06.

White Oak Spoon Rest
Glazing follows the same process I use for all of my leaf and branch pieces. I use burnt umber solution to stain the branch, pulling the excess away with a damp sponge. Then I stain the leaf (I have a "key" I've developed that tells me which stain and glaze combination is used with a given type of leaf) and, again, pull the excess away with a damp sponge to bring up the leaf's veins. Both surfaces are treated with wax resist and, after curing for several hours, dipped in the appropriate glaze. I fire on stilts to Cone 6 with a 40-minute hold.

Although designed as spoon rests, they also work as soap dishes, change stashes, jewelry dishes, tea-bag rests and candle holders. All are food safe and can go in the dishwasher.


Saturday, April 5, 2014

Pillow Vases V: Sea Urchin

Techniques for applying the decoration can vary. When possible, I score and slip the vase's surface - this works quite well with the "Frosted" design because the decoration is always located around the opening and at the vase's "waist". (I use a large round cookie cutter to plot the line of decoration on the tiny vases with multiple openings.)

Since I have learned that scoring marks not covered by decorative elements can still be visible after glaze firing, I score and slip the underside of the decorative elements of the "Scrolls" and "Rosettes" designs instead. Due to the size and arrangement of the elements for the "Sea Urchin" designs, making sure the vase is plastic enough to take the decoration and then gently pressing it on after it has hardened somewhat seems to help prevent separation. There is no applied decoration for the "Lace" or "Plain" vases so the issue is moot for those designs. I then set the pieces to dry slowly before the final preparation for bisque firing.

Once I find a technique that works for me, I tend to push them as far as I can to see what else I can do. In terms of the slip-filled pastry bag, that was expressed in investigating as many different workable decorating tips as I could.

Not all of them work very well, but I did find that the plain round tips (of various sizes) and the ribbon tips are pretty useful. I use a medium to large round tip for these Sea Urchin vases, so called because the decoration resembles the surface of a sea urchin. I start off with a circle of "dots" of slip placed evenly around the opening, then another, larger, circle of dots, alternating between each of the dots in the first row, continuing to alternate down to the vase's "waist". (Vessels have "anatomy" which relates back to human physiology - with "necks", "shoulders", "waists" and "feet".)

Sunday, March 16, 2014

Pillow Vases IV: Frosted

One of my favorite decorating tools in the studio is a pastry bag filled with slip with any one of the various decorating tips I've purchased over the years. I found my first "set" of decorating tools at K-Mart, when Martha Stewart still had a relationship with them - the kit I purchased (in a very nice lidded metal box) had her name on it. Since then, I've scoured cake decorating aisles at Michaels and JoAnne's for new and exciting effects. I find myself most often using star, round (of various sizes) and ribbon tips for my projects. The "Frosted" Pillow Vase designs are made using a "star" tip.

After assembling the Pillow Vase vessel form, it's often too dry to decorate right away. If that's the case, I can either re-hydrate it by draping with a damp rag and placing in a plastic bag or brush the surface with slip intermittently before adding the decoration. Once the piece is moist enough to successfully accept the decoration - moist but not so plastic that the clay will buckle at all with any pressure), I can apply whatever decoration I choose - spirals made from extruded clay, rosettes cut out from a thin slab of clay or slip decoration using a pastry bag and various tips.

For this "frosted" decoration, I use a pastry bag with a star tip. I score and then slip around the vase's opening and along its waist - the location of the join between the two parts of the vase. In the case of those tiny vases with a "pansy frog" (see two vases to the right side of the picture to the right), I mark a circle that encompasses all the openings and score and slip around it. (By slipping the scored area, the applied decoration does tend to conform to the piece more successfully.) I apply a circle of rosettes around the opening first, then around the waist, thus minimizing the risk of "messing up" the work I've already done. I'll either use my finger or a tool of some kind (doesn't really matter which), I clean the opening of any encroaching clay before setting it to dry. It's important with these pieces to make sure to sand the decorated area before bisque firing as the slip can dry into very sharp edges.


Sunday, February 23, 2014

Pillow Vases III: Lace

My Lace Bowls are some of the most popular pieces in my oeuvre. Their evolution started with a piece of lace I picked up at Michael's and used as one of the textures in my Original Sunflower series. The texture was fairly highly relieved and had a rich, tapestried quality.

I liked the results so much, it became one of the textures I selected for my Fancy Sunflower series, for which I employed some of the more highly-relieved surfaces I had used for my Original Sunflowers - important because I was going to glaze the centers and the designs needed to handle two to three glaze coats.

At about the same time, I was exploring textures with some bowl forms; many of the glazes in my palette are reactive glazes that break to different colors over deeply-relieved textures - I had noticed this characteristic on the test tiles I had made and on the glazed sunflowers I was producing. I started playing around with the idea of lace-textured bowls, buttons and wall art - a product line that has become quite successful and continues to evolve; I'm now experimenting with larger platter-type centerpieces using vintage and contemporary lace.

Once I started working on the Pillow Vase concept, it seemed obvious to use the lace texture again, as it had been so successful in other genres. The challenge here was that, rather than using the lace for the inside of the bowls, I was using it for the outside. Whereas I had easily turned out bowl after bowl using the same piece of lace - rolling out the slab, rolling in the lace, forming the lace slab into the bowl and peeling the lace away, then starting on another piece, I had to invert the process so the lace side of the slab went into the bowl first.

After much trial and error, I've developed a reliable process for these pieces, forming the slab bowl into the mold and roughly trimming, then setting to dry until the lace-covered clay releases. I peel the lace away, place the (still-plastic) clay back in the mold and, gently yet firmly, form it into the mold, especially at the lip, trim and score. I don't cut any holes until after I've removed the pieces from the mold. I select the half for which the lace design's center most closely conforms to the center of the bowl form and use that as the orientation for the finished vase's opening.

The pieces are slipped and joined; the join looks like a natural part of the design, forming a resolved part of the lace motif.

Monday, February 10, 2014

Pillow Vases I: Scrolls

One of the first things I did after my divorce was to go and purchase the tableware I had been looking at for years - a set of Colorstone stoneware dishes from Sasaki in a matte black finish. All of the pieces in this range are based on sections of variously-sized spheres - smaller spheres for the bowls, larger ones for the plates and platters. My idea was to have these very simple, elegant dishes for place settings and collect, over time, hand-made serving pieces; I thought the sophisticated spareness of the place settings would be a complement to a varied selection of handmade serving pieces, making for an interesting table for any occasion.

After I purchased the pieces, I started using them - directly and indirectly - in my pottery as molds. I used the salad plate to create my sushi plates and created molds from the coupe soup bowl to form my poppies and other pieces. I eventually invested in additional pieces (not always in the black) simply to use as molds in the studio, rather than constantly raiding my kitchen cupboards. I started using them to make Lace Bowls, then Embossed Leaf Bowls; I used molds I made from them for my Applied Leaf Bowls.

It was when I was making some Embossed Leaf Bowls that I started thinking about using these same forms for making Pillow Vases - mostly closed, pillow-like forms for flower arranging. I thought I could take two molded sections and marry them.

The great thing about this approach is that, while slab bowls can sometimes warp - the technique is generally less consistent than wheel-throwing, by putting two of them together, they hold one another in stasis, making for a piece that maintains a uniform shape.

To start the process, I roll out a slab of clay about 1/4" thick. I cut a circle appropriate to the size of the piece I'm doing and slump it into the mold. Using a damp sponge, I force the clay into the mold as consistently as possible. I also use a very smooth river stone for this step. Once the piece is consistently molded, I use sharp cutting tool to trim it down to the edge of the mold. (The Colorstone as a flat lip which makes this step really easy.) If I'm making a single large opening (which would allow the vase to take a pin frog) or a single small opening (suitable for an ikebana-type arrangement), I'll cut that out using either a cookie cutter or a 1/2" round Kemper Klay Kutter (only for one of the two sections, for the top). I also score the cut edge in anticipation of assembly. I set the pieces to dry - out in the sun in the summer; under the heat vent during winter - until they will release from the molds (which are not porous). In my next post, I'll describe assembling the basic vase.

For the Scrolled decoration, I use a Kemper Klay Gun with one of the round dies. I extrude a length of clay and fabricate three loose arabesques (the clay scrolled at either end with a straight section in the center - the length of these determined by the size of the vase I'm making - Large, Medium, Small or Tiny) and - using shorter lengths of clay - six tight arabesques. (When I first started working with these design elements, my application was much more varied, both in number of elements and relative placement; I found, in doing production, coming up with a consistently satisfying arrangement I can repeat with minimal variation was essential to my sanity.) I flip these over, score and slip them and then apply them to the vase so the three longer pieces almost meet one another over the vases surface and pairs of the smaller ones "bracket" each resulting intersection. I gently firm the to the vase's surface and allow then to dry.

Monday, May 6, 2013

2013 Annual Spring Garden Tour


Saturday, June 1, 2013, 10:00am-2:00pm

Free and open to the public!

The Gardens. Cheryl's life-long love of Clematis and more recent obsession with native plants are both immediately apparent as you arrive at the property.  Designed as an educational space rather than a design show-stopper, the gardens include dozens of Clematis, representing over 10 species as well as large-flowering hybrids, and over 200 species of native plants, ranging from Spring ephemerals to large trees - all nestled in a typical 40x120 urban lot in the heart of the Motor City.  Become acquainted with some of the lesser-known small-flowering species Clematis varieties and the beauties of our native flora, as well as cost-effective sustainable gardening strategies.

Cheryl's garden was featured in the July 2009 issue of Michigan Gardener and she penned the first article on native plants to appear in that publication, in May 2012, as well as her most recent article on Clematis which appeared in that publication's April 2013 issue. She has another article on natives slated for 2014.

Everything Else.  We also feature local garden art, live music and refreshments, as well as two hands-on workshops. Last year's Hypertufa Planter Workshop, led by Chris Hopp of Farmbrook Designs, was a huge success, so we'll be offering it again. Guests will also have the opportunity to work with local artist Christine Laikind to create a unique botanical monoprint using materials from the gardens. (There is a charge for the workshops. The rest of the event is free and open to the public.)

The 2012 Summer Garden Tour was a great party, with over 100 folks enjoying the gardens, art and entertainment - we hope you can join us to make this event even more fun and exciting.

All events are at 3903 Grayton St., Detroit, MI 48224. Contact Cheryl at cenglish@blackcatpottery.com for additional information about the workshops. Register online using the buttons to the left.

Friday, April 12, 2013

Garden Show at Midtown Gallery, Kalamazoo

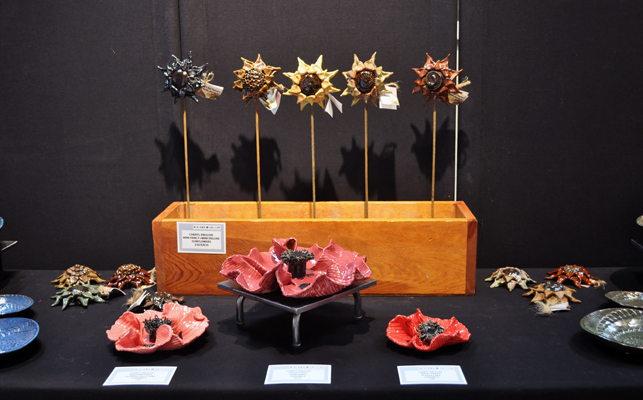
Finally got some pictures of my work on exhibit for the Garden Show at Midtown Gallery, at 356 So Kalamazoo Mall in Kalamazoo. The show is up through April 27 and there is some truly wonderful art to be seen, including metal sculpture, photography and acrylics, among other media. I love how the show was hung, so the various artists' work could complement one another. Be sure to check it out and give a shout out to Terry!

First Row, left: Eastern Cottonwood Leaf Basin (left); Eastern Redbud Embossed Leaf Bowls (right).
First Row, right: American Beech Embossed Leaf Bowls (left); Eastern Redbud Basin (right).
Second Row: Rosette Pillow Vases.
Third Row, left: Clytie (top); Large Sunflower Leaf (bottom).
Third Row, right: Clytie's Son (top); Large Eastern Cottonwood Applied Leaf Bowl with Brake Disk Charger (bottom).
Fourth Row: Lace Bowls (far left and far right); Poppies (front center); Mini Sunflowers (back center).
Fifth Row, left: Deluxe Large, Extra-Large and Ginormous Words Sunflower Installation.
Fifth Row, right: Scrolled Libation Bowl with Stand.