Showing posts with label Pottery - Lace. Show all posts

Sunday, February 23, 2014

Pillow Vases III: Lace

My Lace Bowls are some of the most popular pieces in my oeuvre. Their evolution started with a piece of lace I picked up at Michael's and used as one of the textures in my Original Sunflower series. The texture was fairly highly relieved and had a rich, tapestried quality.

I liked the results so much, it became one of the textures I selected for my Fancy Sunflower series, for which I employed some of the more highly-relieved surfaces I had used for my Original Sunflowers - important because I was going to glaze the centers and the designs needed to handle two to three glaze coats.

At about the same time, I was exploring textures with some bowl forms; many of the glazes in my palette are reactive glazes that break to different colors over deeply-relieved textures - I had noticed this characteristic on the test tiles I had made and on the glazed sunflowers I was producing. I started playing around with the idea of lace-textured bowls, buttons and wall art - a product line that has become quite successful and continues to evolve; I'm now experimenting with larger platter-type centerpieces using vintage and contemporary lace.

Once I started working on the Pillow Vase concept, it seemed obvious to use the lace texture again, as it had been so successful in other genres. The challenge here was that, rather than using the lace for the inside of the bowls, I was using it for the outside. Whereas I had easily turned out bowl after bowl using the same piece of lace - rolling out the slab, rolling in the lace, forming the lace slab into the bowl and peeling the lace away, then starting on another piece, I had to invert the process so the lace side of the slab went into the bowl first.

After much trial and error, I've developed a reliable process for these pieces, forming the slab bowl into the mold and roughly trimming, then setting to dry until the lace-covered clay releases. I peel the lace away, place the (still-plastic) clay back in the mold and, gently yet firmly, form it into the mold, especially at the lip, trim and score. I don't cut any holes until after I've removed the pieces from the mold. I select the half for which the lace design's center most closely conforms to the center of the bowl form and use that as the orientation for the finished vase's opening.

The pieces are slipped and joined; the join looks like a natural part of the design, forming a resolved part of the lace motif.

Friday, April 12, 2013

Garden Show at Midtown Gallery, Kalamazoo

Finally got some pictures of my work on exhibit for the Garden Show at Midtown Gallery, at 356 So Kalamazoo Mall in Kalamazoo. The show is up through April 27 and there is some truly wonderful art to be seen, including metal sculpture, photography and acrylics, among other media. I love how the show was hung, so the various artists' work could complement one another. Be sure to check it out and give a shout out to Terry!

First Row, left: Eastern Cottonwood Leaf Basin (left); Eastern Redbud Embossed Leaf Bowls (right).
First Row, right: American Beech Embossed Leaf Bowls (left); Eastern Redbud Basin (right).
Second Row: Rosette Pillow Vases.
Third Row, left: Clytie (top); Large Sunflower Leaf (bottom).
Third Row, right: Clytie's Son (top); Large Eastern Cottonwood Applied Leaf Bowl with Brake Disk Charger (bottom).
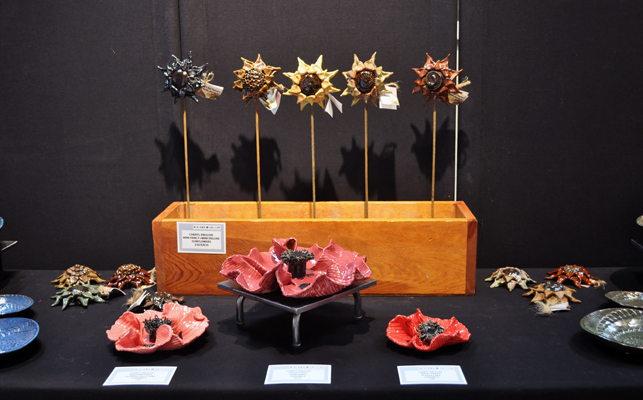
Fourth Row: Lace Bowls (far left and far right); Poppies (front center); Mini Sunflowers (back center).
Fifth Row, left: Deluxe Large, Extra-Large and Ginormous Words Sunflower Installation.
Fifth Row, right: Scrolled Libation Bowl with Stand.


Tuesday, February 26, 2013

Kimono Lace Tea Set

Having figured out how to actually make cylindrical forms using slabs with my yarn bowls, I got, well, I got pretty excited! A whole new world had opened up for me, where I could make vessels using my slab roller rather than the wheel or extruder. (I love my high-capacity extruder but the dies generate pretty thick clay sections, thicker than I really wanted for the sorts of vessels I wanted to make.)

Another format that had been a big, as-yet-unmet, challenge was that of a tray - the trays I had made previously had all warped horribly. My friend Juliet Smith helped me out with this one, sharing some of her experiences on Facebook, forcing me to realize I had to develop some serious patience and let these pieces dry out really slowly. Armed with my new-found knowledge and experience, I set out to combine them into a Japanese-inspired tea set.

I liked the idea of using the lace texture for these pieces, as I had with the yarn bowls, as they really reminded me of the brocades used in the obis for Japanese kimono. I used exactly the same technique for the cups as I had for the yarn bowls. After rolling out the clay slab, I blocked out the size piece for the cups. I wanted them to be modestly-sized, so their eventual contents wouldn't cool off before their users were finished. (I felt slightly smaller cups requiring slightly more frequent refills would be more conducive to keeping tea hot.) I rolled the lace onto the clay slab and cut it to size, bevelled the bottom edge to make the bottom of a box, rolled the cylinder up and folded up the bevelled bottom and attached it to a small plain square slab, making sure the surfaces were well scored and slipped. I have found that an offset frosting or icing knife is perfect for smoothing the surface inside the bottom of the cup to make sure the join is secure; I also check and make sure the corners are well sealed (it wouldn't serve to have a leaky teacup!) I also use the frosting knife to smooth the inside of the seam, which is helped along by applying clay rosettes from the same lace pattern on the outside, not only sealing the seam but further enhancing the overall design.

Detail of cup
I was a bit more trepidatious about the tray design. My past experiences had been less than salubrious and I had been deeply disappointed with them. I decided to keep the design as simple as possible and try to let them dry as slowly as possible.

For the tray, I rolled out a clay slab and rolled an oblong piece of lace into the surface. Cutting it to size - two inches longer and wider than the desired flat portion of the tray - I then marked off a one-inch square at each corner, cutting a section of clay from the inside point of the square to a point one-half-inch from the square's outside point. Removing the resulting small diamond-shaped piece of clay, I used a paint stirrer (any really flat "thing" will work), I turned up the tray's four resulting edges and scored and slipped then together, creating a bevelled lip making it easier to carry the tray and harder for things to slip off of it. I put the tray on a kiln shelf, covered lightly with plastic, and put it high up on my shelves where I wouldn't see it. Checking the tray the next day, it seemed to be drying fairly flat. Once it was more than leather hard, I removed the plastic, still allowing it to continue drying in the ambient studio conditions. Long story short, it dried perfectly flat!

Once all of the pieces were dry, I lightly sanded them with synthetic steel wool to make sure they would be pleasant to handle, then bisque fired to Cone 06. Before glazing, I lightly rinsed the pieces to make sure there was no remaining clay dust and then waxed the bottoms of the cups and tray. I dipped the cups about two thirds horizontally in Amaco's Potter's Choice Temmoku about two thirds; then I dipped each one two thirds from the other direction (so there was an overlap of glazes) using Indigo Float, Lustrous Jade, Vert Lustre or Textured Turquoise. (I dipped them all so the lace rosettes sealing the seam were at the center of the non-Temmoku side just for the sake of symmetry.)

Detail of tray
The tray was more challenging because, although I still wanted to overlap the glaze, there was no way I could dip the piece as I wanted, as I wanted the glaze to run parallel to the tray's longer axis. (It didn't help that I was running really low on both glazes by this time, so even if I had been OK with dipping the other direction, I really couldn't!) I opted to try to pour the Temmoku on half the tray and the Indigo Float on the other half. Although the demarcation between the two "zones" isn't quite as "clear" as I would like, I think it works with the cups.

This tea set actually sold recently on my Etsy site (www.etsy.com/shop/TheBlackCatPottery) but I plan to make another, this time with five cups, more in keeping with a traditional Japanese tea set.

Tuesday, January 22, 2013

Small Lace Kimono Yarn Bowl

Just less than a year ago, I ran into the owner of a yarn shop with whom I had had a not-particularly-successful retail relationship. We had really connected on the theoretical level: She strongly believed in the artisan tradition and wanted to support it by offering other art in her shop. Unfortunately, the folks shopping there didn't even really "see" the pottery she was offering because they weren't expecting to see it there. (I could tell you dozens of stories of folks who have been to my booth at numerous events who have said to me, "You've never had those before!" about an item I've been showing for ten years; selective vision is a reality.) Anyway, we encountered one another again in February 2012 and she inquired as to whether I'd be interested in working on a few projects with them, including buttons and yarn bowls.

I tried out a few ideas and developed an interesting line of lace-embossed ceramic buttons. As I don't throw, however, the yarn bowl concept was more... challenging. It wasn't until I saw a slab-constructed cup at Rovin Ceramics that I figured out how I could tackle the project using my preferred technology.

In designing a Yarn Bowl, there are a couple things to consider: (1) We don't want the yarn rolling all over the place, hence the bowl, but the bowl has to be roomy enough that the ball or cake of yarn can move freely as it unwinds; and (2) there has to be a slot and/or hole through which to feed the yarn smoothly. The slot vs. hole thing perplexes me. I've been told the slot is preferred because then the fiber artist doesn't have to break or cut the yarn; but I've knitted, and eventually you either do have to break or cut the yarn if you're changing colors and the skein is gonna end sometime, regardless. But, regardless, there are folks who want a slot and not a hole through which to feed their yarn.

After a couple of false starts (clay way too plastic; slab too thin; bowl way too big and tall, lots of warping), I came up with a design for a small ball of yarn (suitable for skeins of cotton and/or silk blend yarns) which I'll be able to translate to a larger size for chunkier, wool and wool-blend yarns. Realizing the piece will shrink ten to fifteen percent, I figured out the final diameter of the bowl I wanted to create and factored it by 1.15 (for the shrinkage). I multiplied that by pi (3.14) to determine the circumference I needed for that diameter. I decided the height should be a bit more than the diameter to keep the yarn from popping out.

After rolling out a sufficiently large clay slab, I rolled in an oblong piece of lace for texture and, using a carpenter's square, cut out the size slab I had calculated. Flipping it over so the lace texture was on the bottom, I used the same square to mark an inch up from the bottom and then marked four sections across the bottom and mitered at those marks and at either end, to make the bottom of the cylinder. Cutting a square slab of clay slightly smaller than the desired diameter, I folded up the mitered sections and rolled the large slab into a cylinder, so the miters all met in clean corners

Scoring and slipping the edges of the cylinder and the top of the base slab, I knitted the seam together and positioned the cylinder on the base. Using an icing knife (it's amazing what uses I can find for the tools of other trades!), I clean up the miters at the bottom of the inside of the vessel and pinch the outside corners together with my fingers. I also smooth the seam with a wooden tool. I wanted to make the seam both secure and interesting, so I cut out flat clay medallions using the same lace pattern, scored and slipped the undersides and affixed them along the outside of the seam. I then set the pieces aside to dry until leather hard.

Once leather hard, I cut out the holes in the middle of the medallions in the lace-patterned sides of the pieces and cut a slot down to one of them as well. It is very important to not do this until the piece is leather hard, as the clay will warp as it dries. I even put a large rubber band around the outside of each piece to keep it as aligned as possible as they finished drying. Once dry, I cleaned the pieces up with synthetic steel wool, keeping in mind there should be absolutely no rough spots to catch on the yarn. I then bisque fired them to Cone 06.

I had thought a lot about the glazing for these pieces. they reminded me of traditional kimono for some reason, with the textured brocades of the obi and the juxtaposition of non-analogous colors. I decided to finish them with two overlapping glazes, using the Amaco Potter's Choice Temmoku first and then overlaying with more brightly-colored selections from the same series, including Indigo Float, Lustrous Jade, Vert Lustre, Ironstone and Textured Turquoise. I was very pleased with the results, as the glazes and glazing technique further enhanced the lace texture.

These pieces work great for finer-textured fibers, including silk and cotton blends. I'm going to make some larger ones for chunky wool blends next!

Saturday, November 24, 2012

Lace Crosses and Stars of David

Lace Crosses: T (L-R): Ironstone, Vert Lustre;
B (L-R): Indigo Float, Saturation Gold, Chun Plum
As most folks who know me realize, although I am deeply spiritual, I am not a particularly religious individual. By the same token, I am sincerely respectful of other peoples' beliefs and feel blessed to count among my friends and acquaintances during my life individuals who subscribe to various sects of Christianity, Jews, Muslims, Buddhists, Animists, Atheists, Agnostics, Pagans, Wiccans and Hindus, among others. I have had the opportunity to share in the religious observances of many of my friends and have appreciated those opportunities to share in their spiritual interpretations and experiences.

I was raised Episcopalian, going to church at St. Columba Parish (now dissolved) in Detroit and was very involved in the church for some time, singing in the choir in participating in many of the youth activities. I developed a greater knowledge and awareness of Christian theology during my Art History Classes at Michigan State University - during specific periods of western art, the church was a significant patron of the arts and religious themes were an important part of the iconography. It was also at Michigan State that I became close friends with my friend Marilyn, whose Jewish family welcomed me like a youngest daughter. During my two years in Singapore, my husband's Buddhist family shared their religious traditions with me, as well was the Muslim and Hindu people with I worked and came to know as acquaintances and friends. As a result, although I may not "connect" with the specific observances of any or all of these faiths, I have found a kernel of truth, a thread that connects them all in my spiritual universe.

Lace Crosses: T (L-R): Textured Turquoise, Frosted Melon;
B (L-R): Blue Rutile, Lustrous Jade, Pearl White
Not surprisingly, through these experiences, I have developed a respect, if not a reverence, for the symbols associated with these faiths, even though they do not have a specific place in my spiritual landscape. I have tended to restrict my artistic expression to themes relating directly or indirectly to nature and my interests in botany and horticulture; but I am also a businesswoman who is trying to make a living through her art. So, when a consignment account inquired as to whether I would be willing to make some "grown-up" crosses, I was open to the idea. The gallery already had some crosses in inventory - lovely pieces, some in a Celtic style, others suitable for baptism or first communion, but nothing really suitable for a Divinity School graduate or a wedding. The original request was couched as "more organic", a term that initially threw me, as I couldn't think of any way to apply my more naturalistic aesthetic to this new context. After pondering the request for a few days, I asked if a lace-textured cross might do the trick and received an enthusiastic, "Yes!"

Cross - Ironstone
First, I charted out a template for the form, using graph paper, then transferring it to a fused lamination sheet (in the absence of any clear mylar). The next challenge was to figure out how to relate the lace to the cross. There is one style of cross in which the central crossing is surrounded by a circle - the High Cross, as often seen in Celtic iconography; it was this motif to which I eventually referred in the design I created. I rolled out a slab of clay and positioned the cross on the slab, pricking out the center so I would know how to orient the lace, eliminating the risk of "running out of clay" for the form. I rolled the lace into the clay, centering it over the hole pricked for the center of the cross. Removing the lace, I placed the template over the design, centering the center of the template over the center of the lace design. I then cut out the entire form; I found cutting both sides of the inward-pointing angles with one cut was the most effective means to reduce the risk of odd cuts into the center. I remove the clay on the side with the least waste, rolled the other side of the canvas back over the slab and flipped the entire package over. Pulling back the canvas, the clay releases from the canvas but is still attached to the template. I can then place the template on the remaining clay - the "leftover" lace impression is on the underside, now - and fabricate another cross, flipping the slab between each one, until the entire slab has been used up. Obviously, a very "tall" slab would have more waste, whereas a "shorter", "longer" slab would be able to accommodate more crosses.

Stars of David: T (L-R): Indigo Float,
Lustrous Jade; B (L-R): Pearl Blue,
Saturation Gold, Chun Plum
Using a 1/4" hole punch, I center a hole at the top of the cross (use a piece of 1/4" steel stock to force out the waste clay, then carefully pick up the clay (with the template), place it on a grid for drying, correct any issues with its orientation and then remove the template. They should be dried as slowly as possible. They can tend to warp, so it's a good idea to check them periodically before the go leather hard to correct any issues - it may also help to dry them between pieces of drywall, a technique I need to investigate.
Stars of David: T (L-R): Textured
Turquoise, Frosted Melon;
B (L-R): Vert Lustre, Blue Rutile,
Pearl White

Once dry, the pieces are sanded to remove any rough edges (remembering that a sharp edge only becomes sharper when glazed) and bisque fired. After firing, I rinse to remove any dust, then wax the back of the cross, leaving a margin to take the glaze around the edge to the back. This leaves a space for engraving. Using glazing tongs to hold the pieces at the bottom, I pour glaze over the four arms and then place them squarely on a large stilt to dry.

Star of David, Pearl Blue
Firing has been challenging, primarily due to the fact that the pieces are quite thin, retain some of the "memory" of being moved around while still quite plastic and, as a result, want to warp. The best I've come up with so far is one large stilt to support the top and the two "arms" with two smaller stilts supporting the longer ( and more vulnerable) "foot". Another possibility is to use six half-inch stilts - one under the top and each of the arms, one at the center and two under the foot; this arrangement would provide for more even heating, which might solve the problem conclusively, but would require a great deal of attention to their placement so as to not over lap into glazed areas on the backs of the pieces.

Once glaze fired, I used leather lace, cut to nine inches, folded in half and with an overhand knot and then threaded through the hole with a lark's-head knot, so the pieces could hang. I know many artists make these sorts of pieces with a wire hanger in the back but I'm not comfortable with that on two counts: the piece cannot hang flat to the wall very well; and there is a higher risk of failure. The leather lace allows the piece to hang flat and can easily be replaced if something should happen to it.

Having had success with red stoneware Crosses finished with dramatic reactive glazes, I decided to make some in white stoneware with Pearl White, which would be appropriate for baptism, first communion or a wedding. Then I decided to to try some Stars of David, again, using the center of the lace for the center of the star. These were also very successful. All are available at several galleries throughout Michigan. I would like to investigate other motifs but I'm not certain they would adapt as successfully to the lace texture.


Tuesday, November 20, 2012

Buttons: Lace

Assorted Lace Buttons in a Small Pearl Blue Lace Bowl
I ran into an old contact early this year at the Sidestreet Diner in Grosse Pointe. I was having brunch with an old friend and this individual (sitting in the booth behind me and so only able to see the back of my head) overheard our conversation and asked if I was a potter, indicating she owned a knit shop (she didn't recognize me) and was wondering if I'd be interested in making ceramic buttons and maybe some other things. We exchanged some e-mail correspondence, in which I sent her some pictures of my lace bowls; she thought the texture would be interesting for buttons for hand-knit goods.

Medium Diamonds
(Deep Firebrick)
I had inherited two sets - large and small - of canape cutters from my Mother some years ago. I set to work rolling out clay slabs, rolling in lace and cutting out shapes. I made about a dozen samples, in sets of three and five. Once cut out, I used the smallest-available hole punch (one-eighth inch) to add holes (using a small metal rod to clean out the clay between each hole). I let the pieces dry, cleaned them up with some synthetic steel wool, being careful to remove any and all "catchy"surfaces and edges, and then bisque fired. (If you're doing large quantities, throwing them into a greenware or bisqueware bowl for firing vastly simplifies loading and unloading.) I rinsed the pieces before glazing to remove any residual dust.

Medium Crescents
(Oil Spot)
Glazing and firing were both going to be challenging. The buttons had to glazed all around, back and front, so they were going to have to be on stilts as they dried and while being fired. Coming up with a way to dip them and get complete glaze coverage was perplexing, until I dug out an old pair of tweezers I used to "assist" in putting jute for price tags through too-small holes. By using a pair of long, pointed standard tweezers, I could poke each tweezer into a hole in the given button, dip it into the glaze and hold it flat to let the glaze pool, then lower it onto a stilt and release it. I fired them in a fairly fast kiln to Cone 6. After cooling and unloading, I used a Dremel with an eight-inch diamond grinder to smooth out the marks left by the stilts in the backs of the buttons.

Medium Squares
Albany Slip Brown
The client was delighted with the samples. So very delighted she bought them off of me right then and there (I had also brought some samples of my friend Don Schulte's yarn notecards; she purchased those outright as well) and asked me to make more. A lot more, in lots of different sizes and shapes. So I swung into major production, the first step of which was to call my friend Catherine and let her know what had happened.

Medium Trefoil
Vert Lustre
My friend Catherine is not a horder but she does hold onto some interesting things. Among others, she had held on to some of her mother's old (old) cookie cutters, as well as the animal-shaped cookie cutters from her childhood Easy-Bake Oven. All of which she offered to me. I made up eight of each shape, so I could have a set of three and a set of five (always odd numbers!) I followed the process, making some very large shapes (stars, circles, hearts, rosettes), some nice novelty shapes (terrier) and what I decided to all my "Animal Crackers" series from the Easy-Bake Oven cutters.

Small Triangles,
Crescents and
Six-Pointed Stars in
Palladium, Metallic
Black and Saturation
Metallic.
Although some of the larger sizes are difficult to keep flat throughout the process (this, along with the very clean edges and surfaces, is apparently very important to fiber people), I'm learning that drying them between sheets of drywall may help with this. Also, stilting the smallest shapes on small tripod stilts was not a good bet while straddling them across two bar stilts is much more successful. A Dremel with an eight-inch diamond grinder is indispensable for grinding out the small percentage of holes that seem inevitably fill with glaze during firing, regardless of how carefully I blow them out during glaze application. (Make sure to use the lubricating oil that comes with this special bit to speed up the process.)

In terms of packaging, I purchased a quantity of small zip-bags, into which go each set of buttons. I punched a hole at the top to one side, threaded through a piece of jute and attached a tag with a description including the size, shape and glaze. By putting them in the bag, the customer can see the back and the front of the button(s) and can see the quality of manufacture. The buttons are available a couple places around the state; we're waiting to see how they do in the wider market.


Sunday, April 15, 2012

Lace Bowls 4: Hearts

Deep Firebrick (Large and Tiny) and Chun Plum (Small)
As anyone who knows me at all will attest, "hearts" are not a motif most folks would associate with me. They tend to be a bit... precious for my taste in most cases. But there is the point that a lot of folks do like them and will buy things that feature hearts and, at the end of the day, the whole point of this enterprise is to make a living (and have as much fun doing that as possible). Hence, heart-shaped lace bowls.

Actually, the large heart-shaped lace doily was the first doily I ever purchased, many years ago, to use for texture on my Original Sunflowers. I didn't find any round doilies and I liked the texture of this heart-shaped piece, although it was challenging to get it to work on the larger sunflowers - I'd have to "fill in the gaps" by rolling the doily four times total. When I started experimenting with the lace bowls, the hearts seemed an interesting idea, especially once I found two smaller-sized heart-shaped doilies.

As with the other lace pieces, I roll out a slab of clay, roll the doily into the surface - be careful to roll it evenly so as not to distort the shape - and cut it out with a sharp cutting tool. Carefully lifting off the canvas, I transfer it into the mold (again, using the Sasaki Colorstone stoneware dishes I've accumulated for this purpose). In the case of the large heart, the two top lobes and the bottom point extend beyond the mold, so I pink the bottom to give it some dimension and shape the two lobes to be interestingly symmetrical. The tiny and small hearts don't extend much beyond their molds so I just make sure they're centered. Once the piece is centered in the mold, I carefully press it in and then use a smooth river stone to completely shape the clay to the form. Unlike the flush-cut pieces, I can usually dry these in front of a fan with little risk of distortion.
Chun Plum (Large and Tiny) and Deep Firebrick (Small)

When working with these scalloped forms, it's important that all the edges are completely smooth. Once the pieces are more than leather hard (almost bone dry, really), I use synthetic steel wool in a multiple-step process to remove any burs or rough edges so they're pleasant to handle. (Any sharp edges will actually be enhanced by the glaze used; I have even cut myself on glazed unrefined edges, an experience I certainly don't want to repeat, let alone inflict on one of my clients!) First, I use the steel wool to soften the top edge, then smooth the overall lace texture, then the outer edge; turning the piece over, I use a clean-up tool to smooth any inconsistencies caused by the edges of the mold, then use the steel wool to smooth the bottom edge and the overall underside of the piece. Then I sign it.

After bisque firing to Cone 06, I rinse the pieces thoroughly to remove any residual clay dust from the clean-up process. I've been glazing them with  Amaco's Potter's Choice Deep Firebrick and Chun Plum and firing to Cone 6 on stilts. Once cooled and out of the kiln, I use a Dremel to remove the stilt marks.

I've also made some of these pieces using a white stoneware with the Pearl White glaze recipe I received from my first pottery teacher, Gene Pluhar. Like many white glazes, Pearl White is actually translucent, so it looked rather gray over my usual peach stoneware body. I've also received requests from one of the galleries representing my work to use some of the other glazes for these pieces, especially during "wedding season". I'm also thinking of doing a Goth/Steampunk version of this design - I think it would convey a certain... ironic insouciance.

Thursday, April 5, 2012

Lace Bowls 3: Goth/Steampunk Wedding Set

Goth/Steampunk Wedding Set
With the wedding season upon us, a number of the galleries and gift shops that carry my lace bowls requested what apparently are referred to as "girlie colors". (Yes, I had to get clarification on the terminology, not surprisingly.) Apparently, jewel tones are acceptable, as are white and pastels.

I wanted to do something a little different. When I first worked with the lace bowls, I had made an entire series of the tiny bowls using each of the glazes in my repertoire. Obviously, some were more successful than others, but sometimes combinations of otherwise less than stellar glazes were pretty interesting. Three glazes in particular - two from the Amaco Potter's Choice series (Saturation Metallic and Saturation Gold) and one I had "inherited" from my first pottery teacher, Gene Pluhar (Metallic Black) - were relatively uninteresting on their own and/or didn't seem to play well with most of the other glazes in my palette. It took my friend Cathy Dossin's interest in the tiny Saturation Metallic lace bowl (later her Christmas gift) to pique my interest in these glazes for these pieces.

Goth/Steampunk Wedding Set
The other part of the puzzle is that I have a friend - she works at the art supply/framing shop in Grosse Pointe Woods I frequent - who is a big steampunk fan. (Yes, I had to ask her to define "steampunk" for me.) She often laments that there is little in the way of "steampunk" goods out there; this is evidently an unappreciated and underrepresented consumer demographic. I thought that I could create a series of bowls using these three "orphan" glazes that could be marketed as a less traditional wedding or anniversary gift for the Steampunk or Goth set. (Hey, all kinds of folks get married!)

I thought a set of three (tiny, small and medium) scalloped bowls would make a compelling ensemble, with the small glazed in Saturation Gold and bracketed by the tiny in Saturation Metallic and the medium in Metallic Black. I wanted to emphasize the contrasts between the three glazes - the dark graphite-like satin of the Saturation Metallic, the brilliant gold satin of the Saturation Gold and the high gloss of the Metallic Black - and how they responded to the highly-figured surface of the lace texture. As a set, they look great tied up with a nice, black (or white!) ribbon.

This set is available at a number of galleries around the Detroit area, including Firebrick Gallery in Rochester, Dancing Eye in Northville and Grosse Pointe Artists Association in Grosse Pointe. Discussions have been rampant as to whether it would better if the three pieces would be better/nicer if they were all finished with the same glaze; most come down on the side of the intriguing contrast of glaze color and character.

I dig their understated yet rebellious elegance.

Sunday, February 19, 2012

Lace Bowls 2: Lotus Bowl

Indigo Float Lotus Bowl
I spent a fair bit of time at the end of 2011 and the beginning of this year exploring some more ideas in connection with my Lace Bowl project. I'd begun to refer to the entire range of lace vessels as  my "Ocean's 11 Lace Bowls" because the initial had been quite successful in a number of galleries for the Christmas season, allowing me to work on my less salable, artier "vanity projects". Suggestions and requests for other forms and finishes had been made, from platters and trays to bridal/shower/girlie colors for Spring. I was also given the opportunity to work with some handmade lace donated to me by some of my friends, in addition to the pieces I had found at two national arts and crafts store chains.

Some prized pieces of handmade lace were  donated to me by my friend Deb Hall. Of Maltese descent, her maternal grandmother had won first prize at the World's Fair in the 1930s for her hand-made bedspread. You can imagine my gratitude when Deb gifted me with some of her grandmother's beautiful work, including a large oblong piece suitable for a rectangular try and various forms suitable for round bowls.

One piece in particular inspired a different take on the pieces I had been doing - a large, six-pointed star-shaped piece with a lot of texture and interesting negative space. I decided to try using the entire form instead of limiting myself to a typical bowl with a consistent edge.

Textured Turquoise Lotus Bowl
Following my already-established technique, I roll out a slab of clay about 3/8" thick. To release the clay completely from the canvas, thereby reducing the risk of the clay tearing, I peel back the canvas, flip the canvas back, flip the entire slab-and-canvas over and flip back the other side of the canvas. Now I'm ready to do pretty much anything with the clay slab, from making a sunflower to a mask or a lace bowl. I place the lace doily on the slab, making sure it is as smooth as possible and, in this case, that the points are as uniformly extended as possible.

Using Kemper's Fine Detail Cut-Out Tool (C-090-109), I cut out the lace form. I cut or pull away the excess clay between the points to minimize distortion as I remove the clay from the rest of the slab - as long as at least fifty percent of the perimeter is "free", you're pretty much good to go. I carefully remove the cut-out piece with the lace doily intact I'm ready to actually form the piece.

I've been using the Large Salad Bowl from Sasaki's Colorstone stoneware for these particular pieces - with great success. I gently "encourage" the slab down into the mold, shaping it to the sides as much as possible and minimizing the buckling of the clay. Once I've gotten the piece well into the mold, I use a very smooth river stone to further conform the slab to the mold paying particular attention to the upper edge of the bowl.

Frosted Melon Lotus Bowl
To make the form more interesting, I pinch each of the points - one finger on the top of the center of each point, two other fingers on either side underneath - to add a nice detail to the form as well as to help the unsupported points to stay somewhat "up". If the clay is too plastic, these points can slump badly. If this happens, the piece should be recycled, as this can cause failures in the piece that may not be visible until after glaze firing.

Unlike most of the other bowl forms - which should be dried slowly without a fan to minimize distortion, these pieces seem to dry well in front of a fan with minimal warping. Once they're dry, I use a fine synthetic steel wool to clean up the edges, and undesirable marks from the molding process on the underside, and to soften the lace impression on the inside. This last is very important, as a glaze will only enhance any sharp edges, making an otherwise inviting, tactile piece more than a bit uncomfortable.

For bisque firing, I've been able to stack at least two high - make sure to turn each piece in a stack one-twelfth of a rotation so the points are not on top of one another to reduce stresses during firing.

For glazing, first rinse the pieces to remove any dust generated during the clean-up process. I use a 2-ounce ladle to glaze the interior, grab the piece with a pair glaze tongs, turn it over, and ladle the glaze over the bottom. Because of the size and shape of these pieces, glazing can get a bit messy - always clean up your glazing area afterwards to reduce free silica in your workspace.

These pieces are glaze-fired on a large 10x15 stilt - smaller stilts can't take the weight of these pieces. I use a ceramic Dremel accessory to remove any irregularities caused by the stilts.

Because of the form of these pieces - especially the pinched tips, glaze effects are quite dramatic and pleasing. As a thank-you to Deb, I glazed a piece with Amaco's Potter's Choice Frosted Melon. I hope to give it to her at our next class.

Wednesday, December 7, 2011

Lace Bowls 1: Red vs. White Stoneware

Lace Bowls, Peach Stoneware
One of the more popular designs I've developed in the last year or so has been my lace bowls. Using the same Sasaki Colorstone stoneware dishes as molds that I use for many of my leaf pieces, I've come up with two "designs" in four sizes that have been very popular this holiday season. The idea evolved from the lace I had used for the centers on some of my sunflowers. I had found a heart-shaped piece of lace at either Joann's or Michael's; it was a bit challenging to work with, as the concave section at the top of the heart made for a "blank" in the design of the sunflower's center that I would have to "fix" by rolling the bottom of the heart in to that section; cumbersome but effective. This lace texture sunflower has been very popular, although it may partly be due to the color I stain the petals - bright orange.

I have always been a very tactile person (hence the interests in gardening, pottery, needlecrafts, etc.) I had been working with some bowls for an Empty-Bowls Fundraiser sponsored by Firebrick Gallery in Rochester, Michigan, and decided to use the lace texture and see what happened with that, using the same Sasaki Colorstone stoneware bowls as my molds for these pieces as I had been using for my leaf pieces and other, earlier designs. I had found various sizes of lace at Joann's and Michael's that would accommodate the various sizes I wanted to make.

The technique here is to roll out the clay in the slab roller, place the piece of lace on the slab and roll it into the clay with a heavy maple pottery rolling pin.  If I'm doing a straight edge on the piece, I cut out enough around the lace to work with and place it in the mold.  I usually try to center it but have learned that the pieces can be pretty interesting if they're a bit off-center. (There's a story there I'll share some time.) I use the flattish side of my smooth river stone to work the clay into the mold consistently, peel off the lace and cut the edge of the piece to the edge of the bowl using a sharp tool. If I'm doing a scalloped edge, reflecting the scalloped edge of some of the lace pieces I've found, I use a sharp tool to cut out the form of the lace and place that in the mold as above, although in this case it's more important that it be centered.

Lace Bowls, Lite Stoneware
I let the pieces dry enough to come out of the molds, sign them, then let them dry completely.  Once dry, I use synthetic steel wool to remove the burrs from the cutting tool at the edge of the piece, correct any irregularities on the back of the piece, and to smooth the edges of the pattern made by the lace inside the bowl. This last step is very important, as I have discovered that a glaze applied over a sharp, unrefined edge can make for a piece that is very uncomfortable to handle; for some reason, the glaze enhances that sharp edge, to the extent that I have even cut myself on it. Just a couple sweeps across the surface with the synthetic steel wool is sufficient to correct this issue. These pieces can easily be nested for bisque firing, so you can fire a pretty dense load, getting maximum space and energy utilization.

Glazing is pretty straightforward but glaze selection is important.  The raised lace pattern is particularly effective when a glaze that "breaks" is used - a glaze that changes color as it thins over the edges of s surface. (This is part of the reason I used lace-imprinted clay for my studio's glaze test tiles, to see which glazes would behave in this manner.) These glazes will really enhance the already-extant texture in the bowl. Many of Amaco's Potter's Choice glazes fit the bill, especially Indigo Float, Lustrous Jade, Textured Turquoise, Vert Lustre, Blue Rutile, Chun Plum, Albany Slip Brown, Ironstone and Ancient Jasper. I have noted a preference for the brighter colors in the blue to green range in my client base.

Glazing consists of dipping the piece, using dipping tongs, into the well-mixed glaze two to three times, depending on the glaze's consistency. I do not wax the bases of the pieces because it looks odd, considering there is no real "bottom", just a curved underside. I fire them on stilts and use my Dremel with a grinder accessory to remove any stilt marks.

I did experiment with different clay bodies as well, both my usual Peach Stoneware from Rovin and their Lite Stoneware, a very white body suitable for handbuilding and throwing. I found in most instances that the redder clay was more effective in bringing up the contrasts in the breaking glazes, a phenomenon reflected in the choices I make for my sunflowers, bird bowls and wall pockets.

I am now experimenting with other lace forms.  My good friend Deb Hall has been very generous, gifting me with some of her Maltese grandmother's handmade lace for use in my studio.  Her grandmother actually won first prize at the World's Fair during the 1930s for her lace bedspread, so you can imagine how grateful I am that Deb chose to bequeath some of her work to Black Cat Pottery Studios.

I like nothing more than when a prospective customer really "experiences" one of my pieces - handles and caresses it. These lace bowls really lend themselves to that dynamic.