 |
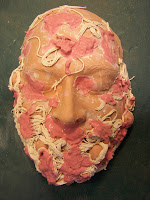
| Mask, Bisque Fired |
Due to my own anxiety, I had bisque-fired the mask on its own in the small kiln - I was really uncertain it would survive, even though I had been very careful in fabricating it. Luckily, all was fine.
Once the mask had cooled sufficiently, I brought it in and started glazing it. I knew it was going to be a multi-step process: glaze sauce (three colors); wax resist pasta and sauce; stain (and nuance) meatballs; wax meatballs; finally, glaze the rest of the face.
Working methodically, I applied three coats of Amaco Celebration Series Scarlet Red to all of the sauce areas (photo below, left). (It helped that I had other things to do in the studio, including glazing some ladybugs on a commission toad house Scarlet Red and Black, it also helped that I had a fan I could put on the piece to speed up the drying, as well as the fact that I had forgotten an appointment, which gave the piece additional time to dry between coats.) I knew I didn't want the "sauce" to be the same color - nothing is really all the same color, after all. So, after applying the Scarlet Red and letting it dry completely, I added dabs of Burgundy from the same glaze series (photo below, center) and, finally, dabs of Clementine, also from the Celebration glaze series (photo below, right).
 |
| Mask Waxed |
Next, I applied wax resist to all the areas of "pasta" and "sauce" to minimize the chances of their getting the other (much darker) stains and glazes on them. I tend to use the wax resist from the jug at a 1:4 ratio with water. Thicker wax resist is harder to apply precisely and takes a very long time to dry. Thinner wax resist can provide less protection if it isn't allowed to dry completely, so I often put my waxed pieces in front of a fan or under the heat vent in the basement (if the heat is on).
 |
| Mask Glazed |
Once the wax was completely dry, I applied a water-based Burnt Umber solution to the "meatballs" using a very small brush (the space was very tight, as I had applied "pasta" over some of the "meatballs") and, as much as I could, removed the excess using a damp sponge, a technique I have used to great effect on many of my "leaf"pieces for nearly 20 years. By taking even a bit of the stain or colorant off with the sponge, nuance is added to the piece, generally to positive effect.
 |
| Mask Glaze Fired |
After having waxed the "meatballs" and allowed the wax to completely set and dry, it was time to glaze the rest of the face. I had had Glazemixer.com make up some small batches of some glaze recipes I was given my my first pottery teacher, Gene Pluhar, including a glaze called Matte Black Brown. This glaze is actually intended to be used in a Cone 6 reduction environment (I fire Cone 6 oxidation) but I really liked the glaze's irregular pitted surface in my firing conditions and figured I might have a use for it at some time in the future. I thought it would be an effective finish for the "skin" on "Gluttony" as I wanted to convey the sense of having eaten to such excess that the image was irretrievably corrupted. Again, using a very small brush, I applied the glaze (rather thickly) over all exposed areas of the face. (I did miss one area, but I'm not telling where....)
I fired the piece on a four-hour cycle at Cone 6 on four stilts. I was delighted when I opened up the kiln and saw the final results. "Gluttony" was shaping up very nicely....


No comments:
Post a Comment