Wednesday, August 24, 2011

Sunflower Masks 3 - Seed

The first masks I made were actually a series of Medusas, again, influenced by my interest in Greek Mythology (and, probably, some transference/projection issues my therapist would rather not discuss; or maybe she would).  Anyway, I was absolutely clueless as to how to proceed once I'd had the first mold of my face done.  How to put the clay in the mold?  And did I have to prepare the mold in any way before introducing the clay?

For some reason, I thought I needed some kind of separating agent, not realizing the very porosity of the plaster mold would provide that for me.  So, in my ignorance, I sprayed Pam (yes, Pam) on the mold before I put in the clay.  This actually is a really bad idea, as it turns out, because the oil in the spray actually slows down the clay's drying process while contributing to the mold's degradation.  I have since learned that I don't need to do anything to the mold at all before I put any clay in to cast a face.

Separating agents aside, my first attempt to make a cast from a life cast was to take wads of clay and push them into the mold and try to get them to squish together.  This didn't work very well - or at least, not in the manner I had wished - as, when I pulled the clay out of the mold the nose (which was a separate piece of clay) became twisted out of plumb and, as I recall, came completely off the rest of the cast.  There were also crevasses between the individual wads of clay.

Although the piece did not look the way I had anticipated, I actually found it pretty interesting and used it for my first Medusa, adding three snake's heads to the piece and eventually raku firing it, glazing the face with Crackle White and the snakes with Copper Sand.  I later used an image of this piece for the postcard advertising my first show back in 1995.  So, although it didn't actually work as projected, the final project was pretty darned cool.

So, after much trial and error, here's how you create a good cast from a life mask mold.  Roll out a slab of clay that's about a quarter inch thick.  If you're using a slab roller with a piece of canvas, once you've rolled out the clay, pull back the canvas to loosen the clay, flip the canvas back, flip the whole thing over and pull back the other side of the canvas so the clay is not stuck to the canvas on either side.  Using the flat side of a metal kidney, gently scrap the slab's surface to remove any of the canvas pattern; regardless of how carefully you push the clay into the mold, this pattern will still be visible, whereas any marks from the kidney will not.  Cut a piece of clay of a size to fit the mold, keeping in mind the depth of the mold.  Carefully lifting the cut slab, lower it into the mold, gently forcing it into the plaster, paying particular attention to the nose, mouth, eyes and brow.  Use a sponge to work the clay into these areas.  If the clay cracks (this often happens around the edges of the nose and mouth), pull pieces from the remainder of the slab and carefully work in.  Work the clay all the way to the edges of the mold, finally cutting off the remainder (or not, depending on what you are doing).  Set the mold aside for the clay to dry somewhat.

Do not let the clay dry completely.  You want the clay to have dried enough to pull the clay cast from the mold without damaging it.  (It'll take some trial and error to get there.)  Once the clay is firm enough to work, trim it so it sits flush to a flat surface and put a hole in on either side about where the outer corners of the eyes are (to facilitate wire for hanging) and you're finally ready to assemble your piece.

This pair of masks represent the final of the first three designs I developed for my Clyties - I call it seed because I take small pieces of clay and roll them into ovoid forms to roughly mimic sunflower seeds.  I futzed around for some years before I figured out that, if I rolled out a slab of clay and used the same punch tool for every wad of clay, I could get fairly consistently-sized seeds.  (Yes, I am a genius....)  I like to arrange the seeds to emphasize facial masses - the brow, the line between nose and mouth, the curve of the chin.  I score the facial surface and brush with slip before applying the seeds.  Even so, some do come loose and I tend to make an on-the-spot decision as to whether they are still needed or not in the final composition.  Depending on where I am in the process, I may just use some vinegar slip to re-apply the loose seeds.  If the piece has already been bisque fired, a drop of glaze in the socket from where the seed came loose will remedy the problem.

Friday, August 19, 2011

Native Plants - Permutations and Combinations

I've been out in the garden working today, getting things as ready as I can for the Garden Tour tomorrow, and realized there's some pretty cool stuff going on right now, even though it's the end of the summer.  With over 100 species of native plants, as well as some traditional garden plants, some interesting combinations and permutations have evolved over the past few years.  You can see them all - and more - in the garden during the Garden Tour.

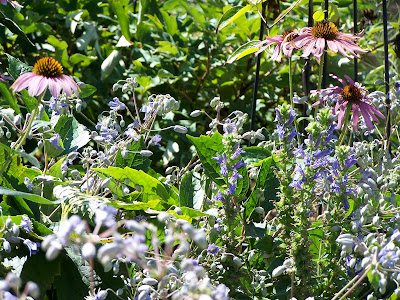
One of my favorite parts of my garden these days is in the front, near my neighbor's, Darryl Kelley, driveway.  A huge specimen of exotic (remember, "exotic" here means "not native"!) Clematis heraclifolia 'Mrs. Robert Brydon' grows there, partly through an obelisk, spilling over right to the edge of the driveway and the sidewalk.  Nearby are clumps of Echinacea purpurea (Purple Coneflower - also exotic, as it's native only to the southwestern corner of Michigan) and Lobelia syphilitica (Great Blue Lobelia).  I love how the Clematis spills through the Coneflower and Lobelia, knitting the diverse plants together into a beautiful tapestry.  I think it also helps that the texture and form of the Clematis and Echinacea leaves are very similar, so the various flowers really get to strut their stuff, from the clusters of tiny blue Clematis to the taller spikes of Blue Lobelia, punctuated by the pink daisy-like flowers of the Coneflower.  This is an excellent example of exotic and native plants can be successfully combined in any garden.

The best of the action is definitely going on in the back yard, though.  Just one vignette consists of all natives, a small section of which I was able to capture in another image this morning.  I think it's pretty interesting, as the season declines, that Mother Nature seems to dress herself in the purple of Asters (various species, now that they've decided our Asters are not actually Asters, although the plants still belong to the Asteracea family) and Ironweed (Vernonia spp.) and the yellow of Cup Plant (Silphium perfoliatum) and Rosinweed (S. integrifolium) and the Goldenrods (Solidago spp.) that are still coming along.  Pretty neat that these colors are complements on the color wheel, intensifying one another when in close juxtaposition.  Here it's Rosinweed and Ironweed (neither of which, in my opinion, are weedy at all!) topped by the delicate white flower spires of wandering of Wild Cucumber (Echinocystis lobata) - another neat combination.

I'm also liking some of the smaller stuff in the back, including Wild Petunia (Ruellia humilis) combined with some sort of exotic sedum and the foliage of Japanese Roof Iris (Iris tectorum alba).  The contrast in foliage texture and color is just great here, as the petite spires of the Wild Petunia rise above the sprawling sedum and the iris foliage (not as glaucus as German Iris (I. germanica)) contrasts in texture and color.  You can see the first of the Downy Sunflowers (Helianthus mollis) just to the back, adding its cheerful yellow to a composition otherwise dominated by cooler tones.

I had some avian visitors today - not the Baltimore Oriole (Icterus galbula) I saw a couple days ago but the Ruby-Throated Hummingbird (Archilochus colubris) was here this afternoon (the first I've seen it this season, although I'm sure it's been here before - and will hopefully return!) and a beautiful brilliantly-yellow male Gold Finch (Carduelis tristis - I wonder why it's "sad"?) was having a great time in the flowers of the Cut-leaf Coneflower (Rudbeckia laciniata).  I did get a photo of him (left) but it's pretty tough to capture a yellow bird in the middle of a bunch of yellow flowers in a bit of a breeze; I did my best!

I hope you can join us tomorrow to share in some of the wonders of my garden during this season!  Garden Tour is 10a-2p - hope to see you!


Farmbrook Designs - Custom Planters

Late last November I had the brilliant idea of hosting an Open House in my studio, inviting folks to sample the artwork of a number of local, Michigan-based artists, many of whom do work relating in some way to gardening.  One of the featured artists was my friend Chris Hopp, of Farmbrook Designs.

One of the folks who came to the Open House was my good friend Barb Radtke.  Barb, and her husband Ray, have been long-time pottery customers, having purchased a number of my flowers, which they have placed to great effect around the patio in the back of their house.  Barb and Ray eventually purchased a couple pieces from Chris, including a lantern and a fountain.

Like many artists, Chris has a series of pieces he produces on spec, including lanterns, some fountains, tables, benches, monoliths and, of course, many types of planters, small and large, including footed pieces.  Like many artists, Chris also does commission work, as he did my troughs and fountain over the past year or so.  Barb and Ray wanted two very tall, large hypertufa planters for their front porch, one quite rectilinear and the other egg-shaped and commissioned Chris to produce them.

It took Chris a while to work through the details.  I actually had the opportunity to see Chris's shop in recent trip to the Lansing area and the work that goes into making the molds for these types of pieces is significant.  Chris has to create different sections of each mold, keying them to fit together properly.  Seeing the pieces in the shop and hearing his explanation of the manner in which he made the sections gave me a fresh appreciation for the work Chris does; the guy could be an engineer, for goodness sake - and I guess he really is, when you get down to it.

These are images of the final pieces.  Apparently, Barb had the same response when she saw them as I did - WOW!  "WOW!" indeed.

Don't forget our Garden Tour, tomorrow, Saturday, August 20, 10a-2p!

Deluxe Sunflower - Pasta

As a potter, certainly one of the driving forces of my creative process is my interest in texture.  If you work with clay, you know that, unlike painting, for example, there's often nothing between your hand and the material; the tactile is key.  When I was first developing the designs for what are now my Deluxe Sunflowers several years ago, I came up with three applied textures; two of which, not surprisingly, were (and still) are extremely labor intensive.

Probably the most challenging design technically is what I call my "Pasta" texture, as it reminds me of really fine spaghetti, cut short and applied on end to the center of the sunflower.  My usual process with these pieces is to drape a slab over the mold to create the raised center for the flower and either apply the petals and then the texture (as with my Bubbles design) or apply  the texture and then the petals (as with "String Theory); in either case, the goal is to make sure there is no "gap" between the petals and where the center starts.  The decision as to the order of work has to do with the manner in which the texture is applied.  As with all the sunflowers, they are taken off the mold when sufficiently dried to remain rigid but permit final steps to allow hanging (holes made to allow wire) and/or staking (in the case of the larger pieces, a clay socket to take a copper plumber's fitting; for the smaller pieces, a hole and a socket to take a 1/4" steel stake).

With the "Pasta" design, it didn't work to apply the texture before it came off the mold.  (Believe me - I tried it that way; good thing greenware is recyclable!)  The surface is simply too delicate - made up of thousands of tiny tubes of clay - to take the weight of supporting the piece as it's flipped over and holes made and the clay socket applied.  The solution with this piece (I can get away with the usual order of work in the smaller pieces, as my large hands can span the sunflower's center and support it with the petals resting on my) was to lay the slab center and add the petals, then let it dry as usual.  When it was sufficiently dried to retain its shape (with some pressure), I remove it from the mold, add the holes and clay socket, flip it back over onto a large kiln shelf, then apply the center.  Which consists of loading my Klay Gun (which has a fine screen as the die) with numerous large coils of clay and extruding 1/2-3/4" bundles of clay and applying each bundle to the center, over and over and over again, until it is filled in.  The piece is then let dry and fired as usual.

Glazing is also a bit different with this design.  First, to make sure the extrusions are about the same height to make for a more consistent surface (and one less prone to damage later in life), I take a3" kiln post and rake it side-on across the center surface to break off any excessively tall pieces of clay.  Because of the high level of surface area of the extruded texture, the center is capable of absorbing a significant amount of water but takes forever to dry.  I'll rinse the piece off to remove and dust and minimize glaze absorption but I have to let it dry out quite a lot.  then I apply the glaze for the center, Amaco Potter's Choice Temmoku, blotting it in to get the glaze between and in all around the texture.  The glaze can run as the clay becomes saturated, so I take a long break between the first and second coats.  Once the center is completely dry after the second coat of glaze, I apply wax resist.  Then I glaze the petals.

I chose Amaco Potter's Choice Shino for this piece.  I have had a hard time getting this glaze to mix up in the bucket for me; it settles out into this immovable viscous mass in the bottom of the bucket.  What I've started to do is pull up some of that material out of the bucket, put it into a recycled yoghurt container and add some of the more fluid material.  I can more easily mix small quantities of the glaze.  I then apply by brush, dabbing rather than brushing.  The glaze gets an interesting cratered appearance with this technique, which really sets this design apart from the other pieces in the series.

Don't forget about our Garden Tour, tomorrow, Saturday, August 20, 10a-2p; see a garden bursting with native plants and clematis in bloom, as well as a selection of garden art (including this sunflower, if you want!) and locally-made refreshments.  See you there!

Thursday, August 18, 2011

Native Plants - Little Gems

Ruellia humilis (Wild Petunia)
Don's been hard at work again, shooting some outstanding images of native plants from the garden, which is looking downright amazing right now.  I know a lot of folks struggle this time of year to have something interesting to look at in their gardens but mine little private paradise is positively bursting with beauty, from the giants (Vernonia missourica, Silphium perfoliatium and S. integrifolium, Helianthius giganteus and Rudbeckia laciniata, to name just a few!) to the tiniest gems tickling their feet.

Ruellia humilis (Wild Petunia) is such a gem, a delicate lavender flower, each of which lasts only one day.  I purchased these plants from my friend Trish last year and they did flower a bit, but only a few and always one at a time.  This year was a bit challenging, as my resident bunny (who may have moved on, but we're still not sure - he or she certainly did have an eclectic palate, and plenty of opportunity to try lots of tasty tidbits in my yard!) thought these were a nice salad green early in the year.  Maybe the rogue pruning did it some good because it is blooming like gangbusters right now, and has been for a few weeks.  This is a smallish plant, rather prone to the ground with flowering stems that do rise from the basal foliage.  As the flowers fade, they just fall off the plant, so it maintains a tidy appearance.  It looks great near my purply-green-foliaged short sedum and my Blue-eyed Grass (Sisyrinchium angustifolium), making a nice contrast of glaucus foliage, even when most of the composition isn't even in flower.

 Pearly Everlasting (Anaphalis margaritacea)
One of my goals in creating a haven of native plants has been to provide nectar and host plants for our butterflies.  Obviously, I'd love to have lots of the charismatic species coming through - the Monarchs and Swallowtails - but I'm also interested in providing for the less... prestigious species.  One such is the American Lady butterfly (Vanessa virginiensis).  The larvae for this butterfly are pretty interesting - all spiky black and orange - and very messy - they weave little webby nests to protect themselves while feeding.  They also host on a range of plants, including Pussytoes (Antennaria neglecta), Sweet Everlasting (Pseudognaphalium obtusifolium) and Pearly Everlasting (Anaphalis margaritacea).  All are characterized by pale green foliage with lots of white fuzzy hairs but otherwise vary rather widely in habit - Pussytoes (perennial) is quite prone to the ground while Sweet Everlasting (annual or biennial) is quite tall as it matures, over 18 inches.  Pearly Everlasting (perennial) comes in right in the middle.  I received my colony of these plants from my friend Michelle Wysocki when I visited her earlier this year.  It's settled in very nicely in the ensuing months.  A word to the wise:  Although butterfly larvae may seem to decimate your plants, fear not:  They have evolved the ability to rebound completely after having been eaten to the ground!

Monkey Flower (Mimulus ringens)
There is a subsection of my garden I refer to as my "Zoo Garden", an idea I've borrowed from my friend Trish.  She has a playhouse for her girls (now all grown up) on her property where she put in a garden of plants with animal names, many of which are actually native plants - Turtlehead (Chelone glabra), Cardinal Flower (Lobelia cardinalis), Dotted Horsemint (Monarda punctata), Pussytoes (Antennaria neglecta); I used to have Goat's Rue (Tephrosia virginiana) and hope to have it again some day.  One of my favorites in my "zoo" is Monkey Flower (Mimulus ringens), so called because the flowers look a bit like a monkey's face, or so I'm told.  This, like Turtlehead and Cardinal Flower (funny how that works), likes  it on the moister side, so I keep all of these guys on the side of my garden that does not get quite as much burning hot sun and, by keeping them all together, it's easier for me to water them when necessary.  Like the Wild Petunia, this plant went in last year, from a single pot I purchased from Val and her friends at the Wild Ones booth at the Marshall Area Garden Tour in 2010.  This Spring, when transplanting, I was able to divide that one clump into nine or ten individual plants, making a nice little mass in the garden.  The plant sends up tallish flower spikes which can flop a bit - but then seem to do OK with a bit of staking, if you're so inclined.  I'm hoping to be able to share in 2012 or '13!

Eastern Prickly Pear (Opuntia humifusa)
Finally, I wanted to share what is probably a plant oddity for most folks in this part of the country.  I know most of us associate cacti to the desert Southwest of North America, but there is a member of the cactus family native to the Upper Midwest, the Eastern Prickly Pear (Opuntia humifusa).  I received my first few pads from my friend (and former gardening associate) Andrew Lathrup.  For some reason, the squirrels thought they would be good to eat, or bury, or something, but would - shortly - decide such was not the case.  Meanwhile, the damage was pretty much done; maybe one little pad survived from that attempt.  I was able to augment the plant later that year with a gift from my friend Karen Bovio of Specialty Growers of Howell, Michigan.  As The plant grows, it sends out new pads, which include all of the thorns the mature pad will possess; in fact, it was difficult for me, at first, to tell what was a pad and not a flower bud.  Now, two years later, the cactus flowered for the first time with seven flowers, each of which did not last even a whole day.  They usually open in the late morning and are closing as the sun begins its decline.  This made it quite a challenge for Don to get a picture - lots of last-minute e-mails and phone calls on this one!  We finally got our selves coordinated and managed to capture the sixth flower.  This plant does bear edible fruit but I don't think any of mine were pollinated.  Maybe next year!

All photos by Don Schulte of Notable Greetings, notablegreetings.com.

Wednesday, August 17, 2011

Fancy Sunflowers 3

In preparation for our upcoming Garden Tour and other events coming up on the horizon, I've been splitting my time between the gardens and the studio - not always easy, having two taskmasters (not to mention the four cats!)  Monday was spent getting the front garden looking pretty darned presentable; yesterday it was mostly in the studio, trying to get caught up, cleaned up and basically getting into that creative zone.

Some of the work I've been doing is finishing glazing some more Fancy Sunflowers - I've a bunch of Deluxe Toadstools I need to fire up but they won't fill a load; these will help with that.   I'm actually glazing up quite a few using one of my (and my students', actually) favorite glazes, Lustrous Jade.  As with many of the other glazes I've been using for this series of pieces, Lustrous Jade does a great job of breaking over the edges which are so much a part of these designs.  Actually, the first Fancy Sunflower I did was a Ginormous Lustrous Jade piece, just like the one in the picture at top left. I had fabricated two Ginormous Sunflowers, one with a bubblewrap center, the other using a circular woven pandanus trivet I had found at Pier 1.  Having made them and knowing I wanted to take a new direction, I talked with my friend Tim Hanks about glazing options.  He encouraged me to use the Lustrous Jade glaze, so I did.  I actually like this center texture quite a lot, as it is reminiscent of the center of an actual sunflower, with the fractal arrangement of seeds.  I also use it in my Original Sunflowers with a praeseodymium yellow Mason Stain on the petals.  Both finishes look great for this design.  I made an extra-special Ginormous Fancy Sunflower with four rows of petals in this design for my living room, along with

Some years ago,  rendezvous-ed with my friend Kathy Evans down in Southgate.  I had a bad cold (caught in a storm spun off by Tropical Storm Ivan) and had to speak at Ray Hunter Garden Center and Kathy was going to meet me to pick up some pottery.  We decided to get Japanese at Black Pine there on Eureka road but they weren't open yet, so we did the obvious thing:  Found a Salvation Army resale store and trawl the aisles.  Kathy was looking for a shallow dish to use as a bird bath and found it in the orphan "chip" portion of a chip-and-dip.  The cool thing about it was the bottom was molded to look like a big, huge hydrangea flower head.  I asked if I could borrow it, to which she consented, and made a mold of it to use for my sunflowers.  For my Original Sunflowers, I use a red Mason Stain; for this series, I thought Chun Plum was the obvious choice to evoke the intense colors often found in these plants.  I made extra-special Ginormous Fancy Sunflowers with four rows of petals in this design, as well as the Jade and Indigo, for my living room; they make an impressive composition.  (P.S.  We did finally get back to Black Pine and had a great meal of Special Miso, Edamame, Veggie Tempura and Green Tea; I went right home, slept like a log - in spite of the tea! - and felt much better the next day.)

The one piece in this series which does not use an Amaco's Potter's Choice glaze instead uses a glaze that was given to me by my first pottery teacher, Gene Pluhar.  Dark Slate was one of my favorite glazes while taking classes with Gene and it continues to be a consistent performer for my oeuvre, mostly because it breaks a good brown where it goes thin but has an amazing greeny-blue people just love where it pools; it's a good fit for the other blue/green/purple colors in this series, making it excellent for mixing and matching pieces for a larger composition.  The center on this piece is actually from another kitchen serving piece, a plastic tray I was given by my Godmother, Aunt Nancy, for Christmas a thousand years ago.  I actually get quite a bit of use out of this tray, in the studio now, carrying stuff to and from the garage where the kilns are located.  The coolest thing about it, though, is the bottom - which looks like zebra striping.  I made a plaster cast of it as well, which I use to apply texture to the petals of my poppy and dogwood pieces, as well as for the centers of some of my sunflowers.  I think of my Aunt Nancy every time I use the tray, as well as whenever I see these pieces, which is a good thing.

The final piece in this series uses Amaco Potter's Choice Vert Lustre, a relatively new formula in that range of glazes.  The glaze has a good, deep green with some lustrous mottling which is especially noticeable on larger pieces or pieces with a good deal of texture.  The key with this glaze, or with any of these glazes on these pieces, is to dip or pour if possible; brushing - even the three coats recommended - is not going to get the consistent application you need and the glaze can only move around so much when it hits viscosity in the kiln.  I experimented with this glaze, both brushing and dipping/pouring and the results definitely came down on the side of the latter.

Although it's tough to tell in this image, the center is taken from a metal grid that has regularly-placed square holes; so, when the clay slab is slapped down on it, you get a grid-like series of square projections.  It makes for an oddly-machined look which is mitigated by the overall organic quality of the design, a dichotomy I find interesting and appealing for both my left and right brain.  The juxtaposition of the very regular form of the center and the organic placement and manipulation of each individual petal creates a tension between logic and creativity, basically a metaphor for my daily existence....

Garden Tour - More Bird Homes By Tim

Don't forget about our upcoming Garden Tour, this Saturday, August 20, 10a-2p.  We'll be featuring a garden chock full of amazing, blooming native plants and Clematis, the work of Michigan-based garden artists and some delicious locally-prepared refreshments as well!

Wren House
I wanted to take some time to share some more about the work of my friend and fellow artist Tim Hanks, one of the artists who will be featured at our Garden Tour this coming Saturday.  I've written about his work before but wanted to "fill in the gaps" about Tim's background, vision and current path.

Tim is formally educated as an artist, with a Fine Arts degree from Wayne State University.  I can say without any hesitation and complete conviction that Tim loves birds, especially songbirds.  I can mimic a couple bird calls but Tim far outstrips me, reflecting a life-long interest, an interest channeled into a desire to make the world a better place for songbirds by creating beautiful, one-of-a-kind bird houses designed to the most exacting specifications.

Unlike many of the shoddily-made, mass produced (I won't even mention country of origin here) bird houses available at most mass-marketers, Tim's creations are constructed of top-grade California redwood.  He uses stainless steel finishing nails to ensure the houses' long-term performance.  And he incorporates refurbished antique hardware - much of it brass - which he has painstakingly collected, conserved and preserved.  Time also treats the surface of the wood with a safe, non-toxic, natural oil to enhance its natural luster and grain, as well as to create and maintain a water-resistant surface.

In line with specifications established by the Cornell Lab of Ornithology (great organization - join today!), the entrance holes in Tim's creations are 1-1/8" and 1-1/4", allowing access for a variety of cavity-nesting birds, including Chickadees (one of my favorites); he also makes homes with 1-1/2" entrance holes suitable for Eastern Blue Birds.  The antique metal escutcheons and other hardware framing the entrances are not only decorative - they also provide protection from larger avian invaders and possible predators, who are unable to make their way through the small entrance or make it any larger.
Tim's Feline Supervisor-in-Charge, Jack

Each Bird Home is equipped with mounting hardware for ease of installation.  (I know this.  The hardest part of installing my new Bird Home was getting out the ladder and pruning the dead wood out of my yew; once we did that, all we needed was a strategically-placed screw, and voila!)  As would any artist, Tim signs and dates every piece with a burning stylus.  Although he works as efficiently as possible, with Tim's attention to detail, the time required to create these unique works of art varies from piece to piece; regardless, he takes the time to make sure each piece is meticulously designed for maximum utility as well as reflecting a timeless beauty.

(When Tim sent me these images of recent work a couple weeks ago, I was especially grateful to see the image of his most ardent and severe critic, Jack, the company's Feline Supervisor-in-Charge.  And although Jack is not always impressed with Tim's work - perhaps due to the sophisticated security measure built into each Bird Home,  you can be certain that quality standards are always rigorously enforced with his ongoing oversight.  At least I'm not alone with my crew of Feline Managers!)

Tim's life-long appreciation for nature, an ongoing inspiration for his music and art, is exquisitely reflected in every Bird Home by Tim.

Wednesday, August 3, 2011

Sunflower Masks 2 - Pasta

The life mask process is not a complicated one, but it does require some practice.  I first learned how to do it from my old friend Tim Mason (Tim, where are you?) while at MSU doing a sculpture project involving lost wax casting.  It can be a pretty fun process.  First, the victim - um, subject - pulls his or her hair back from the face and holds in it in place with a bandana/shower cap/etc.  Then, a good coat of vaseline is applied to all areas of the face, paying special attention to any facial hair - eyebrows, eyelashes, hairline, mustaches, beard.  I take a disposable plastic straw, cut it in half and apply some of that blue putty-like stuff used to adhere posters to the wall to one end of each half so it won't be so sharp; these are inserted into each nostril to facilitate breathing.  I cut a collar out of corrugated cardboard to fit snugly around the head so the plaster doesn't slip down during the process.  Then I lay the subject down on a pillow covered with some plastic garbage bags (easier cleanup) so the head is level, not tilted forward or back.  We agree on a thumbs up/thumbs down signal system, I mix the plaster and apply, focusing, while the plaster is most plastic, on the main features of the face and working outward.  Remember - eyes closed!

The key here is to pat the plaster into place, not rub it as rubbing can cause the plaster to crack.  Once the plaster has been applied, it takes 10-15 minutes to set, during which time it gets rather warm due to the chemical reaction between the water and chemicals in the plaster.  Once it has set sufficiently, I work with the subject to carefully remove the mold; then escort him/her to the kitchen sink, where I've arranged soap, washcloth(s) and hand towels to clean up as much as possible.  The mold should be allowed to cure for a week before using.

What I find really interesting about these pieces is that they can look so different, even though they are all made from the same molds; I have actually had people, when looking at two pieces pulled from the same mold, assert that they are not the same person.  I specifically chose Jose and Tia because their features are in perfect proportion to one another:  Jose's full lips are balanced by a unique aquiline nose (helped along by a brief stint as a bouncer), deeply-set eyes and a strong brow; Tia's delicate mouth and eyes are in perfect proportion to her nose and gentle brow (I often say that there are women who pay big bucks for the bone structure with which Tia was born).  Jose's masculinity enhances Tia's femininity, as her delicacy emphasizes his strength.

For these particular pieces, I applied the petals and then used my mini-extruder/Klay Gun to extrude small sections of clay which I then applied end-on to the desired area of the mask.  My intention was to evoke the stamens of the sunflower's central disk flowers.  As with all the other sunflower faces, I use a Burnt Umber wash for the face, then used, in this case, Mason Stain 6100 (Woodland) for the petals, suggesting some of the darker sunflower cultivars including 'Velvet Queen'.  

Tuesday, August 2, 2011

Farmbrook Designs - Fountain

The addition of a fountain, depending on its design, can genuinely enhance your garden space, not just for you but for native birds, insects and other creatures.

My friend Chris Hopp, of Farmbrook Designs, does some beautiful fountains, including millstone, ball, birdbath and urn fountains.  I had known for a while that I wanted to have one of Chris's fountains but I didn't know which one; more importantly, I wasn't sure where I wanted to place it for maximum benefit in the garden.

I solved the first issue at the Franklin Garden Tour in 2010.  I was next to Chris and he had with him a gorgeous fountain design his Mom, Glenda, had done using a five-gallon plastic bucket as a mold.  After removing the hypertufa from the mold, Glenda had cut into it using a flat chisel, making an irregular surface over which the water would break in an ever-changing pattern.  I was - quite literally - mesmerized by the play of light over the water, as well as the soothing sounds as it bubbled up out of the fountain and spilled over the side.  I asked that it be adapted to have a shallow basin in which the water could pool (Chris has what he calls his "Bird Bath Fountain" which has this very same feature) so the birds could enjoy it as well.

I finally figured out the location issue this Spring.  I had toyed with placing it in the back of the garden, near the bench under the yew tree; and I may still do that.  I decided, however, that by placing it near the front of the back yard, near the seating area and my bedroom window, I could enjoy it as much as possible.

So, the same day Chris delivered my two large troughs, he also delivered the fountain.  I was expecting the same five-gallon-bucket size, but he had outdone himself (he tends to do that fairly consistently, truth be told):  this fountain was huge!

These large fountains come with a large basin which is sunk into the ground, with a plastic insert through which the pump (included) is fed.  The fountain itself rests on a support under the insert and Chris puts a layer of screening (to minimize debris) between the plastic insert and the fountain, which is then covered by decorative rock.  Chris installed the entire piece, digging out the space for the basin and assembling everything for me that day.  We finished up the piece with black river rock.

I do have to watch to make sure the water doesn't get too low, especially if we have a run of really hot days.  For the first few days, the water ran brown due to the peat moss in the hypertufa mixture.  Now it's taken on a nice greenish cast from a bit of slow-growing algae; Chris has suggested we put a bit of bleach in the water to clean that up but I don't want to do that because the birds wouldn't like that one bit.

Because the birds love the fountain!  I have tons of Robins and (unfortunately) Cowbirds bathing in the fountain and the other day a beautiful male Gold Finch paused for a brief drink.  And my kitty Rameses has taken to hanging out in the bedroom on those days which are cool enough to have the windows open - he loves the sound of the water for his daily series of naps - as do I, when I have trouble sleeping at night.

Come to our Garden Tour on August 20, 2011, 10a-2p and see more of Chris's beautiful work, as well as a brief planting demonstration!

Monday, August 1, 2011

Deluxe Sunflower - String Theory

As a potter and gardener, I'm a pretty tactile person - my eyes and my hands are the most important sensory receptors I've got going.  And, I get a bit... obsessive (hey, at least I'm honest about it!) about discovering or creating new textures, whether for my original sunflowers or for my newer creations.

As I've said before, I developed my Deluxe Sunflowers as an exercise in applying clay in its various forms to the flowers' centers to create new textures.  In this case, I used my little mini-extruder/Klay Gun (a Kemper tool) to create this texture.  For this design, I laid the slab of clay over the mold, scored and slipped the entire surface and just started feeding pieces of clay into the extruder and pushing it out through the selected die, one which had a whole bunch of holes in it, and applying to the top of the humped slab (leaving the lower inch or so clear for the petals).  My goal was to create a highly irregular, stringy texture.  Once I covered the entire desired surface with a fairly consistent layer of extruded clay, I then continued on with typical sunflower fabrication, applying the individual petals in sequence.

Glazing these big pieces is quite a challenge, both because of their linear dimensions and their sheer weight.  I obviously cannot dip them in a five-gallon glaze bucket (even the "medium" sunflowers are a tight fit, let alone Large, Extra-Large or Ginormous).  I've been pouring glaze, using a 2oz. restaurant ladle, over the petals after I've glazed and wax-resisted the centers.  I had been glazing the underside (even though it's not usually visible, if I'm thorough I don't miss areas that can be distracting to me or the final purchaser) first, pouring with the ladle, and then flipping the piece over and pouring onto the top, following up with a glaze-loaded brush to touch up.  With this process, I'd end up with a lot of glaze on the piece, which could run and make a bit of a mess in the kiln.

While recently glazing a number of similarly-sized pieces, I changed my glazing tactics, pouring the glaze on the top side of the petals, then using a broad brush to touch up the back to get minimal coverage.  I'm using less glaze plus having less of a mess in the kiln.  Also, I had previously been using tripod stilts, which were actually difficult to space successfully and, if not done properly, could buckle under the weight of these bigger pieces; in this most recent load, I used bar stilts, which were much more effective in terms of placement and load bearing with no failures.

Just goes to show that I never stop learning!

Bird Homes by Tim - Cheryl's Bird House

Anyone who knows me at all knows that, once I find something I like and value, I won't settle.  (This is part of the reason I'm still single....)  If I can't afford what I want, I'll wait and save up until I can.  This was the case with my friend Tim's bird houses.  I had seen his work for a few years but the budget just didn't really permit the investment rightly required.  So, when I finally could afford the investment in a fine bird home, I made the drive to his home/studio, where I spent a lovely visit with Tim, his wife Barb, their cat Jack and the various Love Birds (sorry guys, I can't remember your names).

Tim had thoughtfully rigged up a display in his garage just for me to view all his available pieces so I could choose the one I wanted.  This was difficult.  Nearly impossible.  So, I worked backward, so to speak, eliminating those that were least desirable; not easy, by any means, but easier.  Tim did his best to help me out by describing the materials used, the decision-making process that had gone into the composition of each bird house.  He shared his knowledge about design, process, style, materials, from the periods to which a particular piece of hardware belonged, where or how he had come by it, how it had influenced his creative decisions, basically sharing a biography of each piece, as if each were a person and not an inanimate object intended to house a family of birds.

I finally settled on a fairly austere design featuring fittings made of marine brass, a type of brass typified by higher content of copper, giving it a rosier color than most conventional brass.  As it was the end of September, he agreed to help me hang it the next Spring, in time for my first garden tour; in the meantime it would be kept in storage in my basement.

This Spring, Tim came over and we conferred as to where the house should be placed.  The types of birds it is intended to attract (cavity nesters, including chickadees) have specific criteria:  the house should be at least 10 feet above ground; there should be no other houses within 50 feet; and any bird feeders or bird baths should be 25 feet away.  (These criteria are based on studies of native songbirds.)  I only have one tree of sufficient size in my back yard, my yew (which is the only plant that remains of those that were on the property when I moved in), so we decided to hang it in there.  (Tim was concerned because the bird house I got from my friend Marie was in the tree as well - less than 50 feet away - but I said this way the birds could choose.)  I got up on the ladder and pruned out some dead branches; then Tim got up and set a screw in the tree and hung the bird house.  I haven't seen any indications of residency but I'm keeping my fingers crossed!

Sunflower Masks 1 - Cake

Not everyone knows that I'm actually educated as an Art Historian and Archaeologist - a Bachelor's Degree from Michigan State and a Masters of Arts from Cornell, where I was actually in the PhD program.  Why does this matter?  Well, when I first started doing ceramics with Gene Pluhar, I was still thinking I was trying to do a dissertation on my chosen topic (griffin-head protomes, for those who want to know) and so very much "in" my field of study.  I had been deeply interested in Greek mythology for much of my life (avidly reading Edith Hamilton's book cooling off by the Windmill Pointe Park pool during childhood summers), an interest which translated well to a program in any discipline relating to Classical Studies.  So, when I started working on masks, some of the stories from that body of work (especially those that fed Ovid's Metamorphoses) seemed good fodder.  I experimented with images of the Furies, the Graces, the Fates, Arachne, Medusa (which resulted in a very successful multimedia piece) and Clytie.

Who was Clytie?  Clytie was a nymph and good friend of Daphne, both of whom knew Apollo.  Unlike Daphne, she actually thought Apollo was pretty cool and let him know as much, even though he chased anything in a chiton; but Apollo wasn't interested in Clytie, probably because, well, because she was actually interested in him and he was more interested in women who weren't interested in him and who would go to great lengths to get away from him (something about "the chase" I'm told) - Daphne turned in to a tree, for example.  Anyway, Apollo said, "No thanks."  But poor Clytie was severely co-dependent (she probably came from a dysfunctional family; you know the type) and wouldn't give up; instead of benefiting from some individual or group psychotherapy or some prescription medication, she sat herself on a hill for nine days, subsisting solely on the morning dew, watching the Chariot of the Sun cross the sky on its daily route.  (Yes, in our day and age, this would be stalking and Apollo would take out a PPO against her.)  In the end, she turned into a flower that follows the sun, our most common modern interpretation being the sunflower, which did not exist in the ancient old world.

I created my first Clytie in time for my first show back in 1995, where she was part of the "Girls Gone Wrong" wall, along with Arachne and Medusa (talk about a girl gone wrong!)  I started out using my own face, of which I had a mold, but while I was working at Honigman Miller (don't ask!), I met my friend Tia Nero, and asked her to be my Sunflower Girl.  I had gotten the mold for the male mask some years previously when my friend Jeanne Galloway's stockbroker, Jose Vasquez, consented to be our victim.

For this pair of masks, one of six designs I've developed for this series, I used a cake tip and slip to apply rosettes of clay to the surface that would look somewhat like the disk flowers on a sunflower.  I use red iron oxide (RIO) precipitate for the petals.  This is applied in the same manner as the Mason Stains, although I don't wipe off any access.  (This stuff really stains, so try not to spill!)  The RIO gives the clay an interesting bluish metallic quality many folks find interesting and is one of the more popular for my sunflower pieces.