Friday, January 24, 2014

Fall(ing) Leaves II: Menispermum canadense (Moonseed Vine)

The first time I saw this plant in my friend Trish Hacker-Hennig's nursery, I was just enchanted with how the beautifully-shaped shallowly-lobed leaves cascaded over one another to create a lovely green curtain. I learned about this plant - a little-known native vine - Menispermum canadense, or Moonseed vine - and met it for the first time at her native plant nursery in Ortonville, Michigan. I'm always asking Trish about new plants I could include in my garden; when I saw this vine, I knew I had to see if I could grow it and exactly where it would go in my garden - on a sunflower-themed trellis near my rain garden. I added it to my garden in 2012 and, by 2013, it was more than living up to my expectations.

This is a perennial woody vine that tops out around 18-19 feet. It can  travel via stolons, colonizing other parts of your garden, but has not done so obnoxiously in my yard. Unlike grape, it does not have tendrils but clings by winding around supports; the vine has been able to "reach" from the trellis on which I trained it across short distances to wind itself around other nearby structures. I have not yet seen any flowers on my specimen, but that could be because it hasn't matured enough to make the investment in fruit and flowers. The plant's common name comes from its crescent-moon-shaped seeds. All parts of the plant are toxic to humans. I need to do more research but I'm wondering if, like Parthenocissus quinquefolia (Virginia Creeper), it is toxic to mammals but edible for birds. (I suspect there is something that can eat the fruit to aid in seed dispersal but I haven't been able to find any information on that as yet.)

The most interesting thing to me about the leaves is how the stem actually attaches to the mid-green leaf's underside at a point slightly inside the leaf margin. The main veins radiate out from that point. The prominent veins translate well to this medium, making a distinct impression in the clay. The lobed form is quite popular - I believe because it is reminiscent of most maple leaves.

When I first started observing the plant, I immediately associated it with a glaze with which I had just started experimenting - Arctic Blue, from Amaco's Potters Choice series. Like the Indigo Float glaze from the same series, Arctic Blue has a lot of green in it, although it is much lighter than Indigo Float. I immediately thought to pair it with my proprietary Mason Stain mixture - 50% Titanium Stain and 50% Green-Ivy Stain - for a recipe I refer to as "Spring Green". This stain really works well with the green undertones in the glaze.

I have been able to reuse these leaves to a certain extent but it is best to pick them fresh; they can be then be rehydrated for multiple use.

The Process
Once I've harvested the leaves, the first step is to roll out a slab of clay that's about 1/4" thick. I follow my usual procedure of rolling out the slab, pulling back the canvas to loosen the clay, folding the canvas back and flipping over the slab and canvas, pulling back the other side of the canvas to begin working on the clay. I use the flat edge of a metal kidney to "scrape away" the canvas texture (if you don't do this, you will not get as clear an impression of the leaf's veins, which can be critical with species with more subtle texture). I finish removing the texture by running the rolling pin over the slab. Now I'm ready to place the leaves for the next step.

Saturday, November 23, 2013

South Bend and Beyond

Had a wonderful trip to South Bend, Indiana, and other locations Thursday and Friday.

Dropped off work to CircaArts Gallery in South Bend, where I met Kathy, the owner, and her supervisor, Zoe the long-haired black-and-white kitty, who gave me a much needed feline fix and seemed to approve of me; you can see a picture of her overseeing Christmas decorating on their Facebook page. Then it was up to South Haven, Michigan, and a stop at the South Haven Center for the Arts, where I met young Phoenix, a young all-black lady (about four months old) who loved to stand up on my shoulders and lean into my head as she looked out the window - another much appreciated feline fix.

Then I headed toward Kalamazoo where I stopped at Hidden Savanna Native Plant Nursery to see my friend Chad and pick up some American Beech, Dwark Chinkapin Oak, Black Oak and Sassafras leaves with the help of his four-year-old son, Henrik. Then I dropped work off at Nature Connection Kalamazoo with my friend Laurie Russell, stopped at the Expo Center to visit with my friend Cleve Hayes of Puddingstone Farms, then finally to my friends' Bob and Julie to for some great food, great talk and a very comfortable bed.

Friday I "did" Ann Arbor (as much as I "do" Ann Arbor), with stops at Rovin Ceramics for 500 pounds of clay, my friend Carol's to share some pottery with her (where I met her Siamese Saatchi, who is the first cat to remind me of my trans-species soulmate, Gus), the The Ann Arbor Art Center to drop off work with Amy and meet Nathan, picking up some more Cherry Republic Barbeque Sauce and seeing my friend Jill and replenishing my stock of 18-year-old Balsamic Vinegar and Fused Meyer Lemon Olive Oil at Fustini's Oils and Vinegars. A good trip!

Tuesday, October 15, 2013

Fall(ing) Leaves I: Tilia americana (Basswood)

Tilia americana (Basswood)
It's been over five months since I last posted and a lot has been going on. I may get to all of that but I decided that perhaps the best way to get back to posting routinely might be to do some short posts on recent, seasonally-appropriate work - sort of easing myself back into the saddle.

Considering that we're well into Autumn now, I thought I'd "crib" from my Facebook page and do a series of posts on "Fall(ing) Leaves". with some photos of some leaves I've done as well as some information about the plants they represent.

We're going to start off with Tilia americana, American Linden or Basswood. This is the native relative to the oft-seen Little-leaf Linden, or Tilia cordata. This species favors moist woods - nearby they can be found at the Environmental Interpretive Center at U of M Dearborn. Shorter than the European species, they top out at about 80 feet and have the broadly columnar form common to the genus.

They are among the latest blooming of our native tree species and are often referred to as "bee trees" for their fragrant, nectar-rich flowers, which hang pendulously to protect the precious nectar from being washed away by early summer storms. The flowers and the rounded, woody, pale gray-green nut-like fruit are joined to a pale green bract. The dark green leaves (paler underneath) are broadly ovate to cordate (heart-shaped) with serrated margins and are, at six inches in diameter, twice the size of the European species.

I collect most of the leaves I use, although there have been occasions when folks have generously "donated" leaves, which I always appreciate. Some leaves need to be used fresh, while others can not only be re-hydrated but even reused (oaks are especially resilient). Basswood leaves are on the delicate side, so I try to use them before they dry out.

There's a great deal of synchrony in my work in that I strongly associate certain colors - both stains and glazes - with certain types of leaves. I'm also constrained in my choices by a limited range of stain colors - especially as my (somewhat rigorous) aesthetic requires that I use stain colors that are somewhat close to a color the leaf would be at some point in its annual cycle. Because these leaves are relatively dark, I decided to use my Green - Peacock Mason Stain and combine it with Amaco's Potter's Choice Blue Rutile. The combination has been very popular - these leaves generally walk out the door.

Monday, May 6, 2013

2013 Annual Spring Garden Tour


Saturday, June 1, 2013, 10:00am-2:00pm

Free and open to the public!

The Gardens. Cheryl's life-long love of Clematis and more recent obsession with native plants are both immediately apparent as you arrive at the property.  Designed as an educational space rather than a design show-stopper, the gardens include dozens of Clematis, representing over 10 species as well as large-flowering hybrids, and over 200 species of native plants, ranging from Spring ephemerals to large trees - all nestled in a typical 40x120 urban lot in the heart of the Motor City.  Become acquainted with some of the lesser-known small-flowering species Clematis varieties and the beauties of our native flora, as well as cost-effective sustainable gardening strategies.

Cheryl's garden was featured in the July 2009 issue of Michigan Gardener and she penned the first article on native plants to appear in that publication, in May 2012, as well as her most recent article on Clematis which appeared in that publication's April 2013 issue. She has another article on natives slated for 2014.

Everything Else.  We also feature local garden art, live music and refreshments, as well as two hands-on workshops. Last year's Hypertufa Planter Workshop, led by Chris Hopp of Farmbrook Designs, was a huge success, so we'll be offering it again. Guests will also have the opportunity to work with local artist Christine Laikind to create a unique botanical monoprint using materials from the gardens. (There is a charge for the workshops. The rest of the event is free and open to the public.)

The 2012 Summer Garden Tour was a great party, with over 100 folks enjoying the gardens, art and entertainment - we hope you can join us to make this event even more fun and exciting.

All events are at 3903 Grayton St., Detroit, MI 48224. Contact Cheryl at cenglish@blackcatpottery.com for additional information about the workshops. Register online using the buttons to the left.

Friday, April 12, 2013

Garden Show at Midtown Gallery, Kalamazoo

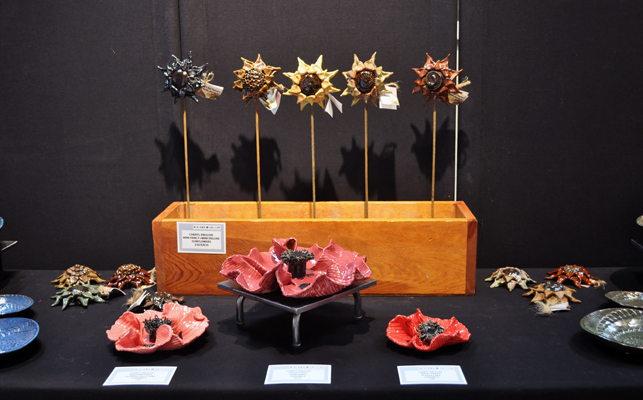
Finally got some pictures of my work on exhibit for the Garden Show at Midtown Gallery, at 356 So Kalamazoo Mall in Kalamazoo. The show is up through April 27 and there is some truly wonderful art to be seen, including metal sculpture, photography and acrylics, among other media. I love how the show was hung, so the various artists' work could complement one another. Be sure to check it out and give a shout out to Terry!

First Row, left: Eastern Cottonwood Leaf Basin (left); Eastern Redbud Embossed Leaf Bowls (right).
First Row, right: American Beech Embossed Leaf Bowls (left); Eastern Redbud Basin (right).
Second Row: Rosette Pillow Vases.
Third Row, left: Clytie (top); Large Sunflower Leaf (bottom).
Third Row, right: Clytie's Son (top); Large Eastern Cottonwood Applied Leaf Bowl with Brake Disk Charger (bottom).
Fourth Row: Lace Bowls (far left and far right); Poppies (front center); Mini Sunflowers (back center).
Fifth Row, left: Deluxe Large, Extra-Large and Ginormous Words Sunflower Installation.
Fifth Row, right: Scrolled Libation Bowl with Stand.


The Seven Deadly Sins: Gluttony - Part 4

It was time to "put it all together". I had everything done (except the door pulls, which were being glaze fired) so I decided to go ahead and assemble what I could. First I laid everything out - the cabinet and its doors and hardware, the mask and the nameplate and three drywall screws.

When I first started working on The Seven Deadly Sins concept, I had made some name-plates for the seven cabinets, rolling out a slab of clay, using my Poetry Stones Kit letters to stamp out the seven sins and punching holes for screws to affix them to the cabinets when the time came. I had finished these by reserving out the letters and glazing the rest with crackle white glaze and raku firing them; they had been in storage for over ten years, waiting for me to finally get back to the project.

I had also thrown a doorpull master all those years ago, of which I finally made a bi-valve mold this Spring. After making two casts from the mold and letting them harden a bit, I incised them with what I hoped might look like a rotting apple (if you really used your imagination) and made holes to take threaded inserts for screws to affix to the doors. I bisque fired them to Cone 06. After firing (and determining that they would work with the inserts), I applied black glaze to the tops, pulling off the excess so the glaze only remained in the incised areas; then I glazed all but the bottoms with my Pearl White glaze - tying them back to the nameplates I had made all those years ago.

My first step was to attach the doors to the rest of the cabinet using the tiny little hinges my handyman/friend Keith had given me. Then, using black drywall screws (which looked perfect with its raku finish), I attached the nameplate at the top center inside the cabinet. I had to do this very carefully because the plaque was not perfectly flat and if I screwed it down too tightly on both sides, it could easily crack; so, using a small cordless screw driver, I worked very slowly and checked frequently to make sure it was tight but not too tight. The screws were much too long, of course, so I marked them after I drilled them in, then took them out and cut them off using a pair of bolt cutters. This way, they firmly held the nameplate in place without extending beyond the back of the cabinet, which would have created considerable problems when installing the piece.

With the cabinet sitting up, I figured out where I wanted the mask to sit, then measured how far down from the top of the mask the wire would stretch when the piece was hung inside the cabinet. Measuring to the center and then three inches down from where I wanted the top of the mask to rest (the distance between the top of the mask and the wire), I drove another drywall screw in at an angle. After making sure I liked how the mask was oriented, I took out the mask, removed the screw, cut it down so it would not extend beyond the back of the cabinet, then replaced it.

When the doorpulls were fired and cooled, I placed them on the outside of the doors. I marked and drilled holes, then put the screws through and put the threaded inserts on them. After making sure that the doorpulls were going to look right and work correctly, I filled both with epoxy and put the over the inserts and screws, making sure the "rotten apples" were correctly oriented.

I thought the piece was "done". I was actually pretty happy with it - the contrast between the innocuous exterior and the excess of the interior was working for me. My best friend, Catherine, came over to go out to lunch (she had generously offered to treat me to celebrate the successful refinancing of my house here in Detroit) and she was the first person to see the finished piece. Despite the fact that she protests that she lacks any creativity, Catherine made the suggestion that I put a knife and fork at the bottom of the piece to balance the nameplate at the top, further suggesting that they be crossed so as to be reminiscent of the crossed bones indicating "Poison". Since we were going to the local diner to eat, I asked our waitress (and friend) if we could buy a knife and fork. Although it isn't in any of the pictures here - we dropped the piece off for jurying for the Grosse Pointe Art Center's "Food for Thought" show right after we finished eating, it really finished off the piece.

Keep your fingers crossed that the piece gets in the show. I actually feel it's one of the best pieces I've ever submitted. The description of the show refers to our "ambivalent relationship with food" and I think this piece does a decent job of capturing just that.

The Seven Deadly Sins: Gluttony - Part 3

When I first started thinking about this concept for the Seven Deadly Sins, I had picked up a few of the small wooden boxes that are designed to hold a few bottles of wine at some of my local markets. They all still had their "lids" - usually two roughly evenly-sized boards - which I felt could easily be adapted into cupboard doors. One of the first things I did once I decided to proceed with "Gluttony" was to contact my handyman, Keith, and asked him to hinge the "doors" and make the box so it could hang.

Well, Keith did that and more. In the intervening years, the boards had warped, so he took the back off the box, used the boards as a new back, and hinged the still-(relatively)flat boards as the new doors. Using almost unimaginably small hinges as well as some picture wire and small staples, he set me up.

I knew I wanted to use pictures of pasta dishes for the inside of the cabinet. I found an Italian recipe magazine at my local market that had photos of 13 pasta dishes; unfortunately, the photos were almost all back-to-back, so I had to get two copies of the publication - at $12.99 a pop (the things we do for our art). But the pictures were exactly what I wanted.

I stained the entire exterior, all of the edges and the inside top and bottom of the cabinet using Minwax Ebony Stain. Once it was completely dry (and the house aired out), it was time to work on the interior. I tore out all the pasta recipe pictures (I didn't want to cut anything because I wanted to have the softer torn edge), then - using a good metal ruler - tore off any excess white space in the images; I wanted as much of a riot of color as possible inside the cabinet. I roughly placed the pictures I wanted over the doors and inside the cabinet (I wanted pictures with red sauces to be more prominent to pick up the colors in the mask) and started applying them using Mod Podge, a product I remembered from my childhood.

In the process, I discovered it was best to apply the Mod Podge to the paper using a one-inch-wide flat brush, flip it over and apply it to the desired surface and then move it into position. Using a barely-damp sponge, I smoothed the paper (as much as I could on a very rough wood surface), pushed the paper it into any corners and removed any excess Mod Podge from previously applied paper surfaces.

I did the doors first and let them dry completely before trimming them with a sharp knife - I wanted to carry the excess over into the inside of the cupboard. Because the doors were a bit longer than the interior (in order to completely cover the box), I trimmed the bottom and top images off to register as closely as possible when the doors were opened. I had one extra image, which I tore into quarters and applied randomly inside the cabinet. Then I let the piece dry over night.

It was time for final assembly.