Saturday, November 24, 2012

Lace Crosses and Stars of David

Lace Crosses: T (L-R): Ironstone, Vert Lustre;
B (L-R): Indigo Float, Saturation Gold, Chun Plum
As most folks who know me realize, although I am deeply spiritual, I am not a particularly religious individual. By the same token, I am sincerely respectful of other peoples' beliefs and feel blessed to count among my friends and acquaintances during my life individuals who subscribe to various sects of Christianity, Jews, Muslims, Buddhists, Animists, Atheists, Agnostics, Pagans, Wiccans and Hindus, among others. I have had the opportunity to share in the religious observances of many of my friends and have appreciated those opportunities to share in their spiritual interpretations and experiences.

I was raised Episcopalian, going to church at St. Columba Parish (now dissolved) in Detroit and was very involved in the church for some time, singing in the choir in participating in many of the youth activities. I developed a greater knowledge and awareness of Christian theology during my Art History Classes at Michigan State University - during specific periods of western art, the church was a significant patron of the arts and religious themes were an important part of the iconography. It was also at Michigan State that I became close friends with my friend Marilyn, whose Jewish family welcomed me like a youngest daughter. During my two years in Singapore, my husband's Buddhist family shared their religious traditions with me, as well was the Muslim and Hindu people with I worked and came to know as acquaintances and friends. As a result, although I may not "connect" with the specific observances of any or all of these faiths, I have found a kernel of truth, a thread that connects them all in my spiritual universe.

Lace Crosses: T (L-R): Textured Turquoise, Frosted Melon;
B (L-R): Blue Rutile, Lustrous Jade, Pearl White
Not surprisingly, through these experiences, I have developed a respect, if not a reverence, for the symbols associated with these faiths, even though they do not have a specific place in my spiritual landscape. I have tended to restrict my artistic expression to themes relating directly or indirectly to nature and my interests in botany and horticulture; but I am also a businesswoman who is trying to make a living through her art. So, when a consignment account inquired as to whether I would be willing to make some "grown-up" crosses, I was open to the idea. The gallery already had some crosses in inventory - lovely pieces, some in a Celtic style, others suitable for baptism or first communion, but nothing really suitable for a Divinity School graduate or a wedding. The original request was couched as "more organic", a term that initially threw me, as I couldn't think of any way to apply my more naturalistic aesthetic to this new context. After pondering the request for a few days, I asked if a lace-textured cross might do the trick and received an enthusiastic, "Yes!"

Cross - Ironstone
First, I charted out a template for the form, using graph paper, then transferring it to a fused lamination sheet (in the absence of any clear mylar). The next challenge was to figure out how to relate the lace to the cross. There is one style of cross in which the central crossing is surrounded by a circle - the High Cross, as often seen in Celtic iconography; it was this motif to which I eventually referred in the design I created. I rolled out a slab of clay and positioned the cross on the slab, pricking out the center so I would know how to orient the lace, eliminating the risk of "running out of clay" for the form. I rolled the lace into the clay, centering it over the hole pricked for the center of the cross. Removing the lace, I placed the template over the design, centering the center of the template over the center of the lace design. I then cut out the entire form; I found cutting both sides of the inward-pointing angles with one cut was the most effective means to reduce the risk of odd cuts into the center. I remove the clay on the side with the least waste, rolled the other side of the canvas back over the slab and flipped the entire package over. Pulling back the canvas, the clay releases from the canvas but is still attached to the template. I can then place the template on the remaining clay - the "leftover" lace impression is on the underside, now - and fabricate another cross, flipping the slab between each one, until the entire slab has been used up. Obviously, a very "tall" slab would have more waste, whereas a "shorter", "longer" slab would be able to accommodate more crosses.

Stars of David: T (L-R): Indigo Float,
Lustrous Jade; B (L-R): Pearl Blue,
Saturation Gold, Chun Plum
Using a 1/4" hole punch, I center a hole at the top of the cross (use a piece of 1/4" steel stock to force out the waste clay, then carefully pick up the clay (with the template), place it on a grid for drying, correct any issues with its orientation and then remove the template. They should be dried as slowly as possible. They can tend to warp, so it's a good idea to check them periodically before the go leather hard to correct any issues - it may also help to dry them between pieces of drywall, a technique I need to investigate.
Stars of David: T (L-R): Textured
Turquoise, Frosted Melon;
B (L-R): Vert Lustre, Blue Rutile,
Pearl White

Once dry, the pieces are sanded to remove any rough edges (remembering that a sharp edge only becomes sharper when glazed) and bisque fired. After firing, I rinse to remove any dust, then wax the back of the cross, leaving a margin to take the glaze around the edge to the back. This leaves a space for engraving. Using glazing tongs to hold the pieces at the bottom, I pour glaze over the four arms and then place them squarely on a large stilt to dry.

Star of David, Pearl Blue
Firing has been challenging, primarily due to the fact that the pieces are quite thin, retain some of the "memory" of being moved around while still quite plastic and, as a result, want to warp. The best I've come up with so far is one large stilt to support the top and the two "arms" with two smaller stilts supporting the longer ( and more vulnerable) "foot". Another possibility is to use six half-inch stilts - one under the top and each of the arms, one at the center and two under the foot; this arrangement would provide for more even heating, which might solve the problem conclusively, but would require a great deal of attention to their placement so as to not over lap into glazed areas on the backs of the pieces.

Once glaze fired, I used leather lace, cut to nine inches, folded in half and with an overhand knot and then threaded through the hole with a lark's-head knot, so the pieces could hang. I know many artists make these sorts of pieces with a wire hanger in the back but I'm not comfortable with that on two counts: the piece cannot hang flat to the wall very well; and there is a higher risk of failure. The leather lace allows the piece to hang flat and can easily be replaced if something should happen to it.

Having had success with red stoneware Crosses finished with dramatic reactive glazes, I decided to make some in white stoneware with Pearl White, which would be appropriate for baptism, first communion or a wedding. Then I decided to to try some Stars of David, again, using the center of the lace for the center of the star. These were also very successful. All are available at several galleries throughout Michigan. I would like to investigate other motifs but I'm not certain they would adapt as successfully to the lace texture.


A Garden Visit

Brenda feeding the goldfish
Back in August, I had the opportunity to visit my good friend Brenda Hershberger in Mason, Michigan. I had been planning a trip to the Lansing area in order to stop in at Wild Type Nursery, also in Mason, for one of the nursery's last public sale days of the season, hoping to fill some gaps in my garden and maybe discover some heretofore unknown botanical treasures.

Brenda and Allie, who has now
been joined by Dom P
Brenda is also very much a native plant enthusiast and, considering she's so close to the nursery, it was easy to put a trip together to visit her beautiful garden and home and stop in at the nursery. Brenda frequently posts images of her garden (and cats) on Facebook so I was really looking forward to visiting in person. Although the drive was rather frustrating, with
I-96 West down to one lane on the same weekend that students were making their annual migration to East Lansing for the start of the school year, the anticipation of visiting a good friend's garden and selecting plants at one of my favorite nurseries kept me going.

Feeder goldfish are less expensive and seem
less attractive to marauding Great Blue Herons
I made it into Mason late in the morning, just in time for lunch. After a brief tour through the front yard, especially a prized Eastern Redbud (Cercis canadensis) slated for major pruning by the local power company, Brenda invited me in and we had a delicious meal of gazpacho, brie and artisanal bread, with a fresh fruit salad for dessert. Her little gray kitty, Allie, was very friendly - and also very interested in helping us with lunch. Brenda has been very supportive of my pottery and has collected quit a few of my pieces, which she has integrated seamlessly into her beautiful home. It was a wonderful opportunity to see where some of my favorite pieces had come to roost.

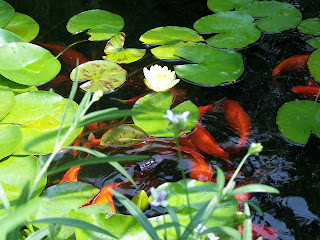
In touring the gardens, the highlight is clearly Brenda's pond, stocked with feeder goldfish (Great Blue Herons were nabbing the more expensive Koi, so she opted for sustainable quantity), beautiful waterlilies and native and exotic plants by pond's edge. The pond - with a natural-looking stone waterfall and integrated plantings - has the lived-in look of the best designed larger garden features. Its "naturalness" is attested to by the abundance of native frogs, who bask on strategically-placed rocks and take cover in the lush plantings.

After our tour, we headed to the nursery separately (it was on the way home for me) and shopped the remaining native plants. I was able to purchase another Fragrant Sumac (Rhus aromatica) for the front yard and, especially, exciting, Orange-fruited Horse Gentian (Triosteum aurantiacum) and Pointed-leaf Ticktrefoil (Desmodium glutinosum), both of which went into a planting of Penn Sedge (Carex pensylvanica) in my tree lawn.

The drive home was less frustrating, as I took a detour to avoid the construction, which took me by a corn stand with the last of the season's harvest, which I enjoyed for dinner that night! What a great day!

Deluxe Sunflower: Spinning

In developing the various designs in the Deluxe Sunflower series, I had been able to come up with quite a few designs using a slip-filled pastry bag with various decorating tips. I had also found a couple of uses for Kemper Klay Kutters. I had created three designs - Pasta, String Theory and Starry Night - using the Kemper Klay Gun and various dies but wanted to explore the potential of this tool more fully.

In browsing through the dies which come with the Klay Gun, I thought I might be able to use one of the circle dies to make long coils, which I could then make into a spiral or spirals. I thought I would first try making a piece with a large spiral covering the entire center. The challenge was going to be marrying a series of long coils into one very long continuous coil to make the spiral.

I started out by fabricating the base of the sunflower, slumping a large slab over the ginormous sunflower mold, cutting it to size with a 1/2" flange at the base. I wanted to make sure the spiral would completely fill the center space so I opted to fabricate the center first and apply the petals afterwards. After scoring and slipping the entire surface, I attached the circle die to the Klay Gun and filled the barrel with clay and pushed out the first coil, forming it into the center of the spiral, starting at the center of the sunflower. It's important that the clay be fairly plastic for this process: if it's too stiff, you have to work really hard to get it to extrude and it will be more prone to cracking during fabrication. I added coils to the spiral until I felt fairly certain that the spiral would completely fill the desired space, carefully smoothing the joins between the coils.
Kemper Klay Gun and Dies

After the coil was finished, I applied two rows of petals to the sunflower, making sure the surface was slipped to guarantee optimal adhesion. I allowed the sunflower to dry to leather hard, removed it from the mold, applied a clay fitting to take a copper fitting so the sunflower can go on a stake and put holes in to take a wire for hanging. After drying completely, the piece is fired to Cone 06.

I glazed the sunflower with Amaco's Potter's Choice Temmoku in the center, as I do for all my Deluxe and Fancy Sunflowers. For the petals, I used Starfire Brown, a glaze recipe I was given by my first pottery teacher, Gene Pluhar, which breaks and pools in almost a jasper-like manner. The glaze is reminiscent of the surfaces preferred about 30 years ago, so it contributes a nostalgic quality to the piece.

Tuesday, November 20, 2012

Buttons: Lace

Assorted Lace Buttons in a Small Pearl Blue Lace Bowl
I ran into an old contact early this year at the Sidestreet Diner in Grosse Pointe. I was having brunch with an old friend and this individual (sitting in the booth behind me and so only able to see the back of my head) overheard our conversation and asked if I was a potter, indicating she owned a knit shop (she didn't recognize me) and was wondering if I'd be interested in making ceramic buttons and maybe some other things. We exchanged some e-mail correspondence, in which I sent her some pictures of my lace bowls; she thought the texture would be interesting for buttons for hand-knit goods.

Medium Diamonds
(Deep Firebrick)
I had inherited two sets - large and small - of canape cutters from my Mother some years ago. I set to work rolling out clay slabs, rolling in lace and cutting out shapes. I made about a dozen samples, in sets of three and five. Once cut out, I used the smallest-available hole punch (one-eighth inch) to add holes (using a small metal rod to clean out the clay between each hole). I let the pieces dry, cleaned them up with some synthetic steel wool, being careful to remove any and all "catchy"surfaces and edges, and then bisque fired. (If you're doing large quantities, throwing them into a greenware or bisqueware bowl for firing vastly simplifies loading and unloading.) I rinsed the pieces before glazing to remove any residual dust.

Medium Crescents
(Oil Spot)
Glazing and firing were both going to be challenging. The buttons had to glazed all around, back and front, so they were going to have to be on stilts as they dried and while being fired. Coming up with a way to dip them and get complete glaze coverage was perplexing, until I dug out an old pair of tweezers I used to "assist" in putting jute for price tags through too-small holes. By using a pair of long, pointed standard tweezers, I could poke each tweezer into a hole in the given button, dip it into the glaze and hold it flat to let the glaze pool, then lower it onto a stilt and release it. I fired them in a fairly fast kiln to Cone 6. After cooling and unloading, I used a Dremel with an eight-inch diamond grinder to smooth out the marks left by the stilts in the backs of the buttons.

Medium Squares
Albany Slip Brown
The client was delighted with the samples. So very delighted she bought them off of me right then and there (I had also brought some samples of my friend Don Schulte's yarn notecards; she purchased those outright as well) and asked me to make more. A lot more, in lots of different sizes and shapes. So I swung into major production, the first step of which was to call my friend Catherine and let her know what had happened.

Medium Trefoil
Vert Lustre
My friend Catherine is not a horder but she does hold onto some interesting things. Among others, she had held on to some of her mother's old (old) cookie cutters, as well as the animal-shaped cookie cutters from her childhood Easy-Bake Oven. All of which she offered to me. I made up eight of each shape, so I could have a set of three and a set of five (always odd numbers!) I followed the process, making some very large shapes (stars, circles, hearts, rosettes), some nice novelty shapes (terrier) and what I decided to all my "Animal Crackers" series from the Easy-Bake Oven cutters.

Small Triangles,
Crescents and
Six-Pointed Stars in
Palladium, Metallic
Black and Saturation
Metallic.
Although some of the larger sizes are difficult to keep flat throughout the process (this, along with the very clean edges and surfaces, is apparently very important to fiber people), I'm learning that drying them between sheets of drywall may help with this. Also, stilting the smallest shapes on small tripod stilts was not a good bet while straddling them across two bar stilts is much more successful. A Dremel with an eight-inch diamond grinder is indispensable for grinding out the small percentage of holes that seem inevitably fill with glaze during firing, regardless of how carefully I blow them out during glaze application. (Make sure to use the lubricating oil that comes with this special bit to speed up the process.)

In terms of packaging, I purchased a quantity of small zip-bags, into which go each set of buttons. I punched a hole at the top to one side, threaded through a piece of jute and attached a tag with a description including the size, shape and glaze. By putting them in the bag, the customer can see the back and the front of the button(s) and can see the quality of manufacture. The buttons are available a couple places around the state; we're waiting to see how they do in the wider market.